
Prabhu NATARAJAN
Department of Computer Science, School of Computing (SoC)
Prabhu continues his exploration of teaching using annotations, this time taking us step-by-step through the process of preparing one’s lecture videos with annotations.

Photo courtesy of Prabhu NATARAJAN
Natarajan, P. (2023, Sept 26). How I annotate lecture videos: A step-by-step guide. Teaching Connections. https://blog.nus.edu.sg/teachingconnections/2023/09/26/how-i-annotate-lecture-videos-a-step-by-step-guide/
Teaching through online lecture videos has become a prevalent method of instruction in today’s digital learning landscape. To make the most of this format and engage students effectively, incorporating annotations in your lecture videos (as explained in my previous post) can greatly enhance the teaching experience. Students find my lecture videos very engaging, easy to understand, and appreciate my ability to explain complex concepts in a simple manner. Their feedback highlights that my explanations are clear, concise, and easily comprehensible. In my previous post, I discussed why teaching with annotation is useful and what students feel about it. In this post, I will guide you through a step-by-step process on how to prepare lectures with annotations and discuss the tools that I have used for annotating lecture videos to foster student engagement.
Step 1: Preparing the slides
In online teaching, students often face cognitive overload when presented with overwhelming amount of content on the slides. To alleviate this challenge, create slides with partial content, allowing space for annotations during the lecture. Focus on key points, visuals, tables, or diagrams that form the basis of your explanations. By presenting information gradually, students can better concentrate on the topic at hand. Refer to the visual representation below (Figure 1) for a sample slide and its annotated version:

Figure 1. Example of presenting the lecture content gradually using annotations.
Step 2: Scripting on slides
Plan and script your lecture content by printing a hardcopy of the partial slide from Step 1 and annotating it with key concepts and examples that require visual emphasis. Use this annotated printed slide as a valuable support tool while recording your video or delivering a live lecture. By referring to the printed slide with annotations, you can confidently convey the information and maintain a consistent narrative flow of the lecture content. See sample printed slide below (Figure 2):
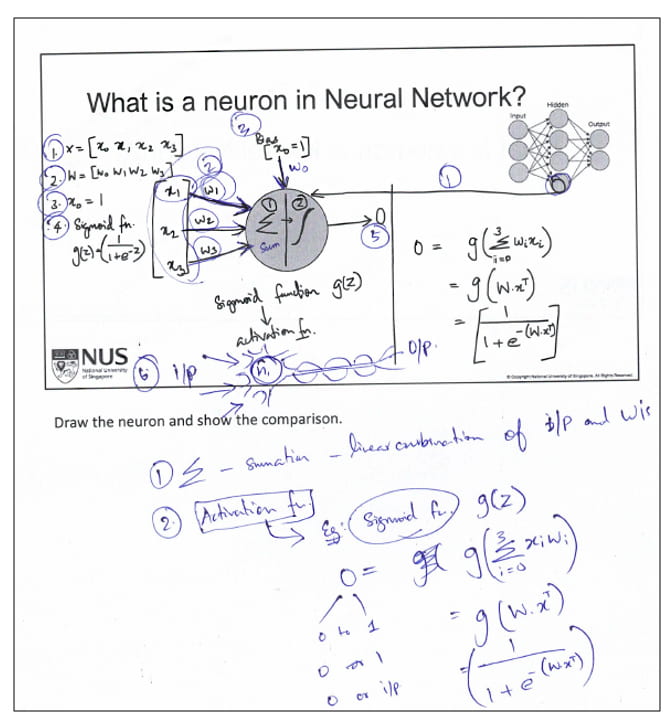
Figure 2. Sample printed slide with annotations on it
Step 3: Selecting annotation tools
To enhance the effectiveness of your lecture annotations, it is essential to choose suitable annotation tools that are compatible with your teaching software or platform. Familiarise yourself with the available features, such as pens, erasers, highlighters, and other relevant options. Take the time to experiment with these tools to understand their functionalities and identify which ones best meet your specific needs. Some of the hardware and software tools that I have used are:
Table 1
Examples of hardware and software tools for annotation
| Example of Tool(s) for Annotation |
Description of the Tool(s)’ Usefulness for Annotation |
|
| Hardware Tools for Annotation |
|
|
| Software Tools for Annotation |
|
|
Step 4: Timing and pace
While annotating during the recording of a lecture video or during a live lecture, pay attention to your pacing. Avoid rushing through annotations or lingering for too long, as it can disrupt the lecture’s narrative flow. Maintain a consistent pace, allowing students enough time to process the annotations while connecting different parts of the lecture content in the partially filled slide. Moreover, as you add annotations, it is crucial to verbally reinforce their meaning and significance, highlighting their relevance within the broader context. This combined approach ensures that students obtain a comprehensive understanding of the content.
Step 5: Publish the annotated slides
After annotating your lecture slides, it is crucial to save and share them with your students. This final step ensures that students have access to the annotated slides for reference and review while they learn the content. By posting the annotated slides, you provide students with a valuable resource that reinforces their learning experience. They can refer to the annotated lecture slides to review key concepts, grasp additional explanations, and reinforce their understanding of the content. It is also good to publish the original slides without annotations, as some students would like to make their own annotations while watching the lecture videos.
In the following video (Figure 3), I will go through all five steps to annotate lecture videos:
Figure 3. Video covering all five steps for annotating lecture videos.
Students have responded positively to the annotations in my lecture, evidenced from the feedback provided:

Concluding Remarks
By incorporating annotations into your online lecture videos, you can transform your lecture from passive viewing into an interactive and engaging learning experience. Through strategic planning, the use of appropriate annotation tools, and thoughtful implementation, you can effectively emphasise key concepts, reinforce understanding, and engage students in a dynamic way during the lecture. Experiment with different annotation techniques and tools, reflecting on student feedback to continually refine and improve your online teaching approach. However, it is important to acknowledge the challenges that come with this approach: Preparing meaningful annotations can be time-consuming, and achieving proper visual representations of some concepts can be challenging. It is also worth noting that while annotations enhance the learning experience for many, some students might find an excessive amount of annotations in the slides to be overwhelming or messy. Moreover, if not done properly, the duration of the lecture could be increased.
Despite these challenges, the goal of annotating lecture videos is to enhance student comprehension, promote active learning, and create a connection between you and your students. By following these steps, you can maximise the impact of your lectures and create an engaging learning environment for your students.
 |
Prabhu NATARAJAN is a Lecturer from the Department of Computer Science at School of Computing. He teaches Artificial Intelligence for non-CS students, Computer Organization and Operating System concepts. He is passionate about teaching and likes to teach complex concepts in the most simple and easy way. He has a strong interest in AI education and cognitive psychology to enhance the student learning experience. Before joining NUS, he was teaching in DigiPen Institute of Technology, Singapore. He is also received the NUS Annual Teaching Excellence Award (ATEA) in 2023. Prabhu can be reached at prabhu.n@nus.edu.sg. |
