Technology in Pedagogy, No. 21, April 2015
Written by Kiruthika Ragupathi
Introduction
Visual literacy and producing audiovisual products is important for today’s global society. Though we know this in theory, it is always a question as to how one can do that in practice. Specifically, what kind of sound pedagogical principles and techniques can we draw upon to facilitate such growth? How can we design appropriate, effective and feasible projects for students of various learning styles and interests? How do we address challenges like access to technology and technological training (for both instructors and students!)? How do we fairly assess unconventional products like videos? These were the questions Stephanie Lo-Philip, from the Department of English Language and Literature at the National University of Singapore set out to answer in this session entitled “Lights, Camera, Action!: Some tips on how to use videography as a learning tool”.
During this session, Stephanie’s focus was on the pedagogical considerations in using videography as a platform for learning where students are producing the video. She highlighted to participants the kinds of technical expertise an instructor would need and surveyed different tools instructors could use to train and guide students. Finally, Stephanie went on to discuss assessment rubrics and various criteria instructors can include in evaluating student work.
Designing Videography-based Tasks
Videography can be great platform for aesthetics and creativity; and therefore can be used to train the eye and the ear. For example when used for foreign language learning, the task could be designed such that it requires students to include subtitles in their videos. This could reinforce language learning as it requires them to write down verbatim based on what is going on. Video can also be a wonderful tool for multimodal engagement that encourages students to consider a wide range of factors and phenomena – both linguistic and non-linguistic.
Thus when designing videography-based tasks, one needs to consider the “learning goals” and the “video and task relationship” to decide whether videography is appropriate for the types of task we design. To determine the learning goals for your videography task, you could explore: (i) content (the content knowledge/subject knowledge that you want your students to learn); (ii) general skills (like critical thinking skills, problem solving skills, creativity, etc.); and (iii) visual literacy skills (enables students to think about lightings, acoustics, background, visioning, presentation of interviewer and interviewees, motion). Encompassing some or all of these in your learning goals can have far-reaching effects and will have a broad effect on what students can pay attention to.
Secondly, it is important to consider the unique affordances of video, and how those affordances relate to your own task design (video-task relationship). In Stephanie’s case, she uses videos for
- Research purposes
- For interaction (e.g., an oral history project requires a lot of interaction with participants)
- For documentation of naturally occurring phenomena (e.g., contextualisation of language to review talk in context)
- Scripted work
- In language pedagogy or theatre studies, video can be used as a medium to dramatise scripts
- Analysing data and conducting fine grade analysis
For some classes, video could be used as a tool for capturing data, and then students use the video to analyse and write a report, while in other classes, students produce an audio visual product. If students are required to produce a video as a final product, then you will realise that students will need to review the data multiple times which allows for familiarity and also gets them to think about the material critically and reflectively. You could also get students to present a video as it is more engaging than a traditional PowerPoint presentation.
Video products can also be used for reflexivity and critical thinking. For example, students record themselves interviewing other people. Students then can use this data, and watch themselves interviewing others leading to a lot of interesting questions – the methodology, the role of the researcher, language, whether or not one is leading the participants. This will enable the teacher to have a very productive discussion with students in multiple ways. Finally, videos can be used as good examples for future classes as well as beyond the classroom.
Instructor-student ratio is a huge consideration depending on whether you require students to produce a video. It also depends on whether you are going to provide training to your students as well as the types of equipment and software that you want your students to use. For small classes, it is possible to make producing video products a mandatory assignment within the syllabus; and for large classes you make producing videos an optional component.
Types of and Access to Equipment and Software
It is important to conduct some analysis of your students’ skill level and to check what kind of access they have to equipment using a simple survey. This will help you determine how technically advanced you want to design the task. In general, students can just use either smartphones or “point-and-shoot” cameras and it may not be necessary for them to use professional equipment. The types of videography software they use also need not be sophisticated – for example, software like iMovie or Windows moviemaker have readily available tutorials that students can learn on their own.
In addition, based on the students’ level of technical expertise, advanced training on equipment and software can be provided for smaller classes. Stephanie mentioned that for her own students, she does conduct some rudimentary training (nothing advanced, but just some basic skills) to provide an extra scaffold for students who have zero technical knowledge and have never done any video editing. This is done so that such students are not excluded from the activity just because they do not have prior videography experience.
Finally, it is also important to inform students of the resources available on campus. For example, students can go to UTown’s Multimedia Hub or the faculty IT unit’s Multimedia Development Lab where some technical expertise is usually available. However, it might be necessary for students to book such facilities in advance.
Technical Training for Instructors and Students
- Film making Basics Students need to have a basic understand of film-making techniques for visual literacy, as does the instructor, particularly if you are going to teach visual syntax and visual semantics. Stephanie recommended the book The Filmmaker’s Eye by Gustavo Mercado as an easy-to-browse and useful reference guide that shows the would-be filmmaker ways in which to become a strong visual storyteller through smart, effective choices for one’s shots. It is a useful reference even for students with no background in film making.
She listed the following basic skills that could be used as a start:-
- Types of shots and subject positioning – get students to understand aesthetics and the cultural meanings behind images. This enables students to understand the cultural interpretations and produce those through images and shots.
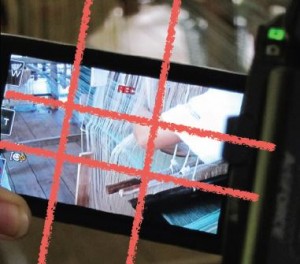
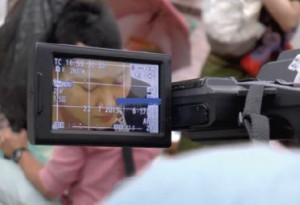
- The “rule of thirds” guideline which proposes that an image could be imagined as divided into nine equal parts by two equally spaced horizontal lines and two equally spaced vertical lines, and that important compositional elements should be placed along these lines or their intersections. This enables students to understand where the place the subject conveys aesthetic and cultural connotations.


- Students need to take a variety of shots. Depending how one frames the subject, you can convey different emotions and portray different meanings (e.g., Extreme close-up shots, Medium shot)
- Nose rooms – How much room does one give the subject
- Combining moving shots with “still” or static shots.
-
- Lighting considerations
- Indoors or outdoors (with no proper light, you might get everything but the face). Get students to be aware of the location of the light resource, and its relation to the subjects.
- Time of day. Get students to be aware of soft lighting and harsh lighting, particularly when filming outdoors.
- Audio considerations
- Indoor vs. outdoor recordings. Students need to be aware of acoustics of the location/surroundings, and be aware of all background noise.
- Different types of microphones (“mikes”) – the simplest way is not to overthink the type of mikes needed, and just use in-built mikes; shot-gun mike vs. army-directional mike
- Positioning of the mike – The way you position your mikes would influence the audio quality; students would also need to test out the mike before they start filming
- Equipment Training
- Auto vs. manual
- Visual literacy skills – white balance; aperture; playing with lights; understanding how light works; the amount of exposure, the brightness, all these factors would affect the quality of the video footage.
- It might be easy to go auto, but students will start to critically think about the aesthetics of the video footage if they use manual mode of recording
- Software Training
- Can either be instructor-led or self-learning tutorials
- In an instructor-led training session, it is important to just cover the basic skills. For example, just get students to film a 10-minute video, and then they come back to a face-to-face hands-on session to do editing. For example, importing clips, using the MAC vs. using the PC, organising the data, key wording for video data, cutting, transitioning, etc. The training can vary depending on the instructor’s time and the learning goals set.
- Basically, such training enables students to spend their time productively on learning and producing the video rather than wasting time on sorting out technical difficulties.
Organisational Tools for Students
Providing students with just technical training is not sufficient. In fact, students would also need to be trained in and provided with tools on how to compose a visual product. They need to be aware that working with images and sound is not the same as writing an academic essay. The instructor must be cognizant to the fact that tools to systematically organise the data and aid in visual composition (syntax and semantics) need to be discussed with their students.
Storyboards enable students to start thinking in visual terms the story that they want to tell or the product that they want to produce. Students do the storyboarding even before they start filming, and gets refined during filming. The final storyboard is compiled after having done all the recording of data.
Shot sequence outlines is when students start thinking in more detail about the storyboard. Students need to think about specific shots and what each shot needs to convey. This outline helps them keep track of what needs to be filmed and what needs to be done for composing the final product.
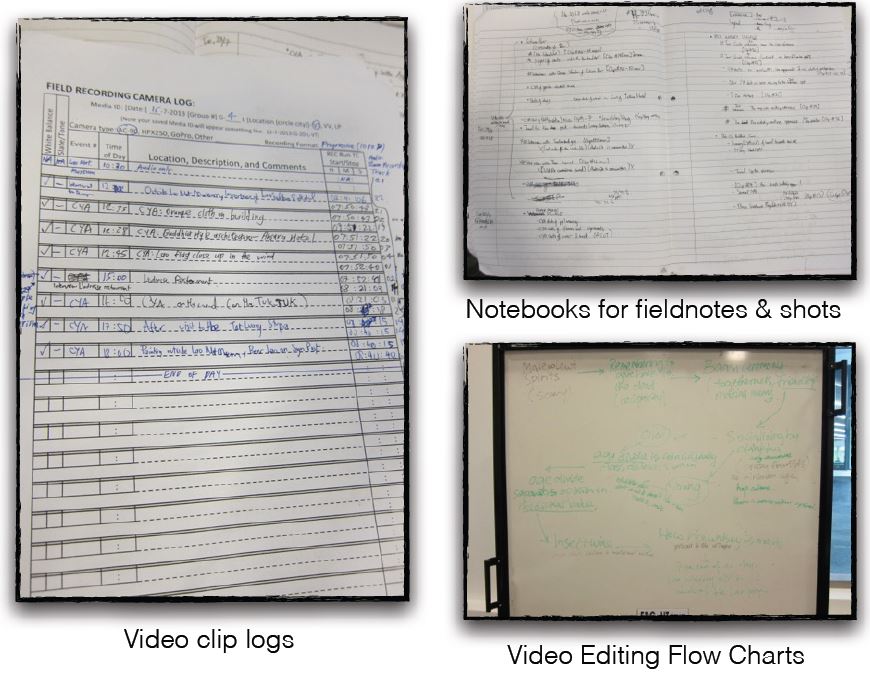
Other tools that can be provided include:
- Video clip logs. Allows students to label video footage according to its content.
- Notebooks for field notes and shots. Allow students to take organisational notes of what they need to shoot and what footage they have already done.
- Video editing flow charts. A flow chart of the narrative of how students are going to compose the video.

Assessment
The assessment will depend on the learning goals. Stephanie highlighted that she first determines the weightage among the different areas that she want to assess her students; and depending on the course and the goal, the weightage can vary. Her assessments are usually based on three different areas:
- Subject content (In Stephanie’s case, there is more emphasis on subject content). A sample of the rubric she uses is listed below:
- research site and participants
- issues, questions and areas of interest that arose
- findings (with examples of data)
- implications
- reflections of students’ experience in conducting research
- General transferrable skills/global competencies (less emphasis). A sample of the rubric she uses is listed below:
- problem solving
- critical thinking
- investigative skills
- creativity
- communicative skills
- Visual literacy (very less emphasis). A sample of the rubric she uses is listed below:
- Meaning creation through images and sound (visual syntax and semantics)
- Types of shots
- Composition of shots
- Image quality
- Audio/visual narrative flow
- Interview content
- Transitions between scene and sound
- Audio/visual cohesion – cohesion between audio
- Meaning creation through images and sound (visual syntax and semantics)
Q & A Session
Following the presentation by Stephanie, a lively discussion ensued and listed below are some questions from the subsequent Q & A session.
| Q: | How does videography enhance the analysis of data? |
| SLP: | Let me take the field of Visual anthropology to answer this. For example, students need to observe a public area of people talking (e.g., hawker centre), they could have it recorded on video. Once recorded, you have the setting and the context; you could then analyse facial expressions as they talk; body language, colours, what people are wearing and so forth; which then gives a rich context to the data more than just field notes or audio.If students are also producing a final video product of their research for example, the subjects in the hawker centre are talking about “Chicken Rice”. In a final product, you are not going to show ten minutes of a hawker centre conversation, but then you will need to be switching scenes. Therefore, students are not just filming the interviewees in the hawker centre but they would also be hunting for chicken rice. This helps them to pick up more data – local context on chicken rice, conversations on chicken rice – and giving rise to a more in-depth research project.Another participant gave another example from medical education to illustrate how videography can enhance the analysis of data. She talked about how video can be used for bedside reporting – students can report on overall impressions, what went well, what could have been done differently; and about how it can be useful in quantifying data, for example how many times did students make eye contact with the patients. |
| Q: | How do you address the issue of consent and privacy for photographic, audio graphic and video graphic recordings, particularly in public areas? |
| SLP: | In our department, we use the “Liabilities and Indemnities” form, and get students to sign it. How you address it varies depending on where you film. In public areas, it is okay to record the faces, but if you need to add it to your report in the final video, then you will need to blur the faces out. However, in non-public areas like schools or vulnerable subjects, then I discourage students to use the video. It is also important to talk to students about ethics. |
| Q: | Students are more IT-savvy than I am. Why do you need to define the software? If the software options are left open, then technical training might not be necessary? |
| SLP: | You can leave the options open and get students to train on their own. But like I said, for my students I do provide rudimentary training – nothing professional but just some basic skills. This encourages students with no prior knowledge to try it out as well. The thing about videos is that it gives students another platform of learning, an engaging platform. I would not want to exclude students from that opportunity just because they do not have experience, so I provide that extra scaffold for the students. But again, it all depends upon the context, the needs of your students, and your teaching goals as to whether you want to leave it to your students or you need to provide the training. |
| Q: | How much percentage do you allot for “Visual literacy”? |
| SLP: | For a Level 1 or a GEM module, I would give a weightage of about 10% of the grade. However, for a module on Visual Anthropology, I would assign a higher weightage of about 30-40% of the grade, as there is a heavy emphasis on students’ learning to produce a quality product. |
| Q: | What if students get professional help? How do you monitor this? |
| SLP: | This would be a case of plagiarism, and it would be difficult to monitor. There is no 100% of way of telling this. However, the quality of the video could provide some clue as to whether students have hired outside help. How they edit it could also serve as warning signs. However, students who have taken such courses thus far tend to be sincere about wanting to learn; and there is not a lot of incentive for them to get professional help. |
References
- Bamford, A. (2003). The visual literacy white paper. Australia: Adobe Systems Pty Ltd. http://wwwimages.adobe.com/content/dam/Adobe/en/education/pdfs/visual-literacy-wp.pdf
- Gustavo Mercado (2010). The Filmmaker’s Eye: Learning (and Breaking) the Rules of Cinematic Composition, Taylor & Francis.
