Conducting assessments online: How can you support your students?

In a previous post, I focused on the options that teachers may consider for conducting assessments online. While these may be important, it is far more important to start thinking about students and their well-being. The current COVID-19 outbreak is indeed a difficult time for our students as well, who may be dealing with a great deal of anxiety and stress. While we need to ensure the quality of our courses and the assessments, we need to give the best opportunity for our students to complete their courses.

Therefore, when designing your assessments, it may be good to think about:

  • How you can minimise additional anxiety for students in these difficult times.
    Recognise the fact that students may be facing challenging personal circumstances while working from home. Particularly when entire families are working/learning from home during this period, it may be challenging for them to even find a quiet spot to take the exam or attend your live lectures. Or that students may have periods of illness during reading weeks, revision and/or examination periods.
  • What you can do to offer flexibility in your assessments, but of course, while maintaining  accountability. For example, you could:
    • Be flexible with your deadlines.
    • Have extended duration or provide longer time to complete your assessments,
    • Offer multiple attempts for students to complete an assessment. You could then take the average of the best attempt or best two attempts.
    • Give choice in the topic, method, criteria, weighting or timing of assessments.
    • Give freedom and autonomy on the assessment format (essay/paper, poster, presentation, video, infographic).
    • Provide a second chance for students. Have students take a time-constrained closed-book online exam, and then follow it up with a second copy of the same, but as an automated take-home online assessment. The student may use class notes, the text, or any other available reference materials except other checking with their peers or others. A composite grade is calculated using the following formula: in-class exam score plus the product of half the points missed on the in-class exam times the percentage score on the take-home exam. (adapted from “Better testing for better learning” by Murray, 1990 In College Teaching)
  • Group work and/or projects. While using group projects as your assessment, think about if your can offer flexibility in whether they can work in group or alone. Working in groups during this period may be stressful particularly when their grades have to depend on their peers’ work as well.
  • How students may experience varying levels of digital literacies and internet connectivity, while completing their assessment tasks.
  • How you can provide a robust assessment method but still be able to meet the needs of students with diverse needs, including reasonable adjustment.
  • Finally and more importantly, how your assessments can offer an equitable solution for both you and your students.
[This post is a reproduction from my other blog on Towards Open Learning]

Conducting assessments online: What options do you have?

The COVID-19 pandemic has thrown many faculty members into a limbo particularly when it concerns assessments. While most have managed with online teaching to some extent either through recording of their lectures or conducting live webinars, many are still grappling with how to conduct assessments online. In this post, I put together some options that you may wish to consider be it using your campus learning management systems (LMS) [examples include: Moodle, Canvas, Blackboard, LumiNUS], or other open platforms that may be available to you.

When developing your online assessments, some important aspects for you to consider include:

  • Establishing the purpose of your assessment, and what you hope to achieve
  • Aligning your assessments with the learning outcomes of your course
  • Communicating your expectations and requirements clearly to your students

More importantly, you will need to remember that online examinations are quite different from your usual face-to-face examinations. Simply converting your current face-to-face examinations into an online format can be a recipe for failure; as these online exams are not in a confined, invigilated environment. So it is important that you ask yourself the following questions when planning to conduct online assessments:

  • How do you make the assessment process meaningful to both you and your students?
  • Should the assessment be synchronous(real-time) or asynchronous (delayed), group or individual?
  • Is securing the assessment necessary? If so, at what level?
  • How do you plan to provide high quality feedback and opportunities for your students to act on feedback?

In this post, I list some online assessment options that you can use. I have also included some examples and available tools that you can consider.

Traditional assignments online
Traditional assignments can be in the form of Essays, Case studies, Article reviews, Proposal writing or Report writing. You can get students to submit the essays to you for review. Most LMS systems have either an Assignments tool or Files Submission tool with which students can submit these traditional assignments online. If you are using Microsoft Teams or the Google Classroom, you can similarly use the Assignments to upload files. Additionally, you can also use the Essay type (short answer) questions with the Quiz tool for students to submit essays.
Whatever be the tool, be transparent in the marking criteria so that students know what is expected of them, and be specific about the allocated marks, word limits. Finally, be sure to offer individualised relevant feedback and a summary of common mistakes for the entire class.

Quizzes (automated online assessment)
Online Quizzes that contain multiple-choice questions, multiple response questions, fill-in-the-blanks, true/false, and matching questions can be developed to assess students’ learning or to assess their prior knowledge. Such automated quizzes can also be embedded within video lectures or micro-lectures to test students’ learning, and these quizzes are generally referred to as in-video quizzes.

Timed online assessment
If you are considering to conduct your mid-semester exams and final exams in an online format, you can design assessments that are time-constrained. To minimise cheating in such exams, you should also consider:

  • randomisation of questions and options in your MCQs
  • personalisation of questions (e.g., numerical values are personalised for individual students; questions are selected from a large pool of questions which are of same difficulty level)
  • structure the questions in such a way that students are prevented from returning to previous question or section (sequencing your questions)
  • require students to provide a short justification (rationale) for each MCQ question (sometimes, referred to as two-tiered MCQs).

Online interaction
The Forum or Discussion tool, blogs and wikis facilitate asynchronous interaction. You can use these tools to monitor student learning via their contributions to online forums, chats, blogs and wikis. These contributions can be in the form of reading summaries, collaborative learning where students work in small groups to provide critical peer review on each other’s work.

Group assessments online 
Students can work in groups to create online presentations, project artefacts and upload their presentations for you to review or to be reviewed by peers or both.

Critical reflection and meta-cognition  
You can consider the use of electronic portfolios, online journals, logs, diaries, blogs, wikis, embedded reflective activities. For any of these, you can consider using peer and self-assessment to assess these critical reflection pieces.

Online oral examinations
One-on-one or small group oral examinations can be conducted via any video conferencing tool such as Skype, Microsoft Teams, Zoom, Google Duo. Additionally, you can also consider students to role play or participate in debates via the online video conferencing platforms to assess their learning. You can use the recording function in these tools, in case you would like to review these at a later date.

Getting students to submit assessment questions
You can get students to create and submit assessment questions online for each topic or course. An online quiz with two-part short answer/essay question can be used to get students to (1) create and input their assessment question and (2) write their explanation on what is being assessed and why it is important for student learning and how it is related to the learning outcome(s) of the topic or course. Alternatively you can get students submit their assessment questions on the forum, and conversations with peers and instructors on the strength and weakness of the assessment question via the forum.

Take-home quizzes on reading assignments
A take-home quiz for every reading assignment with one question for approximately each page of the text, with the order of the questions following the order of the pages. The test questions (stem) should be “objective” in a fairly literal sense, the answers (the options) should be quite specific; to answer a question, students should need to do little more than find the right sentence or paragraph and read it with a certain degree of understanding.
(extracted from “Tests that also teach” by Williams, 1988, In American Philosophical Association Newsletter on Teaching Philosophy)

Group multiple-choice test
When taking a multiple-choice in-class test, students could consult with their peers if they wished; but each student would finally have to complete the online assessment, and would be graded individually.
(adapted from “Better testing for better learning” by Murray, 1990 In College Teaching)

Paired testing
This assessment consists of a series of thirty-question exams of two parts each. The first set of fifteen questions is taken individually by each student (can be a timed quiz). But, the second set of fifteen questions is assigned to student teams of two. Student teams can discuss each test item but were not required. Finally, each student turns in an individual answer to the quiz.
(extracted from “Peer-mediated testing: The effects of an alternative testing procedure in higher education” by Hendrickson, J. M., Brady, M. P., and Algozzine., B., 1987, Educational and Psychological Research)

This blogpost is adapted from a resource guide on designing effective online assessments that was developed by me many years back, which I use for conducting workshops on designing online assessments at my campus.

[This post is a reproduction from my other blog on Towards Open Learning]

Lights, Camera, Action!: Some tips on how to use videography as a learning tool

Technology in Pedagogy, No. 21, April 2015
Written by Kiruthika Ragupathi

Introduction

Visual literacy and producing audiovisual products is important for today’s global society. Though we know this in theory, it is always a question as to how one can do that in practice. Specifically, what kind of sound pedagogical principles and techniques can we draw upon to facilitate such growth? How can we design appropriate, effective and feasible projects for students of various learning styles and interests? How do we address challenges like access to technology and technological training (for both instructors and students!)? How do we fairly assess unconventional products like videos? These were the questions Stephanie Lo-Philip, from the Department of English Language and Literature at the National University of Singapore set out to answer in this session entitled “Lights, Camera, Action!: Some tips on how to use videography as a learning tool”.

During this session, Stephanie’s focus was on the pedagogical considerations in using videography as a platform for learning where students are producing the video. She highlighted to participants the kinds of technical expertise an instructor would need and surveyed different tools instructors could use to train and guide students. Finally, Stephanie went on to discuss assessment rubrics and various criteria instructors can include in evaluating student work.

Designing Videography-based Tasks

Videography can be great platform for aesthetics and creativity; and therefore can be used to train the eye and the ear. For example when used for foreign language learning, the task could be designed such that it requires students to include subtitles in their videos. This could reinforce language learning as it requires them to write down verbatim based on what is going on.  Video can also be a wonderful tool for multimodal engagement that encourages students to consider a wide range of factors and phenomena – both linguistic and non-linguistic.

Thus when designing videography-based tasks, one needs to consider the “learning goals” and the “video and task relationship” to decide whether videography is appropriate for the types of task we design. To determine the learning goals for your videography task, you could explore:  (i) content (the content knowledge/subject knowledge that you want your students to learn); (ii) general skills (like critical thinking skills, problem solving skills, creativity, etc.); and (iii) visual literacy skills (enables students to think about lightings, acoustics, background, visioning, presentation of interviewer and interviewees, motion). Encompassing some or all of these in your learning goals can have far-reaching effects and will have a broad effect on what students can pay attention to.

Secondly, it is important to consider the unique affordances of video, and how those affordances relate to your own task design (video-task relationship). In Stephanie’s case, she uses videos for

  • Research purposes
    • For interaction (e.g., an oral history project requires a lot of interaction with participants)
    • For documentation of naturally occurring phenomena (e.g., contextualisation of language to review talk in context)
  • Scripted work
    • In language pedagogy or theatre studies, video can be used as a medium to dramatise scripts
  • Analysing data and conducting fine grade analysis

For some classes, video could be used as a tool for capturing data, and then students use the video to analyse and write a report, while in other classes, students produce an audio visual product. If students are required to produce a video as a final product, then you will realise that students will need to review the data multiple times which allows for familiarity and also gets them to think about the material critically and reflectively. You could also get students to present a video as it is more engaging than a traditional PowerPoint presentation.

Video products can also be used for reflexivity and critical thinking. For example, students record themselves interviewing other people. Students then can use this data, and watch themselves interviewing others leading to a lot of interesting questions – the methodology, the role of the researcher, language, whether or not one is leading the participants. This will enable the teacher to have a very productive discussion with students in multiple ways. Finally, videos can be used as good examples for future classes as well as beyond the classroom.

Instructor-student ratio is a huge consideration depending on whether you require students to produce a video. It also depends on whether you are going to provide training to your students as well as the types of equipment and software that you want your students to use. For small classes, it is possible to make producing video products a mandatory assignment within the syllabus; and for large classes you make producing videos an optional component.

Types of and Access to Equipment and Software

It is important to conduct some analysis of your students’ skill level and to check what kind of access they have to equipment using a simple survey. This will help you determine how technically advanced you want to design the task. In general, students can just use either smartphones or “point-and-shoot” cameras and it may not be necessary for them to use professional equipment. The types of videography software they use also need not be sophisticated – for example, software like iMovie or Windows moviemaker have readily available tutorials that students can learn on their own.

In addition, based on the students’ level of technical expertise, advanced training on equipment and software can be provided for smaller classes. Stephanie mentioned that for her own students, she does conduct some rudimentary training (nothing advanced, but just some basic skills) to provide an extra scaffold for students who have zero technical knowledge and have never done any video editing. This is done so that such students are not excluded from the activity just because they do not have prior videography experience.

Finally, it is also important to inform students of the resources available on campus. For example, students can go to UTown’s Multimedia Hub or the faculty IT unit’s Multimedia Development Lab where some technical expertise is usually available. However, it might be necessary for students to book such facilities in advance.

Technical Training for Instructors and Students

  1. Film making Basics Students need to have a basic understand of film-making techniques for visual literacy, as does the instructor, particularly if you are going to teach visual syntax and visual semantics. Stephanie recommended the book The Filmmaker’s Eye by Gustavo Mercado as an easy-to-browse and useful reference guide that shows the would-be filmmaker ways in which to become a strong visual storyteller through smart, effective choices for one’s shots. It is a useful reference even for students with no background in film making.
    She listed the following basic skills that could be used as a start:

      1. Types of shots and subject positioning – get students to understand aesthetics and the cultural meanings behind images. This enables students to understand the cultural interpretations and produce those through images and shots.
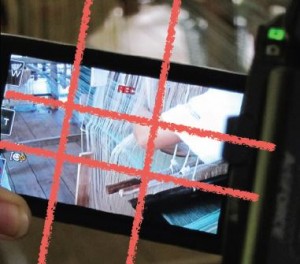
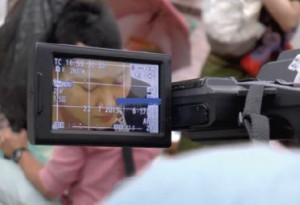
      2. The “rule of thirds” guideline which proposes that an image could be imagined as divided into nine equal parts by two equally spaced horizontal lines and two equally spaced vertical lines, and that important compositional elements should be placed along these lines or their intersections. This enables students to understand where the place the subject conveys aesthetic and cultural connotations.
         rule-of-thirds-1  rule-of-thirds-2


      3. Students need to take a variety of shots. Depending how one frames the subject, you can convey different emotions and portray different meanings (e.g., Extreme close-up shots, Medium shot)
      4. Nose rooms – How much room does one give the subject
      5. Combining moving shots with “still” or static shots.
  2. Lighting considerations
    1. Indoors or outdoors (with no proper light, you might get everything but the face). Get students to be aware of the location of the light resource, and its relation to the subjects.
    2. Time of day. Get students to be aware of soft lighting and harsh lighting, particularly when filming outdoors.
  3. Audio considerations
    1. Indoor vs. outdoor recordings. Students need to be aware of acoustics of the location/surroundings, and be aware of all background noise.
    2. Different types of microphones (“mikes”) – the simplest way is not to overthink the type of mikes needed, and just use in-built mikes; shot-gun mike vs. army-directional mike
    3. Positioning of the mike – The way you position your mikes would influence the audio quality; students would also need to test out the mike before they start filming
  4. Equipment Training
    1. Auto vs. manual
    2. Visual literacy skills – white balance; aperture; playing with lights; understanding how light works; the amount of exposure, the brightness, all these factors would affect the quality of the video footage.
    3. It might be easy to go auto, but students will start to critically think about the aesthetics of the video footage if they use manual mode of recording
  5. Software Training
    1. Can either be instructor-led or self-learning tutorials
    2. In an instructor-led training session, it is important to just cover the basic skills. For example, just get students to film a 10-minute video, and then they come back to a face-to-face hands-on session to do editing. For example, importing clips, using the MAC vs. using the PC, organising the data, key wording for video data, cutting, transitioning, etc. The training can vary depending on the instructor’s time and the learning goals set.
    3. Basically, such training enables students to spend their time productively on learning and producing the video rather than wasting time on sorting out technical difficulties.

Organisational Tools for Students

Providing students with just technical training is not sufficient. In fact, students would also need to be trained in and provided with tools on how to compose a visual product. They need to be aware that working with images and sound is not the same as writing an academic essay. The instructor must be cognizant to the fact that tools to systematically organise the data and aid in visual composition (syntax and semantics) need to be discussed with their students.

Storyboards enable students to start thinking in visual terms the story that they want to tell or the product that they want to produce. Students do the storyboarding even before they start filming, and gets refined during filming. The final storyboard is compiled after having done all the recording of data.

storyboard

Shot sequence outlines is when students start thinking in more detail about the storyboard. Students need to think about specific shots and what each shot needs to convey. This outline helps them keep track of what needs to be filmed and what needs to be done for composing the final product.

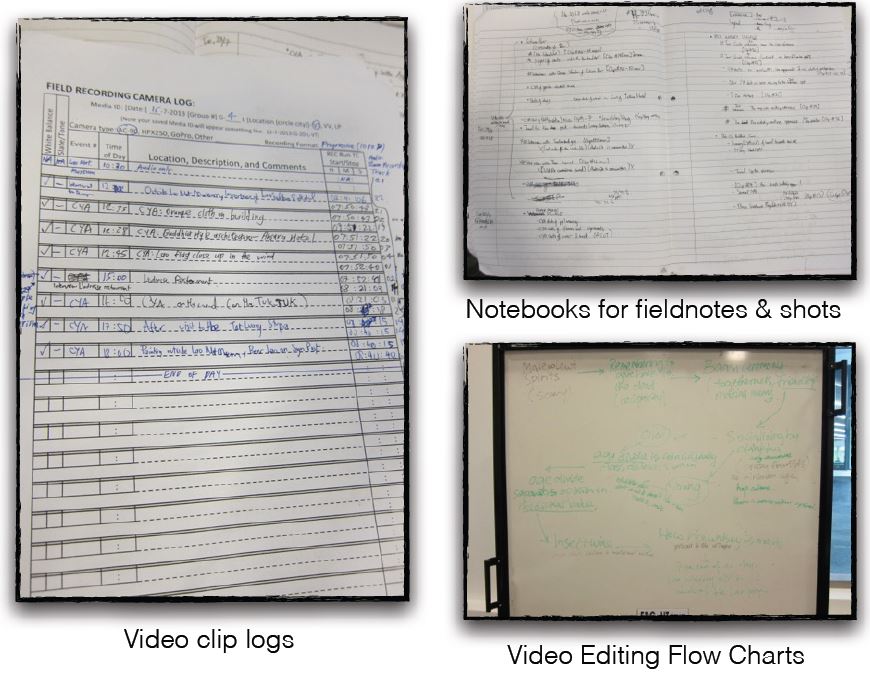
Other tools that can be provided include:

  • Video clip logs. Allows students to label video footage according to its content.
  • Notebooks for field notes and shots. Allow students to take organisational notes of what they need to shoot and what footage they have already done.
  • Video editing flow charts. A flow chart of the narrative of how students are going to compose the video.
    other-tools

Assessment

The assessment will depend on the learning goals. Stephanie highlighted that she first determines the weightage among the different areas that she want to assess her students; and depending on the course and the goal, the weightage can vary. Her assessments are usually based on three different areas:

  • Subject content (In Stephanie’s case, there is more emphasis on subject content). A sample of the rubric she uses is listed below:
    • research site and participants
    • issues, questions and areas of interest that arose
    • findings (with examples of data)
    • implications
    • reflections of students’ experience in conducting research
  • General transferrable skills/global competencies (less emphasis). A sample of the rubric she uses is listed below:
    • problem solving
    • critical thinking
    • investigative skills
    • creativity
    • communicative skills
  • Visual literacy (very less emphasis). A sample of the rubric she uses is listed below:
    • Meaning creation through images and sound (visual syntax and semantics)
      • Types of shots
      • Composition of shots
      • Image quality
    • Audio/visual narrative flow
      • Interview content
      • Transitions between scene and sound
      • Audio/visual cohesion – cohesion between audio

Q & A Session

Following the presentation by Stephanie, a lively discussion ensued and listed below are some questions from the subsequent Q & A session.

Q:  How does videography enhance the analysis of data?
SLP: Let me take the field of Visual anthropology to answer this.  For example, students need to observe a public area of people talking (e.g., hawker centre), they could have it recorded on video. Once recorded, you have the setting and the context; you could then analyse facial expressions as they talk; body language, colours, what people are wearing and so forth; which then gives a rich context to the data more than just field notes or audio.If students are also producing a final video product of their research for example, the subjects in the hawker centre are talking about “Chicken Rice”. In a final product, you are not going to show ten minutes of a hawker centre conversation, but then you will need to be switching scenes. Therefore, students are not just filming the interviewees in the hawker centre but they would also be hunting for chicken rice. This helps them to pick up more data – local context on chicken rice, conversations on chicken rice – and giving rise to a more in-depth research project.Another participant gave another example from medical education to illustrate how videography can enhance the analysis of data. She talked about how video can be used for bedside reporting – students can report on overall impressions, what went well, what could have been done differently; and about how it can be useful in quantifying data, for example how many times did students make eye contact with the patients.
Q:  How do you address the issue of consent and privacy for photographic, audio graphic and video graphic recordings, particularly in public areas?
SLP: In our department, we use the “Liabilities and Indemnities” form, and get students to sign it. How you address it varies depending on where you film. In public areas, it is okay to record the faces, but if you need to add it to your report in the final video, then you will need to blur the faces out. However, in non-public areas like schools or vulnerable subjects, then I discourage students to use the video. It is also important to talk to students about ethics.
Q:  Students are more IT-savvy than I am. Why do you need to define the software? If the software options are left open, then technical training might not be necessary?
SLP: You can leave the options open and get students to train on their own. But like I said, for my students I do provide rudimentary training – nothing professional but just some basic skills. This encourages students with no prior knowledge to try it out as well. The thing about videos is that it gives students another platform of learning, an engaging platform. I would not want to exclude students from that opportunity just because they do not have experience, so I provide that extra scaffold for the students. But again, it all depends upon the context, the needs of your students, and your teaching goals as to whether you want to leave it to your students or you need to provide the training.
Q:  How much percentage do you allot for “Visual literacy”?
SLP: For a Level 1 or a GEM module, I would give a weightage of about 10% of the grade. However, for a module on Visual Anthropology, I would assign a higher weightage of about 30-40% of the grade, as there is a heavy emphasis on students’ learning to produce a quality product.
Q:  What if students get professional help? How do you monitor this?
SLP: This would be a case of plagiarism, and it would be difficult to monitor. There is no 100% of way of telling this. However, the quality of the video could provide some clue as to whether students have hired outside help. How they edit it could also serve as warning signs. However, students who have taken such courses thus far tend to be sincere about wanting to learn; and there is not a lot of incentive for them to get professional help.
 

References


Virtually Vygotsky: Using Technology to Scaffold Student Learning

Technology in Pedagogy, No. 20, April 2014
Written by Kiruthika Ragupathi

Download

Introduction

What is scaffolding? How does it help learning? Can technology be used? Does it work? And who is Vygotsky? These were the questions that Adrian Lee, a senior lecturer in the Department of Chemistry at the National University of Singapore set out to answer in this session on “Virtually Vygotsky: Using Technology to Scaffold Student Learning”. Through this session, Adrian showcased technologies that can be used before, during and after class to provide appropriate scaffolding to students.

Scaffolding, he says, can come in a variety of forms, from increasing engagement, providing alternate learning strategies, resolving learning bottlenecks, and (paradoxically) taking away support to allow students to master material, among other things. The Zone of Proximal Development (ZPD) underpins some of the ideas of constructivism, and according to Vygotsky (1978), “the actual developmental level characterizes mental development retrospectively, while the Zone of Proximal Development characterizes mental development prospectively.” Vygotsky believed that when a student is at the ZPD for a particular task, providing the appropriate guidance (scaffolding) will give the student enough of a “boost” to achieve the task.

scaffold-1

The term ‘scaffolding’, coined by Bruner, was developed as a metaphor to describe the type of assistance offered by a teacher or more competent peer to support learning. In the process of scaffolding, the teacher helps student master a task or concept that the student is initially unable to grasp independently. The teacher then offers assistance with only those skills that are beyond student’s capability. Once the student masters the task with the benefit of scaffolding, the scaffolding can then be removed and the student will then be able to complete the task again on his own. Therefore, what is of great importance is enabling the student to complete as much of the task as possible, unassisted (Wood et al, 1976). How this translates to the constructivist approach is that the area of guidance grows as we teach the subject matter, and as the students mastery level of the subject concepts changes. The model of instructional scaffolding can be illustrated as below:

scaffold-4

Adrian also emphasized on the seven principles of undergraduate education by Chickering and Gamson (1987) that is still incredibly pertinent in today’s teaching.

  1. Encourages contacts between faculty and students
  2. Develops reciprocity and cooperation among students
  3. Uses active learning techniques
  4. Gives prompt feedback
  5. Emphasizes time on task
  6. Communicates high expectations
  7. Respects diverse talents and ways of learning

It is these principles, he said, that shapes his teaching and helps him decide on when and how to provide the much needed scaffolding for his students’ learning.

Note:
For more information on how to use IVLE to implement the 7 principles of effective teaching, please see: http://www.cdtl.nus.edu.sg/staff/guides/ivle-tip-sheet-2.pdf

Scaffolding student learning through technology

Adrian illustrated some technologies that he uses to scaffold student learning, some of which he highlighted were available within IVLE. The first five items are those that are used outside the classroom while the last item is a technology that is used inside the classroom.

1.      Lesson plan
He explained that he uses IVLE lesson plan to connect all the instructional resources for the module, and as a one-stop location for students to access these resources. He uses the topic approach compared to the commonly adopted weekly approach, as the topic approach can easily act as an index of his lecture notes and remains accurate on a year-to-year basis as it is independent of changing national holidays.

Five to six different concepts are covered each week. Each topic in the lesson plan usually consists of:

  • Play-lists – to allow students to access the online lectures in the recommended sequence before the face-to-face lessons
  • Weblinks – to provide additional materials, wherever necessary, to enhance student understanding
  • Online quizzes – to test student understanding of concepts. Each quiz consists of about 10 MCQ or “fill-in-the-blank” questions
  • Multimedia tutorials – to support the various class exercises through tutorials that discuss the concepts
  • Spreadsheets –  to enable students to work out problems, thereby boosting understanding through interactive visualizations

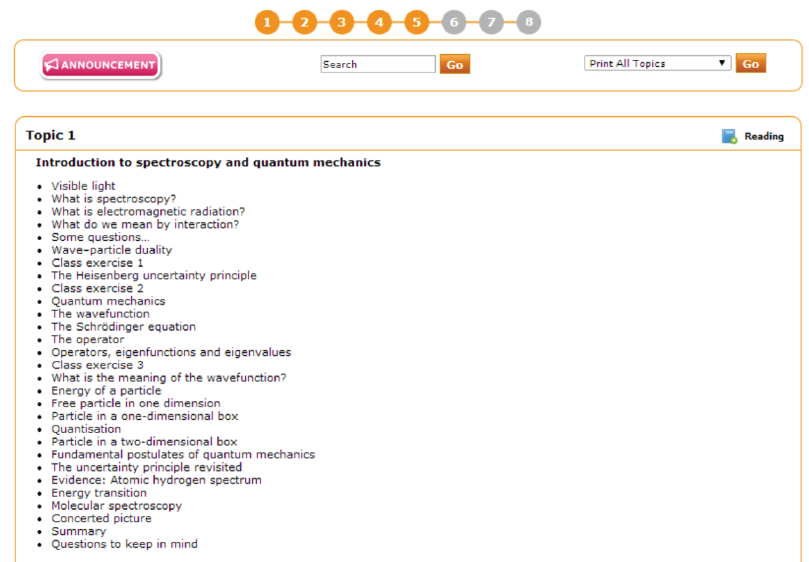
A sample lesson plan for one topic is shown below:

scaffold-3

2.      Online quizzes

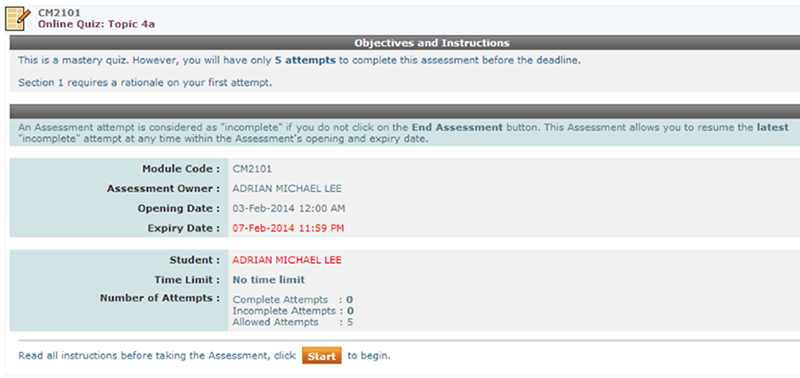
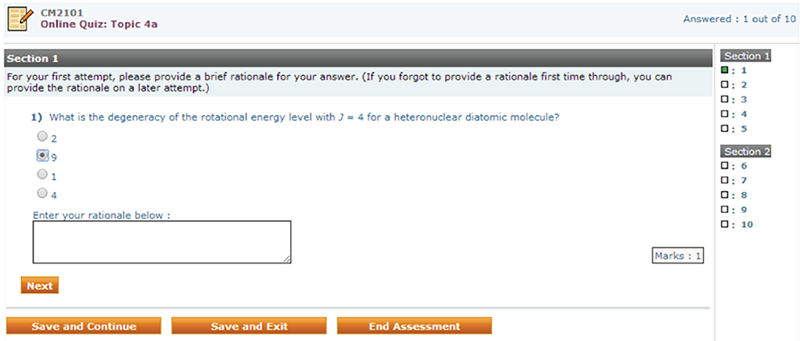
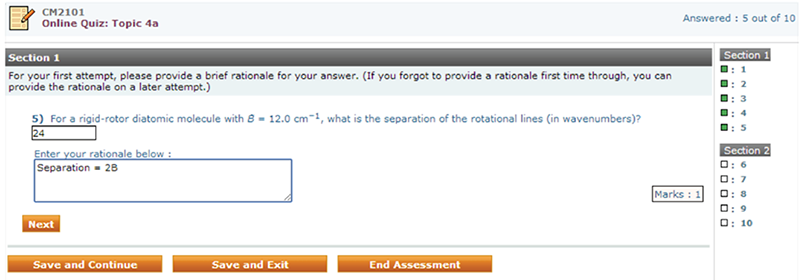
Online quizzes are mainly used to understand what students don’t know. Students watch lecture videos before class (a flipped classroom approach), and take a short quiz on the lecture content. Each quiz question is designed as an MCQ type or “fill-in-the-blank” type, but it also requires students to provide a rationale for their chosen answer. Each student is given 5 attempts. When a student gets a question wrong, feedback is provided along with a hint pointing to the right answer. Students generally would be able to get full marks for the online quizzes within the allowed 5 attempts. The rationale students provide for each MCQ question will give insights on what students don’t know. Adrian explained that his focus was mainly on students’ first attempt of the quiz, as this can act as a good gauge of students’ understanding. He said he used this information to fine-tune his lectures, to pick out discriminatory questions and address student misconceptions.

Samples of the online quiz, designed using IVLE assessment tool is illustrated below:quiz-1 quiz-2 quiz-3

quiz-2

quiz-3

 3.      Interactive visualizations

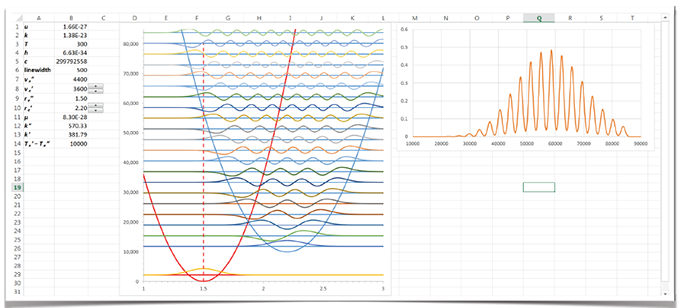
Adrian uses excel spreadsheets to design interactive visualizations. For each question appearing on the online quiz (discussed above), he provides students with at least one related interactive visualization. Students will be allowed to interact with these visualizations while attempting the online quizzes. They will be able to visualize changes that occur when changing the values provided in the spreadsheets.

interactive-visuals

 4.      Peer assessment

Peer assessment is an important component that can be used to enhance student learning. Adrian uses peer assessment to get students to assess their peers’ essays. He also provides a grading rubric that students can use as a guide while marking. Finally, he makes it a point to return the feedback from the peers back to the individual students. Each student gets to mark at least 3 essays. This allows students to see other’s work compared to their own essays. His class, being a heterogonous class prompted him to moderate student grades taking into account the easy-graders and strict-graders. In addition, he also gets students to mark their own essay after having marked their peers’ essays. This acts as a reflective element for their own learning.

Thus with peer assessment, students get an opportunity to observe their peers’ learning process and also be able to get a more detailed knowledge of their classmates’ work. This fosters increased responsibility in students, enabling students to be fair and accurate when assessing their peer’s essay, thereby making fair judgments, while also aiding in self-assessment of their own work.

Adrian also suggested the use of TeamMates, an online peer evaluation tool used by some of his colleagues in the Department of Chemistry, though he acknowledged that he is yet to try it personally. (refer to Technology in Pedagogy Series, No. 18,  on “Leveraging peer feedback”).

5.      Online tutorials

Adrian uses Camtasia Studio to create the online tutorials. These online video tutorials guide students through some of the main ideas discussed for a particular topic and allows them to work on their homework assignments without the need for them to attend his lectures. Other tools that are available at NUS to create such online tutorials and/or lectures are:

  • Adobe Presenter (Breeze) and Adobe Presenter Video Creator,
  • Camtasia Relay, and
  • Ink2Go.

6.      Learner response systems

Learner response systems can be used as a formative assessment to guide teaching, to measure what students are thinking and then address it immediately in class. They can be used to check students’ prior knowledge, probe their current understanding, and uncover student misconceptions. They can also provide feedback to the instructors about their students’ understanding and to students about their own understanding. These learner response system fall into the category of “taking technology into the classroom”. The two options that Adrian uses for this purpose are:

Some ways in which Adrian uses learner responses systems to integrate with the idea of scaffolding:

  1. Get students to answer the questions on an individual basis based on what is being discussed in class.
  2. Ask a question based on the lecture notes, but on a topic/concept that has not been discussed in great detail.
  3. Students can work in groups of 3-4 to answer the questions posed, and come back with a group answer.
  4. Get students to answer individually, and then work in groups to analyse the questions posed. Finally, get students to answer the question again individually.

The distribution of answers is then displayed immediately to the entire class. If the results show that a significant number of students chose wrong answers to a question, then the teacher can revisit or clarify the points he or she just made in class and if most students chose the correct answers to a question, then the teacher can just move on to another topic.

Q & A session

Following the presentation by Adrian, participants had the following questions:

Q:  Do you use the online quizzes as a formative or summative tool? If so   how does it provide scaffolding?
AL:

I use it as for formative assessment purposes. If you want students to tell you   what they don’t know, then you cannot have a summative assessment. We would   need to have formative assessment.

First, I allow students to take   5 allowed attempts, and as there are only 4 choices to each MCQ question,   student should be able to get 100% by the fifth attempt. Second, I award only   a participatory grade, and hence there is no pressure on the students to get   it all right.  The first attempt   requires students to key in their rationale for choosing the answer. Based on   the rationale, I am able to determine if students understand important concepts,   and pin-point topics that students need further guidance.

Q:  How do you decide on what type of questions to use in an online quiz,   without understanding student’s prior knowledge?
AL: In designing the MCQ questions,   experience with handling the course in previous years definitely helps. If it   is the first time, then have multiple tier MCQs (with rationale) or have free   text answers. Based on the answers that students give, and after a year’s   worth of experience, we would then able to design better MCQs.
Q:  When you use many technology tools in your course, do students complain?
AL: During my first class, I   explain to my students as to why I use certain tools, and how they can   benefit by using those tools.
Q:  How much support is there for learner response systems in the   literature?
AL: Current research has good support   for the use of learner response systems. It really depends on how you use   them.
Q:  When you ask MCQ questions using learner response systems, can students   share their answers with their peers?
AL: Students are developing a   learning community. Although community learning helps, at times individual   learning is equally important. Hence I would use all approaches – single   answer; single answer after discussion with peers; group answer.
Q:  How often do you use clicker questions in each lecture?
AL: I use about 1 or 2 questions   per lecture. Students seem to appreciate the use of such questions in the   classroom. I allow about 1-2 minutes for students to answer each question.


Suggestions from group discussion

Following the Q & A session, Adrian posed the following questions for participants to discuss in groups as to how they employed instructional scaffolding in their own classrooms and disciplines:

  1. Do you use technology to scaffold your teaching?
  2. How do you employ scaffolding in your teaching?
  3. Why use technology to provide scaffolding?
  4. How does scaffolding support best practice in your classroom?

Adrian asked participants to ponder over how they get students cycle through their learning; and keep a record of their learning and progress. A summary of the group discussion is given below:

Online quizzes and feedback:

  • Pre-lecture reading quiz
  • Online survey forms: used more as a survey than as a quiz to collect a mid-term feedback from students.

Peer assessment / Peer feedback:

  • An online form was used for collecting peer feedback for group work – using a grade (high, moderate, low) along with qualitative comments that gives reasons for providing that grade. Participants agreed that when students just know that there is peer assessment allows for a better behaviour.
  • Participants also felt that the use of peer feedback moderates group behaviours, improves group dynamics, enhances their reasoning and rationalizing abilities and is also meant to avoid the free-rider problems in group work.
  • It was also shared that to get students to reflect on their own learning and to improve the group dynamics, it is important to get students to sit down as a team and explain to each other what their contributions are.  Generally it was felt that peer assessments are quite accurate—weaker students generally feel that they are better than what they are, while stronger students feel that they can do better. Once they talk to each other, weaker students tend remove the natural bias and tend to grade better.

Learner response systems:

Participants also shared other learner response tools that could be used other than clickers and questionSMS:

All of these tools can be used from any online platform and/or mobile devices.

Other useful ways of scaffolding:

  • Facebook (FB) groups can be used for peer learning and peer review – students can comment and discuss; quiet students are more empowered to participate in the discussions, particularly since the FB space is one that students are familiar with and are comfortable using it. (refer to Technology in Pedagogy Series, No. 1 on Facebook for Teaching and Learning)
  • Wikis / blogs can be used to get students to teach others as well learn from each other. (refer to Technology in Pedagogy Series, No. 2 on The Lunchtime Guide to Student Blogging and Technology in Pedagogy Series, No. 5 on Wikis for Participatory Learning). However, it was noted that some help and guidance is needed to get students to use wikis.
  • YouTube videos to explain concepts
  • Google docs to do peer work. (refer to Technology in Pedagogy Series, No. 3 on Google Docs and the Lonely Craft of Writing)

References

Chickering, A. W., & Gamson, Z. F. (1987). Seven principles for good practice in undergraduate education, 
American Association of Higher Education Bulletin, 39, 3–7.

Ragupathi (2010). Using IVLE to implement the 7 principles of effective teaching.  http://www.cdtl.nus.edu.sg/staff/guides/ivle-tip-sheet-2.pdf

Vygotsky, L. S. (1978). Mind in Society: Development of Higher Psychological Processes, Harvard University Press, 86–87.

Wood, D., Bruner, J. S. & Ross, G. (1976). The role of tutoring in problem solving, Journal of Psychology and Psychiatry, 17, 89–100.

How shall we know them? Learning through assessment

Technology in Pedagogy, No. 19, March 2014
Written by Kiruthika Ragupathi

The vast majority of us learn1; the question is of course, what we learn. Simon Watts, an associate professor in the Department of Chemistry from the Faculty of Science, National University of Singapore believes that all aspects of what we do as a teacher should facilitate student achievement of learning outcomes – this includes both ‘teaching’ and ‘assessment’ activities. Of course, the achievement of learning outcomes by reviewing a final exam one has just failed is clerically a little inconvenient, but in learning terms the assessment would have achieved one of its primary objectives.

Having spent time working on learning and personal support systems in higher education both in Oxford and New Zealand,  A/P Watts talked about his abiding fascination with the way people learn and think2, how they communicate and work in groups. Thus it came as no surprise when he started the session by elaborating on his pedagogic research which is centered around culture3,4 – the NUS culture, particularly the student-staff culture. The paradigm for the work is: behaviours, attitudes and customs; though he is sure that there will be other external drivers that may reinforce these. Without understanding the prevailing culture, it is very difficult to study the learning processes says A/P Watts particularly when the cultural paradigm here in Singapore is so interesting.

A learning process characterized by memorizing and rote learning, “a low level learning culture” does not give a deep grasp of the subject matter, and will affect the ability to process the full breadth and implications of the material concerned5. It has been said that this culture is common amongst many Singaporean students. However, A/P Watts proposes that the learning process be treated like a Tango (a dance where one partner leads, and other follows), and we, as learning facilitators, have a duty to lead this dance. His hypothesis is that the current culture is a result of this Tango.

In this session, A/P Watts discussed the initial development of two applications that facilitate student learning:

  • pre-laboratory tests
  • secure Modified Essay Question (MEQ)

The IVLE assessment tool was used for administering both these tests. The development of these applications is about how IVLE can be used to facilitate students to achieve planned modular learning outcomes and also look at how staff are facilitating high order student learning.

Pre-laboratory tests

The pre-laboratory tests were designed for CM2192, a compulsory module in Chemistry. Many times, as facilitators, we face the challenge of teaching students who simply don’t read at all or do not know how to read the textbook/scripts; and they seem to read and feel as if they need to memorize everything. This is a huge problem when teaching the laboratory, since time is limited for any kind of theory discussion. Hence the use of pre-tests which it is hoped help students focus their reading and help them prepare and understand the most important parts of the material before performing the experiments.

Therefore, the desired learning outcomes of the pre-lab tests designed by A/P Watts and the Chemistry Teaching Team were on safety, familiarity with script, and subject familiarity, but not necessarily requiring them to have an in-depth knowledge of the subject but the basic knowledge needed for the laboratory exercise. The laboratory exercises were designed in such a way that half were based on analytical chemistry while the other half were on physical chemistry. The focused reading of the scripts in preparation for the pre-tests forces students to think about and understand what they are about to do, and also provides framework for studying key concepts for the laboratory exercises. These tests act like a “door wardens” with an outcome of pass or fail. Any student not able to pass the test with 2 attempts is not allowed to take the practical: subtly informing students that preparation is needed.

The teaching team drafted a total of 15 unique questions per practical reflecting desired learning outcomes. Although each member of the team chose the form of their questions, effectively there were two categories: either questions that were yes/no or true/false (i.e. a 50% chance of being right in a blind guess), or more difficult questions: “Fill in the blanks” or “Which of the following is FALSE or TRUE?  (1 of 4)”. Each pre-lab test has 6 questions of which the students would need to get 5 correct to pass the test. The IVLE Assessment tool was used to design the pre-lab tests with every student taking the pre-lab test before every practical exercise. Each test is open for 60 minutes, only available and unique to that batch of the students taking that particular laboratory exercise.

The questions that A/P Watts asked himself were:

  • Is this technique in this application effective for student learning and in the effective use of staff time?
  • Do question types used influence pre-lab scores?
  • Are there marked differences between two the analytical and physical chemistry halves of course?
  • Do students “learn”? (not what do they learn: questions or assessment methods?)
  • Is there a link between pre-lab tests and final assessments?

From this experiment, it was fairly clear the staff time was reduced considerably from 35 hours per semester (based on individual tests twice for each practical on each week) to about 20 hours per semester (of which 70% is manually downloading marks and 20% re-setting tests). With more IVLE applications, it is estimated that this might take only 5 hours per semester.

It also became apparent that students had difficulty with analytical compared physical chemistry questions. However, it was also noted that physical chemistry section had more of “50% chance” T/F questions. Feedback from the participants proposed the usage of negative marking even when using the T/F question type would be able to take care of the issue; while other participants suggested getting students to key in the rationale for choosing a particular choice or to justify a reason for their choice over other choices.

A/P Watts recognized that it was difficult to gauge the effectiveness of student learning though students have reported that these pre-lab tests have helped them better understand and focus on the experiment.

Pedagogical advantages that pre-tests offer

Pre-test is a measurement of the learning received either through pre-lectures, readings or scripts as a result of understanding students’ prior knowledge before participating in an activity. It should be noted that such pre-tests can be used not only in the laboratory setting but also for any activity that requires students to prior preparation for participation in an activity.

Reasons for having pre-tests with focused readings/ video lectures are:

  • They are helpful to quantify the knowledge attained in the class and if the desired learning outcomes were achieved by students with diverse learning styles and varied preparation. More specifically, the tests indicate how the students are prepared for the learning activities and how they are learning.
  • The focused readings / video lectures force students to think about and understand what they are about to do, and also provide them with a framework for studying key concepts for tests.
  • They should also promote curiosity and imagination to predict outcome of experiments or activities while also promoting good reading/listening comprehension strategies like: previewing, re-reading, making connections, and self-questioning, before, during and after reading the scripts.
  • It is hoped that they also improve students’ participation and engagement during learning activities/laboratory exercises.
  • The data collected from the tests may enable facilitators to target students requiring extra help and will also help in identifying teaching and learning methods that need to be changed or developed.

Modified Essay Question (MEQ)

Modified Essay Questions (MEQs) are often included as assessments to test higher order cognitive skills as the more commonly used multiple-choice questions (MCQs) are generally regarded as testing for knowledge recall only. Thus an MEQ is a compromise between multiple-choice question (MCQ) and essay and sits in between these two test instruments in terms of the ability to test higher cognitive skills and in the ease of marking to a consistent standard.

A/P Watts used MEQs as part of the final examination (50% assessment balance) for the module CM4282 – Energy Resources. The desired learning outcomes were: Subject familiarity; ability to quantify abstract problems; ability to use simple models; lateral and logical reasoning.

For developing the MEQs, he again used the IVLE Assessment Tool, but now in a secure environment. Students were allowed to take the test in a secure mode while being able to access specific documents (a Singapore Statistical and Information Pack and a Singapore government policy paper:  Singapore National Climate Change Strategy).

The MEQs were unique in the sense that it employed a “No turning back” design. To illustrate this further, take for example an MEQ with four-part question, students move from Q1a à Q1b à Q1c à Q1d. The student needs the answer to (for example) Q1a to answer Q1b, and so on. Hence, if a student gets Q1a wrong he/she will be disadvantaged in the questions that follow which depended on the Q1a answer. In this situation, it would not be fair to penalize the student in questions 1b, 1c and 1d for the error in 1a. Hence, after students answers Q1a, they are given the correct answer to 1a, but cannot go back and correct their original answer, but can only proceed to the next question. However, now they have a good 1a answer with which to proceed. A sample of an MEQ used is given below:

MEQ - Sample

The research questions that A/P Watts asked himself were:

  • Is this technique in this application effective for student learning and in the effective use of staff time?
  • How does using a computer affect student performance6?
  • How does “no turning back” affect student performance?
  • Do students “learn” from the exam?

The MEQ allowed the staff to mark the final exam in 4 hours, mainly due to the structure of the IVLE assessment; thereby reducing staff time. Students indicated that it was the hardest module but the most enjoyable they had done, and had suggestions for improvement. However, students also felt that the MEQ ‘no turning back’ structure did not help them have a better understanding of the full set of questions and hence did not allow them to do planning at the beginning of the exam before taking the questions. Taking this feedback into consideration, A/P Watts has decided to allow students access to a soft copy of the paper during the exam. As a follow-up, until there were “drawing” input abilities for IVLE, he also felt the need to use it more for course-work exams rather than only for final examinations.

A/P Watts ended his presentation and opened up the discussion posing questions and seeking feedback and ideas from participants.  Some of the questions that were posed include:

  • How do we test absolute student learning and how do we know what they are learning?
  • Participants’ thoughts on the “no turning back” structure

This stimulated a lively discussion with participants sharing their experiences in the laboratories and in the use of assessments.

Q:  Most of the time in the laboratory classes, 2% of the un-prepared   students take up 98% of staff time. So with the use of the pre-tests, does   the preparation of the students match the pre-test scores?
SW: More students were prepared,   but unfortunately students were still focused on getting the results that   they need to get, and generally do not come with probing questions to be   discussed during the lab. Often we see students start to think and prepare   for the labs only when they start writing their reports; and so the pre-lab   questionnaire is a way to get students to start thinking about it   before-hand.Comment from participants:

You mentioned that students   analytical scores improve over the term – would this be due to the fact that   they are involved in the lab work before they learn a concept and hence   during the end of term their understanding of concepts are better.


Q:  Is it a lot a work for a pre-laboratory work?
SW: Looking at a combination and   changing questions for each set of pre-lab tests is automatic, opening up   tests to different groups of students does not require much time. The time   needed is for the preparation of the questions, which is a team effort, and   as mentioned earlier time is saved in marking them, and getting students to   be better prepared for the laboratory exercises. 
Q:  You only allow them to take the pre-lab two attempts. Will it be a disadvantage   the students?
SW: Yes, only two attempts are   allowed as we also do not have a big pool of questions to recycle. However,   when students fail both the attempts, this alerts the academic who runs the   practical session, to assist if there is a genuine problem. But for students   who do not take the effort to attempt the questions, they will not be allowed   to do the practical. 
Q:  Wouldn’t changing numerical values will allow you to create a large   pool of questions?
SW: Yes, that is entirely possible,   and something I badly want to do. I have not found an easy way to do this   within the IVLE system; but will be exploring for ways to have that happen   with the IVLE team. 
Q:  Are the students asking more qualitative questions during the lab   after the pre-lab? Many students just give you answer that they got from   their senior’s reports
SW: Not necessarily. I asked   students questions about their results during the lab and did not really get   better qualitative answers.  Some will   just give you answers from their senior’s reports.

The discussion then moved on to improving the laboratory learning experience and making it engaging and fun. One participant mentioned that it might be good to have at least one of the practical to be a flawed practical in the first year, as a way of training them into the lab as a practical skill; while others felt practical is progressive work and it is important to address the average NUS student – it is not that their attitudes are bad, but they need some encouragement to progress over the years. Participants also noted that there are other factors that play a part – curriculum design; validation by external bodies; breadth of coverage in the first and second year. They also felt the need to think for the common student, not dumb it down – get the structure, get them to move a little bit out of their comfort zone; but will still need to have the teaching team colleagues on board. There were suggestions to add to the current video lectures before the labs with virtual practical using Java applets.  As teachers we aim to facilitate an inquisitive nature in our students, although often one asks observational questions first.

Others highlighted the fact that if we consider culture is a problem (i.e. if seniors are passing lab materials and report to juniors), why are we as facilitators not riding on that to use it to our advantage. While grappling with a lot of things; we teach skills, but we also need to teach attitudes.  Having talked to a lot of students – they need to learn but not at the expense of their grades – you try to make the system such that we encourage them along the way.

Another issue that was discussed was on training of Graduate Teaching Assistants, as sometimes the lab technicians and GTAs might give away the correct results, getting students to repeat the exercise rather than help them probe further.

Finally the discussion moved to MEQs; particularly the usage of MEQs during for course-work tests rather than for the final exams. It was largely agreed that using essay type question for large classes or resorting to MCQs was not the way to go for enhancing student learning. Hence, MEQs would be a good option to consider particularly if easy questions could be designed for the first few tests; and as we proceed over the semester – have more difficult questions. This will show an improvement in the assessment, and could be due to their familiarity of the content as well as the process over the semester.


References

  1. Basic Cognitive Theory (e.g. Piaget) for example Paul, K. [1951] The Psychology of Intelligence. Routledge, London.
  2. Schaeffer, B. K., Rubenfels, M.G. [2001] Critical Thinking, what is it and how do we teach it? Current Issues in Nursing. 6e J.M. Dochtorman and H.K. Grace, Mosby, St Louise.
  3. Baker, D. Taylor, P.C.S. [1995] The effect of culture on the learning of science in non‐western countries: the results of an integrated research review. Int. J. Sci. Educ. 17, 695-704.
  4. Bishop, R., Berryman, M. [2006] Culture speaks: cultural relationships and classroom learning. Huia. Wellington, NZ.
  5. Biggs, J. B. [2003] Teaching for quality learning at university. Buckingham Open University Press, 2e
  6. Sloan & McGinnis, (1978); Russell & Wei (2004); Powers, et al., (1994); Mogey (2010); Burke and Cizek (2006); Russell and Haney (1997); Mogey et al., (2010), etc.

Leveraging Peer Feedback


Technology in Pedagogy, No. 18, February 2014
Written by Kiruthika Ragupathi

Using peer feedback among students is a useful tool in education. Feedback from peers is usually available more speedily than instructor feedback and is given in a language that they can easily relate to; effectively conveyed, it helps them review and question their own personal beliefs. This process of giving peer feedback requires active engagement as well as a critical understanding of what an assessment task demands and the criteria used to assess and grade work.

Peer feedback can communicate peer expectations in team assignments says Damith Rajapakse, a senior lecturer with the Department of Computer Science from the School of Computing at the National University of Singapore. He says, instructors can also use peer evaluations to reward or penalize team members based on students’ contribution levels and can easily supplement instructor feedback on student performance. In this session, Damith introduced a tool that he and his team developed to manage peer feedback and peer evaluations in class.

Reason for using Peer Feedback

Damith started the sharing session by highlighting a study Norman Vaughan from the Mount Royal University, Canada on the perceived value of peer assessment feedback. The students in that study were asked to rate the value of peer assessment feedback before and after a course, and then it was followed up with getting student’s perceptions on the value of teacher assessment feedback. It was reported that an emphasis on formative peer feedback impacted students’ perceptions on the value of instructor assessment. The study results highlights that students’ participation in a peer-feedback activity creates a win-win situation for both instructors and students with students valuing their teacher feedback.

When Damith started getting his students from the large classes to work in teams, he felt the importance and usefulness of using peer feedback. That is because, when working in teams, students who generally slack tend to rarely participate and usually contribute very little to the project work, yet these students are not penalized enough and ride on the other members’ work to attain grades higher than what they deserve. To give a grade that a student really deserves, Damith felt the necessity for a system that can allow students to easily give peer feedback and enable teachers to access the information effortlessly. Secondly, when there are a number of deliverables from students every week, instructors would not have enough time to give feedback immediately, particularly on student presentations.

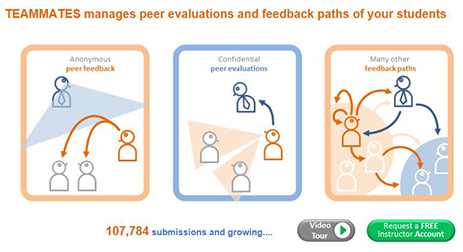
These two situations prompted his team to conceptualize on developing an online system, TEAMMATES (http://teammatesOnline.info) that can be used for managing peer feedback. An online system makes the maintenance and collection of feedback easy and effective. He shared that the system is currently being used by over 50 universities with over 7000 users and can be freely accessed.

TEAMMATES information

A video tour of the TEAMMATES system can be accessed from the TEAMMATES home page.

Damith detailed four main features of the TEAMMATES system, and how it was useful for his classes:

1.      Peer evaluation / feedback for student teams

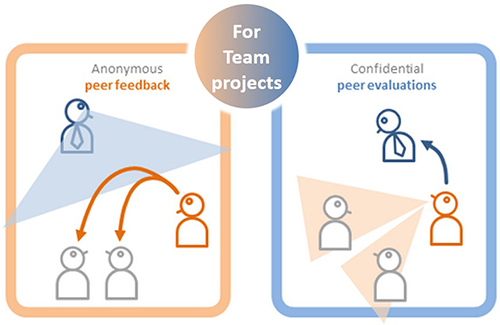
When students work on team projects, he found TEAMMATES to be particularly useful for collecting feedback from peers working on the same project. Students first estimate the performance of their peers’ participation and contribution to the project, and provide anonymous feedback to their team members. Second, they complete a self-evaluation of their performance using the system. This allows them to compare their own evaluation with the final score assigned by one’s own team’s perception. Finally, they also provide confidential feedback and comments on their peers to the instructor. This facilitates the instructor to easily identify the problem teams and be able to moderate the scores. It also gives an opportunity for instructors to intervene at an early stage while students get the time needed to amend their behaviour/problem before it is too late.Peer FeedbackSince the comments from peers are made transparent and open to all team members, students take ownership and responsibility. All of these, enable the instructors to penalise any under-performing student with more conviction and reward the deserving students with confidence.

For participants to get a sense of the system, Damith then went to demonstrate the usage of the system both from an instructor’s perspective and a student’s perspective. Once logged in to the TEAMMATES system, an instructor can easily create a course and enroll his students by copying from an already available spreadsheet. Instructors can then assign time periods at which students can give feedback, and the system follows up with an automatic email reminder to students. The students are then required to login to the system through the link provided in the email and get to key in the feedback based on their own participation and contribution, peer’s participation and contribution taking into consideration the team dynamics.

2.      Flexibility to create other feedback paths

As an instructor, you will be allowed the flexibility to determine your own set of questions, feedback paths, and visibility levels from the system. The real flexibility lies in allowing the instructor to pick any question from the set of questions for his students to give feedback on their peers.

The feedback paths can be chosen so as to allow feedback to be provided:
(a) between students in the same course,
(b) for various instructors in the course,
(c) amongst other teams within the course

The visibility level is so flexible that the instructor can choose from various options like:  students can see the feedback or comment; students can see the author of the comment; etc.

3.      Closed-loop feedback

A closed-loop feedback system is planned in such a way that it not only allows instructors to receive anonymous feedback from the students but also enables them to respond to the particular student, but anonymously as well. Thus, students are able to receive personalized quick responses. Instructors are also able to easily track if their students are reading the comments, and appropriate intervention is then possible when necessary. Depending on the questions chosen, instructors would be able to better understand student misconceptions and unclear areas.

4.      A repository of student information

The last feature was not so much related to peer feedback, but allows for easy maintenance of one’s own students that an instructor has taught thus far. This will provide an easy access for instructors to collect feedback from past students, and also be able to contact them for guest lectures.

Pedagogical advantages that Peer Feedback offers

Damith highlighted the following features that he liked and prompted him to start the development of a student peer evaluation tool:

1.      Provide early and frequent feedback

Peer Feedback enables students to gain initial feedback on their work at an early stage, not only in a timely manner but more frequently as well allowing them to respond to the feedback in future assignments. Providing early, frequent, and incremental feedback in a non-threatening environment can play an effective formative role in students’ personal development.

2.      Formative first, summative second

Peer feedback is about students providing constructive comments on a peer’s work; it does not involve awarding of marks but is a formative step prior to submission of a piece of work. Such feedback can help students to recognize and rectify gaps between peer/instructor expectations and their own performance. TEAMMATES is designed for both formative and summative purposes, but places greater emphasis on the formative.

3.      Shifts responsibility from the teacher to the students

This way, students are more involved in their assessment process when they have a larger responsibility. Not only do students take a closer look at the performance of their peers, but they are also constantly reminded of their own performance and are likely to use that as their frame of reference for improving.

4.      Develop self-reflection skills in our students

It enables the development of critical reflection skills and the ability to give constructive feedback to peers. Students can better engage with assessment criteria and internalise them for application in their own work. It enables the development of skills like making informed judgments, self-evaluation, critical reflection skills, critical thinking, analyzing learning outcomes and formulating constructive feedback to the peers.

5.      Introduce diversity in teams

The instructor has the ability to better understand the student strengths and weaknesses in terms of team dynamics, knowledge, skills and attitude based on the system scores. This enables faculty to introduce diversity in the teams based on student capabilities and contribution in team projects. The more the diversity in a team, the higher the benefits for each student as peers would learn to depend on each other in a positive way for a variety of learning tasks with the diverse groups that they work with.

Summary of Feedback/ Suggestions from the Discussion

Following the presentation by Damith, participants got into a lively discussion and asked Damith questions on how they could start using the system. Listed below are some questions from the subsequent Q & A session.

Q:  How does the system quantify the scores – the positives (+) and the   negatives (-)?
DR:

The   system does not quantify the scores. This is scaled down internally to address   the quantification. The values are taken to make a comparison, and acts more   of a red flag to faculty. Therefore, the values displayed are relative, and as   instructors you will need to look for mismatch (i.e.) the relative   proportions.

Q:  Are students honest or do they overplay their own contributions?
DR: Usually students underplay the   team members’ performance, but overplays their own contributions and   participation. Therefore, it is normal to have a gap between the contribution   level ‘claimed’ by a student and the level ‘perceived’ by peers. Hence this   needs to be taken into consideration when grading.
Q:  Are there unintended consequences? Can this lead to unhappiness   amongst team members?
DR:

The   situation is not as lenient as before. The students who do more work   generally like the system, as they have their own voice and are able to   report the actual scenario back to the instructors. Since the comments are   visible to all, students will need to take on ownership and responsibility.

Q:  What if slackers don’t give feedback?
DR: Sometimes, there is a   possibility for this to happen. A student who doesn’t give feedback would get   a reminder from the system. As an instructor, you could also give a gentle   nudge or reminder to the students. And if the students still don’t and is   marked down by other team members for his participation, then this will act   as a sort of confirmation.
Q:  Does the system provide criteria to the students that they can refer   to before giving score?
DR: Yes, these can be done. The   rubrics can be included as part of the question itself i.e. at the question   level.
Q:  Do you plan to integrate it with the NUS learning management system?
DR: Since the system caters to many   other universities and schools, there is no plans to integrate it with the   NUS learning management system.
Q:  Is the use of TEAMMATES Free?
DR: Yes, you can register for an   account for TEAMMATES at http://teammatesOnline.info.   No installation is required, just get an account, and you can start using the   system right away! However, students would need to use their google accounts   to use the TEAMMATES system.


References:

Morrow, L. I.  (2006) An application of peer feedback to undergraduates’ writing of critical literature reviews, Practice and Evidence of Scholarship of Teaching and Learning in Higher Education, 1(2), 61-72.

Draper, S. & Cutts, C. (2006). Targeted remediation for a computer programming course using student facilitators, Practice and Evidence of Scholarship of Teaching and Learning in Higher Education 1(2), October 2006, 117-128.

Online Assessments

Technology in Pedagogy, No. 17, May 2013
Written by Kiruthika Ragupathi

Online Learning and Educational Apps seem to be the new buzzwords in education. The advent of MOOCs, educational applications (apps) and online lectures delivered via iTunesU, Coursera and TED, look set to bring about a paradigm shift in modern pedagogy. Yet, it is always important to be mindful of the educational principles that underpin good (and sound) pedagogy says Erle Lim, an Associate Professor at the Department of medicine, Yong Loo Lin School of Medicine from the National University of Singapore. As educators, it is important to ask, “Are we engaging our students?”, and more importantly, “Are we teaching students to curate knowledge rather than just acquire lots of meaningless facts?”

Assessments and high-stakes examinations are therefore important to determine if students are learning (and applying what they learn). Despite the healthy skepticism about these new-fangled ideas, we need to ask ourselves if we should embrace technology and better utilize smart devices and online tools to fully engage our students and test their ability to apply what they have learned, rather than just regurgitate “rote” knowledge. In this session, A/P Lim discussed the potential for online assessments – how to use them, and when not to.

A/P Lim started the session with a brief introduction to online assessments, and then highlighted the benefits and problems associated with using online assessments.

 Assessment + computer + network= Online assessment.

Benefits of online assessments

  • Instant and detailed feedback – how students perform, how the top-end students in relation of bottom-end students
  • Flexibility of location and time – log on and take on the exam at any time – important to differentiate to formative and summative assessments.
  • Multimedia – makes it more lively when these multimedia objects are incorporated
  • Enables Interactivity – blogs, forums
  • Academic dishonesty – essay questions can be automatically submitted to platforms like  Turnitin, iThenticate to check for plagiarism
  • Lower long-term costs
  • Instant feedback/instant marking
  • Reliability (machine vs. human marking) – scoring is impartial
  • Impartiality (machine vs. human)
  • Greater storage efficiency – digital versus hard-copy exam scripts
  • Able to distribute multiple versions of the exam 
  • Evaluate individual vs. group performance – how has one individual scored vs. the cohort
  • The report generating capability allows to identify learning problem areas.
  • Allows to mix and match question styles in the exams

Disadvantages of online assessments

  • Online assessments can be expensive to establish
  • They are not suitable for all assessment types
  • Cool is not necessarily good. Just because something is new and easily available may not be the best. Sometimes established old things are better.
  • There is potential for academic dishonesty and plagiarism, even with Turnitin, it is possible to tweak the answer to be not detected.
  • The online assessments gives only the “right” and “wrong” answers, and not necessarily on not necessarily on how students arrived at the answers.
  • Potential for glitches, and therefore every problem has to be envisaged

The Modified Essay Question – an evolving scenario

The questions in a written examination can be constructed in different ways, e.g. short answer questions (SAQ) or essay questions. However, the use of short answer questions (SAQ) AND essays for online assessments make it difficult to mark online. Therefore the essay questions were modified to a “Modified Essay Question (MEQ)” which replicates the clinical encounter and assesses clinical problem- solving skills. The clinical case is presented in a chronological sequence of items in an evolving case scenario. After each item a decision is required, and the student is not allowed to preview the subsequent item until the decision has been made. The MEQs test higher order cognitive skills, problem-solving and reasoning ability, rather than factual recall and rote learning, and is generally context-dependent.

How useful is the MEQ

  • Measures all levels of Buckwalter’s cognitive abilities: recall or recognition of isolated information, data interpretation, and problem solving;
  • Measures all of Bloom’s 5 levels of Cognitive Processing: Knowledge, Comprehension, Analysis, Synthesis, and Evaluation;
  • Construct and content validity;
  • Dependable reliability coefficients;
  • Correlate well with subsequent clinical performance
  • Allows students to think completely in a new way with firm pedagogical underpinnings

Challenges and limitations of using MEQs

  • Recall of knowledge and the questions
  • Structurally flawed compared with MCQs.
  • MEQ re-marking: lower scores than were awarded by the original, discipline-based expert markers.
  • Failed to achieve its primary purpose of assessing higher cognitive skills.

Points to consider when planning a good test/examination

  • Valid: The test measures what it is supposed to measure
  • Reliable:  (a) At any given time, the same student should be able to score the same mark, even if he/she had taken the test at a different time (b) Score what you are supposed to score
  • Objective: Different markers should mark the same script with the same standard, and award the same mark
  • Comprehensive: tests what one needs to know
  • Simple and fair: (a) language clear, unambiguous questions (b) Tests appropriate level of knowledge
  • Scoreable: Mark distribution fair

How to set Good MEQs?

  • Understand the objectives of the assessment and be familiar with curriculum materials that relate to learning outcomes.
  • Determine expected standards: what do you expect the candidate to know? It is important that there is a clear alignment between what students have learned and what they are being tested on. Always test what is taught to them, not to test beyond students’ level of understanding.
  • It is also a good idea to involve peers when setting the MEQs and getting colleagues to try the questions out. This will also enable you to determine if the timing allotted is adequate and will also allow you to assess the adequacy of mark distribution. Get comments and criticisms from your peers.
  • Do not set questions in silo. The formation of MEQ committees will be advisable, and ensure a good distribution of specialists in the committee (e.g., paediatrics and adult, subspecialty groups).
  • Provide sufficient realistic clinical and contextual information, thereby creating authenticity in the cases.
  • The components of the online assessment in order to increase discriminant value of examination.
  • The design of the assessment should be contextual, sequential, with enough time to think. Due to the use of sequentially expanding data, students should not be allowed to return to their previous responses in order to change answers.

How to set FAIR MEQs

  • Good quality images
  • Data for interpretation:
  • Information must be fairly presented: don’t overwhelm the candidates
  • Choose relevant/reasonable tests: no esoteric tests (if possible), don’t give unnecessary data to interpret
  • If tests essential to the MEQ but students not expected to know how to interpret: can use to teach – i.e. give them the report, but leave to them to interpret eg CT brain image showing ICH
  • Keep to the curriculum

Q & A Session

Following the presentation by A/P Erle Lim, a lively discussion ensued and listed below are some questions from the subsequent Q & A session.

Q:  Why do you find essay questions difficult to mark online? I have a very opposite experience. Maybe your system is different. If your question is sufficiently clear, students will be able to cope and I don’t find it difficult to mark.
EL: There are advantages and disadvantages. One is you don’t have to read bad handwriting.
Q:  You talked doing the assessment anytime and anywhere. How do we know if they are doing it in groups or doing it by themselves?
EL: I am sure there are some settings to be able to control the assessment.
Q:  How do you go about the bell curve?
EL: We do get a decent bell curve. It is not necessarily even.  We accept the marks as they are and for the School of Medicine, we do not do a bell curve.  Every individual exam is not tweaked, it is only done at an overall level.

Social Media in Education

Technology in Pedagogy, No. 16, April 2013
Written by Charina Ong (cdtclo@nus.edu.sg) based on the presentation notes of John Larkin

What is Social Media Anyway?

John Larkin started the session by asking how “connected” are you as a teacher? John Seely Brown posits, “The Internet is not simply providing information, but access to people”. A common definition of social media may thus be: “a blending of technology and social interaction for the co-creation of value.”

In the session, John Larkin showcased several social media exemplars as used in NUS and various Singapore organizations. He then presented various social media tools and shared his experiences on how he used Blogs to teach History.

Why is Social Media Important?

Social media provides rich learning opportunities to foster students’ digital skills and talents. Employers value employees with technology skills that can be readily utilized to create value, and be able to contribute and communicate well. They are not looking for exam results anymore. The challenge for educators therefore, is to be able to teach students on using social media effectively:  to benefit the community and the society; to deepen their skillset and widen their experience; how to connect with their peers and more importantly be able to develop a skillset that employers are looking for.

How is Social Media Being Used?

There are various social media tools available, the list is endless. As educators, we need to foster developing mature competencies within the students so that they can use these tools to achieve meaningful outcomes.

John showcased examples from various disciplines on how social media is used in education. For example, faculty from Business schools and Language Communication often use Facebook and Twitter to facilitate communication and collaboration. Others use Flickr to exhibit their work. Blogs are used for writing collaboration, design, and sometimes even for programming. Line allows student teams to quickly collaborate during field trips exchanging images, video, audio media messages and make free voice calls. Linkedin is another great and sophisticated tool to connect to people related to one’s own field, and as John put it, it is the ‘thinking person’s Facebook’. Google plus is a multilingual social networking site, similar to Facebook, and lastly, Evernote, an excellent note taking tool that can be used to collaborate with peers.

With this great variety of tools readily available, educators have to be mindful of what they hope to achieve when using a particular tool. In their article on Social software for learning: what is it, why use it? Leslie and Landon write “The adoption of social software is not synonymous with the effective delivery and assessment of quality teaching and learning.” It is therefore essential to balance and plan ahead while carefully considering why and how to use the tools appropriately.

The following below are some examples on how social media is used effectively: 

NUS Exemplar

Sivasothi, a lecturer from Department of Biological Sciences, has been using blogs to communicate with his students and the general public for the past ten years and facilitates and encourages connection and communication between his students and the public.

Originally students submitted their assignments, research, tasks, etc to the lecturer allowing only the teacher and student to read. To maximise the impact and to create greater student ownership, Siva asks students to write about their research and use social media to communicate their findings, publish the result of their field trips, and photographs in Biodiversity class blog.

Students take ownership over their blog entries enabling them to develop a sense of responsibility over the information they upload as it is not only for the eyes of the instructor but their peers and external community. These entries also allow them to hone their communication skills when they express their thoughts, skills, knowledge, and attitude from a framework that the public can understand. This also led Siva into organizing guided talks around the mangroves (Kent Ridge, Pasir Ris, etc.) with his students. This gave his students the opportunity to discuss on their research with the general and no longer merely articulating their work in terms of writing a dissertation, an assignment, or task that only the lecturer would understand. They are now articulating their research, findings, knowledge, and passion in a way that the general public would understand. This is a good example of using social media at its best with the student establishing connection not only with the teacher but also their peers and the general public. This also enhances the employability skills that are necessary in their future workplace.

John Larkin’s Experience

John shared prime resource materials in his history class using WordPress on how he uses social media and the way he encourages his students to use these social media tools to collaborate and communicate. “I choose an area that I’m passionate about and have knowledge of and start publishing about it using WordPress as a blogging platform. My knowledge and passion eliminate a layer of stress and the students utilize these resources.

I get my secondary 2 students to write their stories, imagining they live in the past and I ask them to publish it online. These students vary in skills- I have students with severe learning disability, they mix with other students who are capable. I tell them to take a moment from history and write a story. They were using WordPress as a publishing tool to express their views about Black day. Students don’t just skim the surface but they are thinking about the subject matter, writing and publishing. Their peers, as well as their parents and the community see this. They think deep and reflect on how they can utilize this fully.” says John.

How Do I Get Started: Next Steps

John Larkin offered these tips to get you started with your social media journey:

  • Take small steps and choose part of your curriculum particularly you’re passionate about;
  • Select the tools equipped for you, the one you can use most effectively;
  • Work with small cohorts (30-40 Post graduate students);
  • Collaborate with your colleagues; and
  • Delegate to the students.

Q&A Session

Following the presentation by John Larkin, a lively discussion ensued and listed below are some questions from the subsequent Q & A session.

Q: A month ago, a person on social media challenged the court decision that the judge had made. The person was prosecuted by the court because he is not allowed to express his opinion and challenge the court. Social media in my perspective, in order to change the world, you need to have freedom to express your views and not be punished. What is your opinion about this?

JL: I don’t have a direct answer to your question. People in Australia have more freedom to express their views as compared to Singapore which is completely a different environment. In classroom context, I teach students how to use social media responsibly. I tell my students to think deeply about the things they write and publish. We have to teach our students the right way of using social media. We need to teach them to think deep and think about the tools that they want to use.

Q: You mentioned that your students publish their own stories online. Have you ever thought of getting some historians to come in to critique or provide feedback to the students?

JL: Yes, at the JC1 level, history class that I’m teaching, students have communicated with a group of Archeologist blogging about Pompeii. Students get to interact with them, getting comments, etc. I believe that bringing experts into the classroom is important.

Q: Social media is public and people can follow you. If student posts something, it may affect people’s view about the way we educate our students. How can we manage this and how can educators be exemplars?

JL: You can apply demerit points if students go off track. Students in general are quite responsible. I was first reluctant to have my students to publish their work, but I realized that they were as good as me. We often forget that we need to give them some responsibilities as part of their learning. What I will suggest is that whatever you choose to set up for your class – make it a closed group discussion. For example, Facebook, consider using a page or group, and then only open it to the immediate group.

Collaborative Learning using Google Docs & Maps

Technology in Pedagogy, No. 15, March 2013
Written by Kiruthika Ragupathi 

“I don’t work for Google; I make Google work for me”, says Dr Chris McMorran, a Lecturer in the Department of Japanese Studies. Research indicates that when students work collaboratively in small groups, they learn more, retain more and are generally more satisfied with the experience. If used in an educational setting, collaborative technology can enhance active participation (through content creation), increase students’ engagement with course content, and enrich the learning process. Having used Google tools for several years, Dr McMorran discussed how he employed new ways of using the tools. In particular, he highlighted two Google tools he used to encourage collaborative learning both inside and outside the classroom – Google Docs and Google Maps. He then demonstrated how the two tools enabled his students to work together and build shared sets of knowledge. The talk was divided into three sections:

  • Collaboration – why is it important?
  • Collaboration using Google: What are its uses?
  • How can these (or other) tools for collaboration help fulfill the goals of the flipped classroom?

Pedagogical advantages that collaborative activities offer

Dr McMorran felt that it is important to allocate time to design collaboration opportunities both inside and outside the classroom. He felt these activities:

  • Encourage peer-instruction (Mazur 1997; cf. Cain 2012): It is fairly clear that the person who learns the most is the content creator, and the one who teaches others. It is said, nothing clarifies ideas in one’s mind so much as explaining them to other people. Therefore he tries to turn this to his students’ advantage by assigning them with opportunities to teach each other.  Through the act of putting ideas into their own words, students make it their “own” and ultimately learn better than just being on the receiving end. 
  • Build a learning community: Even if students are assigned to arbitrary groups, by the end of 13 weeks they feel closeness to the group. The activities designed and the collaborative nature of the tools enables them to form a sense of belonging to the class as a whole.
  • Give students a sense of their learning level: Students are often not quite clear on where they stand in reference to their classmates’ levels of understanding even after the mid-term. When students participate in such collaborative activities they tend to identify their strengths, their shortcomings, and what needs to be improved. More importantly they are able to identify classmates to whom they can turn for help or offer their support to peers in need.
  • Allow efficient time management: Students have the flexibility to work at a time that best works for them without having to bother their fellow classmates, and also have convenience of working at their own pace.

Reasons for using Google tools for collaboration

In a large class setting, he would allow students to use collaboration tools of their own preference. However, in this session, the focus was on tools that he got his students to use to encourage collaboration and also be able to better understand the students’ learning process.

Listed below are some reasons for choosing Google tools for collaborative activities he designed:

  • Control edit settings: The teacher can control the access level (edit, comment, view) given to students.
  • Allow simultaneous work: Students can see who else is editing the documents at the same time. The changes are immediately updated on the document and changes made by individual students are differentiated by different colored text on the documents.
  • Chat with other students: Students can see who is working on the documents and can ‘chat’ with each other, to indicate for example that the student is working on para 3. This allows better control when working on documents.
  • Save changes and retrieve past versions: Google keep tracks of the changes and saves a history of the different versions. If anyone deletes part or all of a document, students can revert to previous versions. The best part is that students don’t have to pass Word documents around and guess who has the latest version. In Google, the updated version is always on the screen.
  • Offer clear online tutorials and help sections: This allows students to easily clarify issues and problems rather than relying on the teacher to seek technical help.

Google tools can be easily used even without having an exclusive Google account. Students can start participating in the collaborative activities designed using Google tools with a Yahoo account, Live.com account or Hotmail account. However, with a Google account, it is also possible to use the full suite of Google applications from the Google Drive, where one can create presentations, spreadsheets, documents etc., something similar to MS Office applications. It also has the extra function, the Share function which allows for sharing of the documents to anyone around the globe with a simple share link. Incidentally, if you want students to collaborate with the entire class or tutorial group, it would be a good idea to collect their email addresses (non-NUS emails) in one master document at the start of the semester to ease future invitations.

Examples of collaborative activities using Google tools

Google tools allow students to collaborate online either synchronously or asynchronously and to discuss problems, share ideas, reflect and review, making it an excellent tool for collaborating across continents. Dr McMorran featured three activities that he designed using the Google tools: collaborative translations, shared timelines, and group maps.

1.      Collaborative translation

The Problem:

Dr McMorran takes his students on field study trip to Japan as part of the module. Usually, he would have collected a number of leaflets/documents from local governments from earlier trips he has made. He wanted to use the resources available to:

  • introduce a site (e.g., Isahaya Bay) to his students for which very little academic writing was available
  • expose his students to government documents and/or propaganda
  • introduce specialized vocabulary
  • take advantage of a range of language abilities that his students have

It was immediately clear to him that it would be good to share those materials with his students before they make the trip to Japan. This would then give students a better understanding and allow them to know more about the background of the place they are visiting and make efforts to learn the specialized language, etc.

The solution:

Dr McMorran uploaded the scanned documents of the brochures to IVLE and assigned each page of the document to individual students to translate. He then setup a Google document where students put in their translations on the different pages. Each student created a table and translated the lines in the page.

The benefits:

Students were better prepared for the study trip as they learned the names of places, vocabulary, and styles of government documents. As each student worked on single page, the workload was shared and balanced. Students also took the initiative to add more information and/or issues regarding the item. However, the final product created by his students was not as colorful or engaging as original.

Students also explored other translation tools apart from the suggested tool and shared those with their peers. Though peer sharing was taking place, Dr McMorran felt that peer learning / peer-editing could have been better if students took the time and effort to read what their peers had written and add in their suggestions and comments.

2.      Shared Timeline

The Problem:

In this class, the module title was “Japan – the green nation?” The topic was the long history of the nuclear industry of Japan – its emergence following the atomic bombings of Japan during World War II, the current situation where all the nuclear reactors have been shut down after the tsunami in 2011, the new rigorous standards which would allow for some nuclear reactors that pass the standards to be restarted.

A variety of 4 to 5 readings were assigned to students. However, there was no single timeline that helped students understand the long trajectory – how public perception changed, how the industries changed, how the government changed over the decades.

The solution:

Dr McMorran could have easily created the timeline for his students. However, he realised the importance of engaging students to collaborate for creating the timeline. He assigned a group of readings to all students, created a Doc template and shared it with his students. He also assigned activities to student groups of 5, with each group working on a period that he had created by breaking the postwar era time. Students had the flexibility to work out among themselves how to split the workload for each period. Students were given a reading goal, which allowed them to look for specific information and not just a general overview of the period they were working on.


The benefits:

With the creation of a shared timeline, students got a broad sense of the different aspects that they needed to consider (e.g., shifts in policy, citizen reactions, and industry perspectives). Students were forced to do the readings in order to develop the timeline while also taking responsibility to share the workload. Only a general class participation grade was awarded for this exercise. Though this activity was not graded, students contributed well to the timeline and had a good learning experience. It can be easily converted to a graded exercise as the revision history would give a clear indication of what changes were made by whom.

3.      Group Map

The Problem:

Having to teach Geography for students from the Department of Japanese Studies, very often the students in his course rarely think spatially, says Dr McMorran. Students can think relatively over time but rarely can associate it with where it takes place in a spatially nuanced way, and seem to have very little knowledge of the geography of Japan – what it looks like, what it feels like, where certain things took place and why the location was important.

The solution:

The class on “Japan – the green nation?” had one student assigned to bring in “Green News” each week – news on something related to japan, its eco-friendliness, and its green-ness. The student would present a summary in class as to why that chosen location is important. While summarizing they place a dot on the Google map (that is shared with the class) on the exact location along with the news summary. This activity allows students to have a better understanding of the relationship that each location has with other important locations in Japan, such as Tokyo to the hinterlands.

 Dr McMorran also uses the Google Maps in his other course which has a large class size (450 students). He created a map with all the points along with a short summary, as seen at http://goo.gl/maps/JaOma. He adds in the point on the map every time a location is discussed in the lecture, thus creating a dynamic looking map. He then uses these maps in his assessments re-iterating the points covered in class. Using the Google maps and Google Earth help students learn about specific locations and see what they look like from an aerial view and study satellite images superimposed on the maps.

The benefits:

Students became more familiar with Japan’s geography and gave more credit to the spatial aspects of problems. One of the things he was happy about was that one student took this exercise a step further by adding a line rather a point – a line that separates Japan’s two electrical grids, and explained to the class on why it came about, why that was useful and so on. Thus, it is a powerful tool that empowers students to collaborate, visualize, share, and communicate information about Japan.

Some Drawbacks of using Google Tools

  • These tools are not integrated into the NUS site
  • No assurance of privacy
  • There is a possibility that the Google site could crash, and the document could evaporate
  • Students must be online to access materials
  • It cannot be used with add-ons like EndNote

Summary of Feedback/ Suggestions from the Discussion

One participant suggested that instead of tracking down the emails and inviting students through email, it would be a better idea to share the link of the Map with students. However, it was also noted that then the entries made on the Maps would not be associated with specific users and be marked generally as unknown user. Another participant indicated how the Google Docs was helpful in scheduling of presentations for group work, where students easily formed groups using Google spreadsheets. The discussion also explored on how Google docs or other tools for collaboration help fulfill the goals of the flipped classroom.

Q & A Session

Following the presentation by Dr McMorran, a lively discussion ensued and listed below are some questions from the subsequent Q & A session.

Q:  Can you track who made changes when students collaborate on a Google document?
CM: Yes. You can see who edits or make changes when you are the editor or owner. Changes by students are highlighted by different colors so you can see at one glance who has made more changes.
Q:  At the end of the day, do you get like a report of the statistics of the changes made by students?
CM: Yes. But I have not really used that.
 
Q:  Can the Google Maps be duplicated?
CM: Yes, the maps can be copied and reused. I put in the points each week on the Google Maps, and students go back to it each time, so they can see it emerging. Historically this is important, since we start in a very narrow band in Japan, and this expands as time passes. Thus students are easily able to understand how the civilization keeps growing and how eventually it encompasses the Japanese empire.
Q:  Is there a notification feature when new points are added?
CM: As far as I know, I don’t see an alert feature. However, each time I add in a new point, I update students by sending in an IVLE announcement.
Q:  If two student groups are discussing the same topic but I would like each group to work individually, how would you do it?
CM: You would need to start with two documents – one each for each group. You can then share the link to each group and get them to work from there.
Q:  Do you think it will work well in large classes, when I get students to collaborate on a single document?
CM: It is very good for small groups and unwieldy for large groups. However, I guess when you work with tutorial groups instead of the entire class it would be more feasible.
Q:  Can you make the link shorter?
CM: Yes, the links can be made shorter. Using the Edit function, you can find the link, and there is an option for short URL.
Q:  You have tried both on small classes and large classes. What are some of the considerations, differences or challenges, particularly in the context of MOOCs or flipped classrooms?
CM: I think that these kind of documents will work very well for the MOOCs. However, I would encourage students to do it on their own. You could split the lecture theatre into different sections and get each group to work on the same question separately. This allows collaboration on different documents but on the same question, which can allow for comparison between what different groups have come up with. However, there is the risk of students deleting others’ work or document which seems to be the biggest challenge, but for smaller classes/groups, there will be a better control.

References

Cain, S. (2012). Quiet: the power of introverts in a world that can’t stop speaking. Thorndike, Me., Center Point Pub.

Mazur, E. (1997). Peer instruction: a user’s manual. Upper Saddle River, N.J., Prentice Hall.

The Slow Road To Flipping

Technology in Pedagogy, No. 14, February 2013
Written by Kiruthika Ragupathi 

Over the past two years, there has been a lot of buzz and interest in the flipped classroom approach to teaching.  Traditionally, a flipped class refers to substituting classroom lecture time for hands-on time in performing key learning activities. Online video lectures (viewed at students’ own time and location) take the place of traditional lectures allowing students more time in class to work with the teacher, and hence the term flipping. This flipped approach offers a lot more than that say our two speakers, Ashish Lall, an Associate Professor at the Lee Kuan Yew School of Public Policy and Laksh Samavedham, an Associate Professor at the Department of Chemical and Biomolecular Engineering.  In this talk, they shared their experiences in moving from a lecture based approach to a blended or flipped classroom in their respective ‘professional’ schools.  A/P Lall focused on the use of the case method as an important pedagogical tool to engage students and to activate their prior knowledge, while A/P Samavedham emphasized the need to plan and structure learning activities so as to yield its potential benefits. Then, they showcased how technology played a pivotal role in helping them achieve their teaching and student learning goals.

 
Reasons for using “flipped class” approach

In his early days of teaching, Ashish’s technique was “Do what my professors did to me”. The problem arose when he was asked to teach an economics course to MBA students who were from varied backgrounds and had undergraduate degrees from various disciplines – some with no background in Economics. In addition, most were working adults with about 6 to 7 years of work experience. The main problem he faced was linking theory to practice and illustrating to practitioners how economic theory can inform business decisions. He then turned to his colleagues in the Business school for help and their response was “We use cases, but you probably can’t in a theory class”.  Nevertheless, Ashish wanted to give the “case method” a try.

For Laksh, the motivation to start flipping was completely different. He was teaching the module (a graduate module titled “Mathematical Methods in Chemical and Environmental Engineering” that usually has a mix of M.Sc., M.Eng. and PhD students) for the last time, having taught it for many semesters, he felt the urge to try out something different and get some fun out of it. The objective of the module is to help students who come in with wide spectrum of attitudes and abilities to gain skills in algorithm development and problem solving by using authentic problems and industrial strength software. Offering the module in the 1st semester of AY2012-2013 provided him with a golden opportunity to create online resources for posterity – something that will benefit not only NUS students but also students in other parts of the world. In the past, he had used webcasts mainly for his personal benefit – to check out how he has performed in classes and also to have a complete archive of his lectures.


Using the case method for flipping

Ashish decided to use cases, as he understood their potential to illustrate concepts well in business situations. He was also aware that cases facilitate the development of a variety of professional skills such as communicating a point of view, listening to others and persuading others using facts, diagnosing a problem, developing a plan of action and implementing decisions.  These skills are difficult to impart through the lecture method and while they are useful in all professions, the emphasis may differ across professions.   For example, in the Medical school, the emphasis may be on diagnosis and in the Business school there may be a bias towards action and implementation.

Initially when he started using cases, he resorted to the “path of least resistance” – providing students with a case and asking one group to present and another to critique. But he was not completely satisfied with the outcome as he realized that a lot more could have been discussed and students were not extracting as much information from the case as they could have.  It was this dissatisfaction, which led him to learn and develop discussion leadership skills so he could become a more effective educator.

So what is a case discussion? – Derek Bok, a former President of Harvard University has described a case discussion as a systematic way of breaking down the characteristic problems of the profession, so that they can be thought through in an effective, orderly, and comprehensive fashion.  As a rough guide faculty should allocate three times the amount of time they will spend discussing the case.  A typical case discussion lasts 90 minutes which implies a preparation time of about four and a half hours.

Case analysis has to be based on the facts of the case and students are expected to study and analyze the case as well as discuss it with peers before coming to class.  The typical student process has three steps:

(1)    Individual preparation and commitment requires students to prepare by reading the cases before the class. If in the process of preparation, if student feels that he has already cracked the case, then there is no necessity to attend the class. But for well-designed cases, that is usually not the case as there is enough ambiguity and uncertainty in the cases, the students are motivated to attend the class discussions so as to learn from their peers.

(2)    Small group discussions where students form informal study groups to discuss on the case, usually done one day before class. It is important at this point to tell students it is not about consensus and agreement, but it is just for them to try and get a sense of the problem. Given a certain set of facts, perhaps there are different ways of interpreting and looking into the problem. Therefore, talking to different people in the group provides an appreciation of different aspects, different angles, different ideas and perspectives of the same problem.

(3)    Large group discussions are usually planned for 90 minutes where vigorous debate and contention happens with students assessing the various alternatives while persuading their peers to see their point of view and perspective of the case.

Student learning continues after the class as students are usually talking and thinking about the case even when they have left the classroom. Since there is no right answer to a case, students leave the class with questions rather than all the answers. This develops reflection and personal generalization in the student and also enables them to train themselves to ask the right questions.

As for assessment, the basic rule that Ashish employs – regardless of the class and regardless of whether there is a final examination or not – is that 50% of the grade comes from individual class participation during the case discussion.

The good thing about using cases for flipping the class is that it takes care of 40-50% of the 3 hours allotted to a typical class at NUS. He hands out the cases and assignment questions well in advance, using digital distribution either through IVLE or other modes. The questions are very general in nature and the idea is to get students to reflect on the major issues in the case.

Faculty must model the behavior that they want to see in their students. For example, Ashish requires his students to be well prepared with the facts of the case. This would then require him to be better prepared than the students. Hence Ashish rarely refers to the case or his notes during the case discussion even though his case and notes are laid out on the table and within reach. It is important to manage the discussion, as students would want to focus on what is on their minds (the thoughts and ideas they had when reading the case).  While student views and reflections are critical to the discussion process, the educator must not lose track of their teaching objectives as well.  It becomes difficult to bring back a discussion that has gone off track. The facilitator needs to manage the flow of the discussion in a flexible manner and have a sense of how much time should be devoted to each topic.

Using the board during a case discussion is important for three reasons – (1) to record student responses, as it gives students an indication of what ground has already been covered and gives forward momentum to the case discussion, (2) To allow for an easy transition of the topics, and (3) to reward students as not all student responses go on the board.

In summary, the general process of a case class would consist of an opening question, a careful sequencing of topics, and in managing transitions to new topics while also providing order and structure to the process. Ashish makes it a point to record responses (key points) on the board and to provide closure at the end of the lesson and not “the answer” – thereby making sure that his students assume collective responsibility and carry the load.

He also provides sources for cases and case teaching materials: (i) Portals/Aggregators, (ii) Harvard Business School (hbsp.harvard.edu) (Best), (iii) Harvard Medical School, (iv) Kennedy School, (v) Stanford and other universities, (vi) ECCH   (European Case Clearing House – ecch.com),  (vii) Caseplace.org (Aspen Institute),  (viii) Individual business school websites and other sources.

Flipping to improve observability of learning and feedback

Laksh shared his personal experience of how he employed the flipping approach for his graduate module on “Mathematical Methods in Chemical and Environmental Engineering”. He had started using technology to archive his lectures with the use of webcast way back in 2003, and has also taken all the eLearning weeks on campus seriously by learning and trying new technologies to conduct his lectures/tutorials. He had made use of the opportunities to try out online lectures through the use of Breeze and screencast lectures when he had to be away on conferences – a non-disruptive alternative to rescheduling lectures.

For the graduate module in which he used flipping, the class had about 50 students with a mix of M.Sc., M.Eng. and PhD students. The objective of the module was to help students gain skills in algorithm development and problem solving. Emphasis was on using authentic problems with students developing a line of attack and writing algorithms and implement them using industrial strength software. The assessment components were carefully designed to understand and observe student learning so as to provide appropriate feedback that supports and enhances student learning. The 4 assessment components are listed below:

  • Learning Portfolio where students have to choose their own problems from various sources – textbooks, research articles, or anything else – that they decide to tackle. The portfolio was to be generated through group work with each group comprising 3 members. The groups were assigned by the teacher to provide a good mix of students taking into account their background, abilities,, and nationalities and also to provide for greater diversity as this will likely be the way that their  future work environment will turn out. These learning portfolios capture and portray the student’s progress toward the achievement of the learning objectives: acquiring knowledge, reasoning ability, ability to collaborate in teams, and the problem solving ability to analyse and tackle a varied range of problems. Thus, through a collection of authentic experiences displayed in the portfolio, Laksh is able to understand his students’ skills and attitudes.


  • Viva Voce at the end of the semester which was conducted individually (i.e. for each student) for about 15-20 minutes. Through this component, Laksh sought to understand how engaged his students were in the learning process. Some of the questions he asked his students at the session were:
    • “Why was a certain problem chosen or a particular method employed in your learning portfolio?”
    • “How significant were your results and how would you compare it against the research paper or article?”
    • “What was your starting and ending point with respect to this module?”
    • “Through which of the problems in your portfolio did you learn the most?”
    • “How was your experience with the Teach the Teacher component”?
    • “During the module, did you have a “aha” moment? If so, when was it?” Or “When did you feel empowered to take a higher level challenge?”
    • “Which was the murkiest point? Or “What were the difficult topics?”
    • “Which video tutorial was the best, and which was the worst? Why?”

He indicated that this component helped him to understand the “experience” of the students in the module. It also helped him to understand the places he should improve upon should he try a flipped class in the future or try the Learning Portfolio as one of his assessment tools. Students were also able to reflect on their experiences and vent out both negative and positive emotions associated with the course.

  • “Teach the Teacher” which requires students to explain and demonstrate a new method or concept that was not discussed in class, by creating a 15-minute online video resource using Ink2go. It was this component that his students enjoyed the most, says Laksh as students were able to engage with the new content more deeply, develop skills needed to present their topic, analyse and carefully choose what need to be presented, working within the time limits, and finally be able to reflect upon their experience at the viva voce.


  • An Open-book, open-internet final examination. Laksh talked about how he never uses assessment questions from the past years; in fact, he puts up all the past exam and assignment questions on the learning management system (IVLE) along with partial or full solutions to some problems.

He explained that his rationale to use the flipped classroom approach was to improve the “observability ratio of learning” in his module, which was made possible with the well-designed assessment components. Usually, students spend 30% in class time while 70% was spent on out of class work. However, student learning remains only partially and indirectly observable by the teachers. Not happy with this ratio of observability of learning in his traditional way of teaching the module (though his classes are very interactive), he sought to achieve a more favorable ratio through the flipped approach.

 What did students do during the Lecture Time?

Students came into the lecture after initial application of the concepts they learnt and work on the problems in their own groups. However, each of them came with different starting points and worked on questions at different levels. Most of the problems that were dealt with in class were either taken from research articles or were problems posed by their own peers. Each of the group discussed new solution techniques and had the opportunity to solve the same problem with multiple methods and sub methods and be able to understand the strengths and weaknesses of methods discussed. It helped students analyse problems from different angles and perspective based on questions posed by their peers.

Students in the team teach one another and also take turns to explain their approach to the class, and this also helped students who were otherwise shy to participate in class discussions. The preparation also made them confident and students were ready to demonstrate and explain the solutions and/or approaches to the entire class. This also enabled Laksh to discuss the student solutions, its positives and negatives and also get them to understand how some methods are more natural to some problems than others.

Laksh strongly believes that people get better at anything through the “practice and feedback” process. Practice is not to be equated to training people to solve standard problems in routine ways but as deliberate practice in ways of thinking, evaluating alternatives etc. Similarly, feedback is not exclusively about external feedback but also of self-regulation/self-direction. Thus, Laksh used his class time effectively to provide practice opportunities for his students to try different methods and sub-methods; he was also at hand to encourage them and provide the right kind of feedback for students as they went about solving problems in the class. Thus, as a teacher, he was able to directly observe student learning (by looking at their work) in the class while also providing the much needed feedback to his students.

As discussed by King and Sen (2013), the three principles from social science research can help teachers teach better and students learn effectively:

  1. Social connections motivate
  2. Teaching teaches the teacher (Help students teach each other)
  3. Instant feedback improves learning

Laksh concluded by saying that a flipped classroom model helped him achieve all three of these social science principles by making the classroom  intensely active and participatory while also being able to address what students don’t know  or are confused about.


Lessons learnt from the “flipped classroom” approach

  1. Post online materials and case readings at least one week in advance – posting two days before class might not sufficient.
  2. Provide set of related triggers (problems) and cases. These problem sets and cases should have a mix – in terms of contexts and difficulty levels.
  3. Students prefer short video chunks – 15 minute chunks.  Students prefer that the teacher annotates, scribbles, etc. on the video because they feel more engaged that way.
  4. It is important for the teacher to know the cases better than the students. Otherwise it becomes difficult to expect from the students.
  5. The discussions in class needs to be orchestrated, as students tend to jump in to talk about what they are thinking and it becomes easy for the discussions to go off track.
  6. When students teach a concept to other students, they learn better as nothing clarifies ideas in one’s mind so much as explaining them to other people.
  7. Providing immediate and frequent feedback improves student learning.
  8. Effectively use the whiteboard to record important items of the discussion. Students will then know what ground is covered, and students understand what has to be said and what is to there.
  9. The golden rule is that “students carry the load” and it is perfectly okay to even walk out of the class if none of the students are prepared.
  10. Always provide a closure at the end of the session.


Listed below are some take-away points from the session:

  • A public holiday can be a good opportunity to try the flipping approach.
  • Take your time to get ready to flip and work with only what works for you.
  • Experiment — have fun!
  • Do not use technology just because your colleagues are using it.


Pedagogical advantages that Flipped classes offer

Through this talk, Ashish and Laksh shared from their experience what an effective flipped classroom should take into account:

  • Students come to class much more prepared than they otherwise would and the collaboration in teams for group work improves the classroom experience
  • Students challenge one another during class in a positive note which enhances learning.
  • Student-led tutoring and collaborative learning forms spontaneously.
  • Discussions are led by the students where outside content (cases, research articles, problems posed by peers) is brought in and expanded.  These discussions and interactions in the class typically reach higher orders of critical thinking.
  • Students take ownership of the material and use their knowledge to lead one another without prompting from the teacher.
  • Students ask exploratory questions and have the freedom to delve beyond core curriculum.
  • Students are actively engaged in problem solving and critical thinking that reaches beyond the traditional scope of the course.
  • Students are transforming from passive listeners to active learners.


Q & A Session

Following the presentations by Ashish (AL) and Laksh (LS), a lively discussion ensued and listed below are some questions from the subsequent Q & A session.

Q:  I’m doing a course online in Coursera and they have about 15-20 mins lectures with full transcripts of the lecture in PDF files. Do you provide transcript for your online presentations?
LS: No, I do not provide transcripts. Instead, I provide PDF files of my clean PowerPoint slides and may sometimes even include a few extra slides along with my notes. If I use the transcript, then I am not the teacher that I am.
Q:  Could Talking you elaborate a little bit more on the post-production of the videos? Do you do any?
LS:   
AL:
Sometimes I don’t start with the best possible way. When I am really happy with the 1st 2 slides, I have already spent 10-15mins. Then I get my “flow” better and am able to complete the lesson faster. With the current version of Camtasia Relay that I am using, I am only able to remove the start or end of the recorded videos (e.g., first 8 minutes or the last few minutes of the lectures).I use Camtasia for Mac which allows me to edit, however I do not do too much of the post-production either.
Q:  Have you used Breeze and Catamsia? How do you rate the two applications?
LS: I like both. Since my teaching requires the use and demonstration of multiple software applications at one time, I prefer using Camtasia, due to its screen capture capability.Note:With the release of the new version of Breeze, Breeze (Adobe Presenter 8) also has the screen capture capability.
Q: I like your idea of using a tablet. But it is quite expensive in NUS tender pricing, though it is not the case in the open market. Probably CDTL should talk to Computer Centre on this matter.
A Participant: One other alternative is the Wacom tablet although the tablet PC will be better.
Q: How do you choose cases?
AL: I choose cases from all over the world from all sorts of countries.  There might be preconceived notions about certain countries. So when choosing cases, one has to be as neutral as possible.
Q: How do you contribute to their learning in case discussions?
AL: It is very transparent process. People can decide for themselves how they fared. The process of case discussion is the product. I need to persuade. I need to listen. I need students to raise their hands. They should be better at case discussion – in week 13 than in week 1.
Q:  How do you bring students back onto the right track when they start to veer off track without insulting them?
AL: Nobody likes to be told off, so try to anticipate it. They want to talk about what is foremost in their minds. These are teaching cases and help to explain a certain concepts. I do not leave a class till I achieve my teaching objectives but I do not drag the class for 2 or 3 hours. There is a certain amount of energy when students come in fresh into the class. But if you stretch the discussion too much, they get distracted. These are people issues, I do not think of them as teaching issues.
Q:  How do you encourage students who are shy in participating in the case discussions?
AL: I agree with Laksh that we need to engage students. However, I do not always like to communicate through email as I feel students use technology to hide. I want to see students in person, talk to them about their problems in confidence, little bit of pep talk.It is not absolutely true when students claim that Asians are shy while Westerners like to talk. Because once these students leave the class, you hear them talking so loudly. So, during the first few weeks, I meet with students who are particularly shy. For instance, I had a student who thought her English was bad and would not speak up in class. So when I meet such students I emphasize to them that if I can understand them, their English is fine. One of the things I do to encourage these students is that I give these students the opening question, and tell them “when I ask that question in class, I will look in your direction and if you want to answer it you can”. This encourages them to start participating, and once they are nudged to start speaking, they will gain confidence.
Q: Does the use of case method have a limitation in class size?
AL: Currently, I have a maximum of 50 students. But, scaling up is not a problem. The more the merrier, the diversity of views is important. The only problem would be in remembering the student names for grading class participation. For the case classes in other leading universities, classes are recorded and a seating plan is already in place with a careful mix of race, gender, nationality, etc. But we do not have that kind of support.
Q:  You talked about wrapping up the class and not necessarily giving the answers but some students insists on getting the answer.
AL: Once we get to the recommendations, all I am looking for is plausibility. All we can assess is if they can apply a conceptual framework. I usually have cases where you need to crunch some numbers so there are right and wrong answers for that part, but otherwise I emphasise that every case will have different information and all they need to do is to apply their skills to look for plausible recommendations given the information in the case.
Q:  Do students get defensive when they come and present solutions in front of the class?
LS: Not really, as students are generally open to feedback and criticisms from their peers. Though Students do not have marks for the participation, there is usually a lot of discussion and debate that happens during this segment. These discussions and interactions in the class typically touch higher orders of learning.
Q:  Did you take a video of the actual class discussion?
LS: No I did not, though one could easily get it done, if necessary with the help of TAs or student. Such recordings will be essential if one needs to play it back to class, and in my case that was not really necessary.

References

King, G. & Sen, M. (2013) How Social Science Research Can Improve Teaching, (In press) PS: Political Science and Politics.