DMS1401CM blog

Just another Blog.nus site

Chocolate and ICE CREAM!!

The 4th chapter introduced us to chocolate and ice cream! It’s pretty apt to learn about ice cream now especially because Haagen Dazs ice cream has been on promotion for a while now so there’s always at least one pint of it in my freezer. If I remember correctly, at one point in time there were 6 pints… I mean, 3 for $25, how not to buy right? So yes, it was cool that I got to learn more about ice cream in school during this period of time! As for chocolate, I’m not the biggest fan of it but I do love dark chocolate, especially the ones that melt in your mouth.

Image result for awfully chocolate truffles

Chocolate truffles from awfully chocolate. Heaven in my mouth.

Workshop experience!
1. Making chocolate mousse

Expectation:

Picture of chocolate mousse adapted from https://www.spicebangla.com/chocolate-mousse-recipe/

Chocolate mousse is an airy chocolate dessert typically made by mixing melted chocolate with whisked eggs and whipping cream. In this recipe (https://www.onceuponachef.com/recipes/chocolate-mousse.html), chocolate is first melted together with butter and left to cool. Then, egg yolks are incorporated into this mixture. Egg whites and sugar are then whisked separately until stiff peaks are formed. This is then folded together with the chocolate mixture. Heavy cream is then beaten together with vanilla extract and sugar until medium peaks are formed. Finally, the chocolate mixture is combined with the heavy cream mixture and there we have it!

Reality:

I was quite surprised by the number of ingredients that we used (or lack thereof). I expected that we would have to use at least some form of whipping cream or heavy cream together with chocolate but no we only used chocolate! My group (fortunately or unfortunately) got this brand of chocolate that has no sugar added. 

This is the brand of chocolate my group used

The first thing we did was break up the chocolate into small pieces so as to facilitate melting!

Bowl of chocolate before melting!

Then we added hot water into this bowl of chocolate and mixed it to melt all the chocolate. After that, we whisked the melted chocolate while cooling the mixture down by placing this bowl into a bigger bowl of ice.

Here’s a video of us whisking the chocolate: IMG_2251

After whisking diligently, many groups eventually achieved the mousse texture except ours and another group that used this same brand of chocolate! We eventually concluded that it might be because of the lack of sugar content in the chocolate we used. I’m still not quite sure how this can be scientifically explained though. It definitely has to do with the inability of this chocolate to stabilise pockets of air to form the mousse texture. Maybe we should have compared the ingredients in detail instead of just focusing on the amount of sugar. I’m guessing that it might have to do with the amount of cream or egg because these are the ingredients that can actually foam up on whisking due to the formation of a protein network, but that’s just my guess!

Eventually, we added dry ice into the mixture (haha…) in hopes that the cold temperature could help us achieve the mousse texture. (Spoiler alert, it didn’t work.) But it was really fun because the mixture was bubbling and looked like it was boiling instead!

“Boiling” melted chocolate with dry ice haha!

2. Making ribena sorbet

Expectation:

Sorbet is a type of frozen dessert that is typically made from sweetened fruit juice. I think sorbets are the perfect desserts especially in Singapore where it’s warm everyday. From what I understand, sorbets are quite easy to make and the ingredients (fruits!) are also readily available. Although I had expected for us to try making the creamier/richer types of ice cream (like haagen dazs haha), convenience wins!!
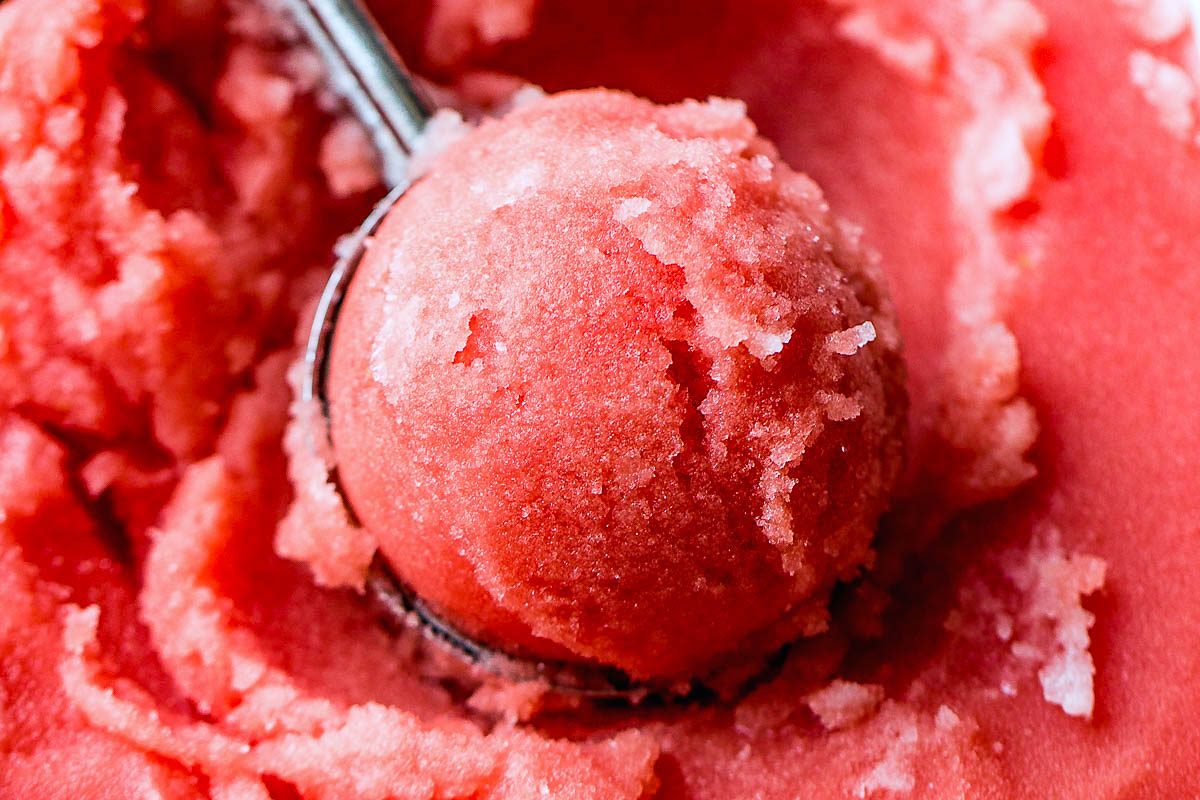
2-Ingredient Honey Watermelon Sorbet - #recipe by #eatwell101

2-Ingredient Honey Watermelon Sorbet adapted from https://www.eatwell101.com/watermelon-sorbet-recipe

Doesn’t it look like the only thing you need on a hot and humid day? Also, look at how easy it is to make!

1. Blend watermelon cubes and honey in a food processor or blender until combined and smooth. Adjust sweetness to your liking with remaining honey.

2. Pour into a rectangular pan and smooth into an even layer. Freeze for 2 hours, or until frozen but still a little soft for scooping. Enjoy!

Yes, that’s all. 2 steps and done!

Reality:

During the workshop, we used ribena instead of fruit juice. I was really excited because ribena itself is already very refreshing, so I could only imagine how much more refreshing ribena sorbet would be! The process was simple as expected. However, instead of using a freezer, we used dry ice to cool the ribena down! The key to achieving the sorbet texture is to stir as fast as possible to agitate the mixture while it is cooling down. This is to ensure that the crystals that form are small. Well, we can imagine the opposite, if there was no stirring after the addition of dry ice, we would probably just end up with a huge block of frozen ribena.

Here’s a video of us making the sorbet! IMG_2254

I didn’t take a photo of the final sorbet but here’s a photo from Sirin!

Sirin’s ribena sorbet!

The sorbet was really easy to make and super refreshing, just as I thought it would be!

Baking!

Making pancakes in school!!

This week, we had our most hands-on activity thus far, and that was (as the header suggests), making pancakes from scratch in school! I was extremely pumped up for it because who would have imagined making pancakes in a university library, right? Also, I do have a sweet tooth so I was also looking forward to eating them afterwards (:

My group attempted to make japanese souffle pancakes. Gosh, we failed… Unfortunately… I’ll list out a few possible reasons why we didn’t succeed and also some of the challenges that we faced, without which maybe we could have gotten better results (hopefully?).

Challenges/Mistakes
  1. There was a limited number of weighing scales available, and knowing that japanese souffle pancakes will take a longer time to make, we eyeballed most of the ingredients. (Whoops)
  2. Manually whisking egg whites until stiff without a handmixer was definitely a workout. I used to bake at home so I know how much effort it takes to whisk egg whites until they form stiff peaks, even with a handmixer. Let alone with a manual whisk! We definitely did not achieve the right consistency, even though we took turns and tried our best to whisk as fast as we could.

    This is me whisking and wishing I had brought the hand mixer from home T.T

  3. We weren’t sure if we added sugar in too early into the whisked egg whites. Maybe that’s why it didn’t form stiff peaks?
  4. Mistaking a cup of egg white for oil and adding it into a mixture that was not supposed to contain egg white… Yep, it happened.

Our pancake turned out to be… honestly, not fluffy at all! It was rather dense and dry, which is completely not what japanese souffles are supposed to be like! Although we didn’t succeed, I still did enjoy the process!

All smiles!!

The end product… hahaha

So what next?

Later the same day, I came across this video on how to make japanese souffle pancakes. There were quite a few valuable takeaways I got from it!

  1. Adding sugar into the meringue foam makes the foam finer but slows down the foaming process. Referring back to challenge #3, I guess this answered my question!
  2. They added water onto the pan while cooking the pancakes. My guess would be that this reduces the water loss from the pancakes (so that it doesn’t turn out dry). And it might also help to prevent the temperature from going up too high since water would absorb some of the heat.
  3. Using a mold while cooking pancakes to achieve the shape and thickness of the pancake.
  4. Adding cornstarch to the batter to make the pancake tougher. Although japanese souffle pancakes are supposed to be fluffy and light, one downside is that they flatten easily. Adding a small amount of cornstarch will result in a firmer pancake that doesn’t flatten as easily.

Link is here: https://www.youtube.com/watch?v=i3SktcOL4ko

I really want to give this another shot at home (especially with a hand mixer and not adding in the wrong ingredients) but I haven’t had the time to do so yet. I’ll definitely try it again as soon as I can find time to!

Some science behind japanese souffle pancakes!

Following up on challenge #3, I wanted to know why sugar slows down the foaming process. And here’s what I’ve found!

What happens during the whisking of egg whites is that the proteins will unfold and cross-link to form a network, which contains and stabilises air bubbles. When sugar is added to the egg white, it dissolves in water (from the egg) to increase the viscosity to further stabilise the structure.

When sugar is added too early (before the egg whites are whisked thoroughly enough), the sugar granules will interfere with the unfolding process of the proteins. This results in a weak network and thus the egg whites will not be able to stabilise air bubbles. On the other hand, if sugar is added too late, 2 things can happen. First, the sugar draws water out of the foam, which weakens the structure. Secondly, the sugar might not dissolve completely. It is therefore important to add sugar at the right time! It is recommended to add sugar after the egg whites get foamy but before they start to form peaks. This sweet spot would definitely take a lot of experience and practice!

Main takeaways from readings

If I had to choose 1 thing that peaked my interest the most in the readings, it would be the purpose of each ingredient in baked products such as bread/cakes/cookies etc. The table on page 524 of the book by Harold McGee summarises these information rather effectively. There are 11 types of ingredients listed in the table, all with different purposes and effects on the structure of the product. Some examples include:

  1. Sugar is a carbohydrate that weakens the gluten network and absorbs moisture, thus tenderizing the product and preserving moisture.
  2. Salt is a purified mineral that tightens the gluten network and makes dough more elastic.
  3. Eggs contain proteins, fats and emulsifiers (in the yolk only). The proteins will coagulate during cooking, supplementing the gluten network. On the other hand, fats and emulsifiers weaken the gluten network. Emulsifiers also help to stabilise bubbles and starch.

I used to bake from time to time a few years ago. I’d bake things like cookies, cakes, brownies and pancakes! I always came across this phrase – add a pinch of salt – in recipes and wondered why, but never took the extra step to figure it out then. I was curious about it because I never saw the purpose of adding salt into cookies since cookies aren’t meant to taste salty, right? I could understand why we would add sugar, but salt? Now I finally have the answer!

Chapter 2 Reflections

Workshop experience

During the fermentation workshop, we learnt about the fermentation of Kombucha. Prior to the workshop, I never heard of kombucha and never knew that tea could be fermented. In essence, kombucha is a fermented tea beverage, which is fermented using a symbiotic culture of bacteria and yeasts (SCOBY). It is slightly alcoholic due to the presence of yeast, and slightly acidic due to the presence of bacteria. The fermentation period can be varied depending on preferences of the consumer. For example, if someone prefers the beverage to be more sour, then the fermentation period should be extended so as to allow more acids to accumulate in the kombucha.

During the workshop, we were all given a jar and a bottle to bring home and try fermenting kombucha on our own at home.  This is what they look like after a week. It looks like a layer of cellulose has formed on the surface.

I noticed that there were a lot of bubbles that formed. I think that these bubbles should be filled with carbon dioxide as yeast produced carbon dioxide as they respire.

The presenter touched on an interesting topic which is “Fermentation vs Spoilage”. I think it is a very relevant topic that we will all face from time to time in our daily lives. He shared that fermentation is deliberate, desired and palatable, whereas spoilage is uncontrolled, unwanted and unsafe. However, I think that it is still quite difficult for typical consumers (like myself) to judge if a fermented food is still edible. I face this problem at home as there is a container of kimchi in the fridge and every time I consider taking some to eat, I would take a sniff first and I’d feel uncertain because it does smell like spoiled food. Now looking at the kombucha from the workshop, I cannot deny that I am still feeling uncertain about consuming it because I am no expert in fermenting foods and I don’t think that I have enough knowledge to conclude if the kimchi/kombucha I have at home are still edible or not. I would feel a lot more comfortable eating such fermented foods in restaurants or prepared by people who are properly trained. However, I do think that DIY fermented foods are really interesting. I hope that this knowledge gap between typical consumers and fermentation experts can be bridged, so that we can comfortably ferment our own foods at home from time to time.

Chapter 1 Reflections

Among the content videos tied to chapter 1, I found the video on taste & smell to be particularly interesting. In terms of learning, I learnt a lot more in the aforementioned videos as they introduced more concepts (especially in biology. For eg. the nervous system) that I was not previously exposed to. The other videos mostly covered content that chemistry majors (like myself) are already familiar with. However, it was interesting to see how these basic concepts were presented in such an engaging manner in the videos so I still enjoyed watching them even though they were prior knowledge!

In the video titled “Taste & Smell: Crash Course A&P #16”, I learnt that the sense of taste (gustation) and smell (olfaction) are chemical senses. The process of us smelling and tasting things can be fully attributed to detecting the molecules around us. One very interesting learning point is that each olfactory neuron has receptors for only one kind of smell (aka one chemical). In fact, it is the different combinations of some 40 million olfactory receptors that allow us to be able to identify over 10,000 different smells. Before watching the video, I had a much simpler assumption on how our sense of smell worked. I never would have thought that our olfactory receptors were specific to only one type of chemical. It is interesting how vast the possibilities of combinations can be. The video also mentioned that the typical tongue diagrams that depict the distribution of taste buds are wrong! This came as a surprise to me because I never had doubts about those tongue diagrams. I remember referring to such diagrams when I was younger and I would consciously concentrate bitter foods at the tip of my tongue because the “bitter zone” is located towards the back of the tongue. I don’t remember if I arrived at any conclusion back then, but I guess now I know that it shouldn’t have much of an impact on taste since research has shown that variations in sensitivity around the tongue and insignificant! Maybe I will test this out again the next time I get my hands on extra bitter/sour foods!

In week 1, we had gone through a workshop on coffee brewing. Overall the workshop greatly broadened my horizons in the field of coffee. I never understood and appreciated the wide range of drinks available at cafes (eg, starbucks) because I never looked into different types of coffee and coffee-related concepts/processes such as brewing. Through the workshop, I learnt a lot about the multitude of factors that affect the eventual taste of a type of coffee. These include the type of coffee bean, the brewing time/temperature, grind size and the ratio of coffee grounds to water etc. The most striking thing to me was the significance of brewing and how there are so many variations in the brewing process. The same type of coffee bean will produce coffee of different tastes if brewed for different periods of time. For example, bitterness is achieved by brewing for a longer period of time. Before the workshop, I had thought that it was just the type of coffee bean and amount of milk/sugar that determined the taste. Now I realise how complex coffee making actually is and how much skill and knowledge goes into making the perfect cup of coffee!

Hello world!

Welcome to your new Blog.nus site. This is your first post. Edit or delete it, then start blogging!

Please remember to the Terms of Service:
1. Please use the blog for academic, educational, research and administrative purposes only.
2. Please adhere to Singapore laws and the NUS Acceptable Use Policy for IT Resources: https://nusit.nus.edu.sg/services/it_security/acceptable-use-policy-aup/
3. The Centre for Instructional Technology and National University of Singapore are not liable for any legal or financial issues which may arise as a result of your use of Blog.nus.

Also, a few disclaimers:
1. Content on Blog.nus and all blogs hosted on Blog.nus contain opinions which may not represent the official views of the National University of Singapore.
2. The Centre for Instructional Technology and the National University of Singapore are not responsible for the content of external internet sites. Such websites are subject to their own data protection and privacy practices and you are encouraged to examine the privacy policies of those websites.

We hope you enjoy your new blog.

© 2024 DMS1401CM blog

Theme by Anders NorenUp ↑

Viewing Message: 1 of 1.
Warning

Blog.nus accounts will move to SSO login, tentatively before the start of AY24/25 Sem 2. Once implemented, only current NUS staff and students will be able to log in to Blog.nus. Public blogs remain readable to non-logged in users. (More information.)

Skip to toolbar