Month: November 2017

Singleton connection with promise-mysql

When using promise-mysql, we often want a singleton connection created in a .js file:
module.exports = mysql.createConnection({
  host: 'localhost',
  user: 'root',
  database: 'mydb',
})

then files for different routes will import and use it:
const connection = require('./connection');
router.get('/', (req, res) => {
  connection
    .then(conn => conn.query('SELECT * FROM table WHERE id = ?', req.body.id))
    .then(rows => res.send(rows));
});

However, calling connection.then(conn => ...) for every routing function is somewhat troublesome.

In ES6 modules, variables are exported as immutable bindings rather than values. Hence, we can do the following:
let conn;
mysql.createConnection({
  host: 'localhost',
  user: 'root',
  database: 'mydb',
}).then((connection) => { conn = connection; });
export { conn as default }

Now we can use conn directly in routing functions:
import conn from'./connection';
router.get('/', (req, res) => {
    conn.query('SELECT * FROM table WHERE id = ?', req.body.id))
      .then(rows => res.send(rows));
});

How cool is that? :p

As even Node 9 does not support ES6 modules, Babel has to be used to transpile the source, which wraps the exported value as an object to achieve to same effect.

Note: for some peculiar reason, the export default conn syntax does not export conn as live binding.

Deploying a React Native app

I first started mobile development in native iOS with Swift 3.0 and XCode 8.0. Swift was a very new language with fancy syntactic sugars such as trailing closures, type inference etc. With the exception of string manipulation, I generally enjoyed coding in Swift.

The same cannot be said for XCode. It’s arguably the worst IDE I ever had to use. Major issues include random hangs/crashes (especially with the Storyboard), slow compilation time, and bad user interface (for one, I frequently misclicked on breakpoint), broken/strange auto-format rules. It didn’t even have code renaming/refactoring back then!

As for Android, needless to say, most people avoid Java if they have a choice.

Fortunately, React Native soon became mature enough to replace native app development.

A React Native app is a real mobile app

With React Native, you don’t build a “mobile web app”, an “HTML5 app”, or a “hybrid app”. You build a real mobile app that’s indistinguishable from an app built using Objective-C or Java. React Native uses the same fundamental UI building blocks as regular iOS and Android apps. You just put those building blocks together using JavaScript and React.

Benefits of React Native:

  1. Very similar to React.js. Learn once, write everywhere!
  2. Most of your code would run on both Android and iOS perfectly. Write once, run everywhere!
  3. More reusability between mobile and web version. If you have written some front-end logic in Javascript, you can easily share it between your mobile and web versions. Even UI components could be made to be reused through react-native-web, though native component designs might not be suitable for your web version.
  4. Much better development environment! With live/hot reloading, you can see your changes in <1 sec instead of waiting several seconds for XCode/Android Studio to compile!
  5. Retain the flexibility to incorporate native modules when necessary.

To  create a React Native app, we have 2 choices:

  1. react-native init: a standard and bare minimal React Native app
  2. create-react-native-app: the native parallel to create-react-app. Comes with Expo SDK.

More on Expo SDK

Expo apps are React Native apps which contain the Expo SDK. The SDK is a native-and-JS library which provides access to the device’s system functionality (things like the camera, contacts, local storage, and other hardware). That means you don’t need to use Xcode or Android Studio, or write any native code, and it also makes your pure-JS project very portable because it can run in any native environment containing the Expo SDK.

Expo also provides UI components to handle a variety of use-cases that almost all apps will cover but are not baked into React Native core, e.g. icons, blur views, and more.

Finally, the Expo SDK provides access to services which typically are a pain to manage but are required by almost every app. Most popular among these: Expo can manage your Assets for you, it can take care of Push Notifications for you, and it can build native binaries which are ready to deploy to the app store.

While the pitch makes it sound like the holy grail to React Native development, it does come with some drawbacks (un-ejected):

  1. No access to native modules
  2. No asset bundling (assets have to be downloaded online from Expo Cloud when user first open the app). Asset bundling feature is planned in the next release though (v24.0)
  3. Larger app size (from my own experience, it increases the size by ~30 MB for iOS and ~8MB for Android)

 Microsoft Code Push

Expo comes with “Over the Air” updating, meaning if you did not alter any native codes (not possible for an unejected Expo app anyway), you can deliver changes in your Javascript code instantly to your user the next time they restart the app, instead of waiting ~2 days for App store review of your updated app!

However, if you choose not to use Expo for the above or other reasons, then Microsoft Code Push is the tool of choice in distributing your app over the air.

Apart from the instructions in the documentations, I had to add google() to gradle’s buildscript/repositories for Android, and set Code Signing Style to Manual in Build Settings for iOS, for App Center to successfully create a signed build.

As seen above, it comes with complete CI/CD pipeline, auto building, testing and distributing your app whenever a new commit is made. Additional functionalities include crash reporting, analytics and push notifications! Yet another great addition to my automation tool belt!

Persisting user settings in mobile/web apps

For almost any apps, there is a need to persist user settings. Ideally, these settings should be persisted both on server side and locally so that it can be synchronised across device and retained for offline usage. Even if you do not intend to offer offline functionalities, you’d still need to store the authentication token locally to use it to fetch the matching user’s settings from the server.

One possible solution is to use Firebase, which provides a realtime database specially designed for this purpose.

However, if you do not want to tie down your app to Firebase, or if your app only requires local storage, then you can manage it on your own through the LocalStorage interface provided by the Web API, or AsyncStorage in the case of React Native apps.

If you are storing all user settings in the Redux state, then there is an easy solution: redux-persist. With just a few simple API calls (well documented in the Github repository), it’d automatically persist your redux state locally after every state changes and rehydrates it when user reopens the app.

In the recently released version (v5), it added cool new features such as delaying the rendering until rehydration is complete, adding versions to the persisted state for migration when state tree structure is updated.

If there’s any part of the Redux state tree that you do not want it to persist (most commonly the routerReducer), then you can make use of the blacklist/whitelist config. If you need to blacklist/whitelist a nested state in a reducer, you might need to add in the redux-persist-transform-filter package.


Deploying a modern web application

In this post, I’ll outline the tools I used to automate Continuous Integration and Continuous Delivery of a web application so that every team member can focus on what’s important: writing code.

1. Continuous Deployment of front-end

With Git/Github driving continuous integration, how can we automate the process of building the source from last commit and deploying it to the live website (for the production/master branch)?  My previous tools of choice were Github pages + Travis, but Yihang introduced to me a more feature-rich solution,  Netlify:

Netlify is an all-in-one platform for deploying and automating modern web projects.

Simply push and Netlify provides everything—servers, CDN, continuous delivery, HTTPS, staging environments, prerendering, asset post processing, DNS, and more.

Any project, big or small, can perform instantly on a global scale.

With Netlify, every time you make a commit to the production branch, the configured build command will automatically be executed and the build folder will be deployed to a subdomain provided by Netlify (eg. vis.netlify.com).

2.  Continuous Deployment of back-end

I host my back-end (which serves RESTful API to the front-end) on AWS EC2. I make use of Travis CI to build the source (not needed for NodeJS apps not using transpiler) and upload it to Amazon S3, and trigger new deployment on AWS CodeDeploy whenever a new commit is pushed to Github. Lastly, for NodeJS apps, I run pm2 with the command

pm2 start ./bin/www --log-date-format='YYYY-MM-DD HH:mm:ss' --watch

for logging and to automatically restarting the server when CodeDeploy uploads new build files to the EC2 instance.

3.  Custom domain

The domain name registrar I’m using is namecheap.  For the back-end, I make use of AWS ELB‘s Certificate Manager for provision of the SSL/TLS certificate.

As ELB does not have a static IP address, we cannot use A record to point namecheap domain to the ELB directly.

The solution is to set namecheap’s name servers to AWS Route 53‘s to use it as the custom DNS manager and give AWS complete control over the domain. Then, I create an A record in Route 53 to point to the ELB target, which forwards traffic to the EC2 instances.

For the front-end, I created CNAME records in Route 53 to point the custom domain to the subdomain provided by Netlify.

My final Route 53 Hosted zone configurations:


As Route 53 is not completely free (though it’s dirt cheap), a workaround to avoid using Route 53 is to create a subdomain (eg. www.example.com) to point to the ELB with a CNAME record (which root domains are not allowed to have), then use domain forwarding to forward example.com traffic to www.example.com. The disadvantage of this approach is that it makes your website URL slightly longer (“www” is enforced).

4. Forced HTTPS

Netlify supports automatic TLS certificates with Let’s Encrypt.

To redirect HTTP traffic to HTTPS for the front-end, we can simply configure it under Netlify’s domain management HTTPS settings:

Debugging a Redux app

One key advantage of Redux is making the app’s state mutation obvious, predicable and easy to manage.

Yet, in a complex application with several connected / asynchronous actions, debugging is still an inevitable eventuality.

Since the dawn of programming, debugging has been a tedious process that plagues every software developers. A myriad of debugging tools has been developed to ease the pain, at varying success rates.

In this post, I’ll explore our available options in debugging a Redux web/mobile application.

1. Manual logging — the naive way

If a reducer does not appear to be working, we can simply add console.log statements to print the previous state, action and the next state:
case EDIT_COMMENT: {
  console.log('prev state', state, 'action', action);
  const copy = state[action.questionId].slice();
  copy.some((comment, index) => {
    if (comment.commentId === action.commentId) {
      copy[index] = { // create a new obj as comment is not deep-copied
        ...comment,
        text: action.text,
        date: action.date,
      };
      return true;
    }
    return false;
  });
  console.log('next state', { ...state, [action.questionId]: copy });
  return {
    ...state,
    [action.questionId]: copy,
  };
}

Obviously, it’s rather tedious to do this every time u want to debug a reducer, and sometimes you might not be able to pinpoint which reducer is problematic, in which case you might end up manually adding it for all your reducers.

2. Redux-logger  — the lazy way

Redux-logger is a middleware that basically does the above process for you automatically: prints all Redux state changes and logs them.

To use it, we simply add it to our middleware

import logger from 'redux-logger';
const middleware = [thunk, routerMiddleware(history)];
if (process.env.NODE_ENV === 'development') {
  middleware.push(logger);
}
const store = createStore(reducer, applyMiddleware(...middleware));

And every state changes will now be logged to the console:

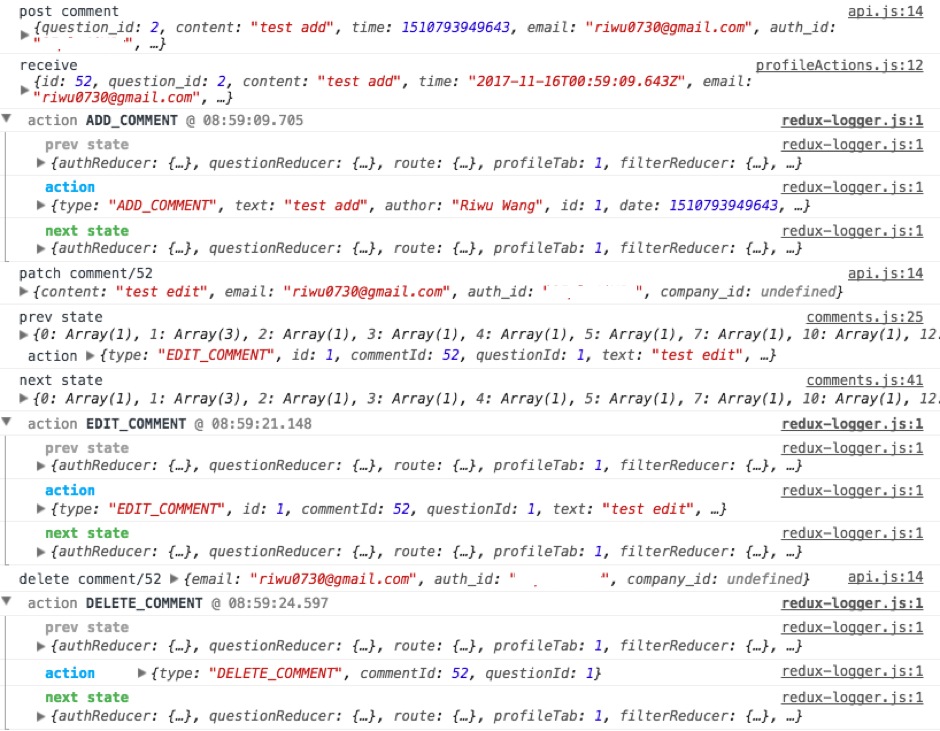
This is convenient, but it makes your other console.log statements hard to spot (unless you use a different level of logging for the rest of your applications, say console.warn). Furthermore, you have to examine the state one by one and figure out which part of the state changed manually.

3. Redux-devtools — the smart way

Like redux-logger, redux-devtool also logs all the state changes, except that it presents in a separate window with a much nicer GUI:

To use it, we simply download the extension and add it as a composer in `createStore`.

const composeEnhancers = (process.env.NODE_ENV === 'development' && window.__REDUX_DEVTOOLS_EXTENSION_COMPOSE__) || compose;
const store = createStore(
  reducer,
  composeEnhancers(applyMiddleware(...middleware)),
);

Or in React Native environment:
import { composeWithDevTools } from 'remote-redux-devtools';
...
composeWithDevTools(applyMiddleware(...middleware)),
...

As seen in the above screenshot, the tool also compute the state diff after every action. It also comes with various additional features such as time-travelling*, state tree overview and a nice chart:

As cliché as it sounds, this is an essential tool for all Redux developers!

4. Redux-logger-server — the masochistic way

This is a tool that does the exact same thing as redux-logger, except it logs to your server instead.

Why would anyone want to pollute the server log with redux state changes?

I supposed its only purpose is to try tracking down a bug that your clients are reporting but neither of you could replicate it deterministically.


* for your Redux state

© 2024 Course Reflection

Theme by Anders NorenUp ↑

Skip to toolbar