
Teaching reflections
My teaching reflections on teaching different modules and using different tools can be found summarized in the padlet. Click here
Pecha Kucha Presentation
The Pecha Kucha (PechaKucha.com) is a 20slides x 20seconds presentation format, giving us 400 seconds to convey our message. Recently at the NUS Higher Education Campus Conference (HECC) 2019, a few colleagues and I have shared our teaching practices and experiences via Pecha Kucha.
I have made a recorded version of the presentation for sharing of the presentation as well as to help you understand how the Pecha Kucha format works. Hope you enjoy the sharing!
E-Learning in the face of a pandemic
I believe that eLearning can be as meaningful as physical learning. But the interactive touch with the teachers also need to be present. There are many types of eLearning ranging from video lectures, webcast, online discussion forums and etc. I think that the effectiveness of the eLearning will lean more towards student’s efforts to tune in to these resources and to make use of these resources to facilitate their learning. There should still be channels for interaction with the instructor, be it a forum or online consultation, to reinforce the concepts or for clarification.
Here are some of the E-Learning mode i have provided recently and the tools that I use to create the resources:
WEBCAST
This is mainly provided by our University IT support, where a recording during our lecture session will be made. Quality is good if you use the mic and capture the sound. One feature i like is that LTs like LT6 allow 2 screen projection, So i can keep my powerpoint on one side and also do demo/derivations on the visualiser that will be beamed on the other side. Both sides are captured during the recording simultaneously and so its really nice.
SCREEN RECORDING
For lectures where i have to do self recording during the lecture session, I used screen recording tool Panapto on my laptop. This is a bit tricky in terms of recording the voice. As we walk around during lecture. Also, as i am using a Surface Pro with smart pen. The writing on the laptop screen causes very noisy background sounds and makes the video very difficult to hear. My solution for this was to use my Trekz Titanium bluetooth (bone conduction) earpiece with built-in mic for the voice. Works very well as its hands free and wire free.. And because its bone conduction, it does not hinder my hearing. Downside is because I’m using my laptop, it doesn’t capture my writing on the whiteboard or on the visualizer. Since I’m aware of this, I try to keep my writing on the laptop as much as possible since it has a smart pen. Also, screen capture works very well when doing demo on software like Excel and Matlab.
SELF RECORDED LECTURE
I started this when I missed my lecture due to CNY this year. So we can record in our own office or at home. I used Panapto mainly because it allows the ppt slides to be captured very well and that students can skip to the slides they want to focus on if say they are watching for the 2nd time. In LumiNUS, we can analyze the statistics and see how many students watch the videos and also how much (%) they watched. Self-recorded lecture tends to be faster paced that webcast as it lacks the interactions with students. In future, i will plan to put in activities like a quiz in intervals during the recording.
SELF RECORDED TUTORIAL
Tutorials are different from lectures, lots of explanations and writing. As such, i used Camtasia which has an easier editing toolbox. Camtasia is also screen capture and I used it in making tutorial videos. For the writing and derivation part, I use a self-made visualizer (Out of recycled materials) together with Whitelines paper to capture my writing and explanation.
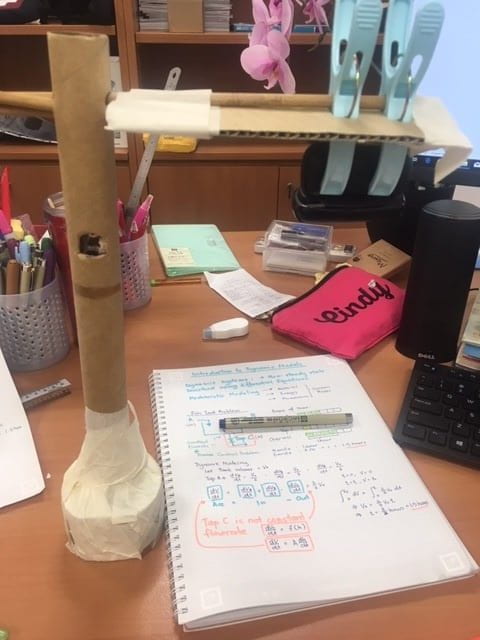
Makeshift visualiser (document camera) using kitchen paper roll, chopsticks, masking tape and clothes peg.
The screen capture tool allows me to toggle easier through the writing, Excel and MATLAB demonstration.
One alternative that can be used is the ZOOM online webinar/classroom teaching. This can be used to facilitate e tutorials and e consultations. CIT provided timely training on the use and functions of ZOOM, helping us to get ready to use them in our teaching.
In my tutorial session, I have even played a game of KAHOOT with my students online. Using the screenshare function in ZOOM, students participating in the class online can also take part in the KAHOOT quiz.
DISCUSSION FORUM
For Discussion, I used Padlet as the platform to allow students to ask questions and comment on the module. In the beginning of the class, this is not adopted were much by students, but i see students warming up to its use. Perhaps at the beginning, they still not very clear on what to ask etc. Padlet is very easy to use and very convenient for us to keep an overview of the topics of interest or concern to the students.
OTHERS
- KAHOOT for Quizzes during Flipped classroom sessions.
- Using Poll on LumiNUS on students’ preference on elearning or F2F sessions during the initial stages of the virus situation
- Using Survey on LumiNUS to facilitate contact tracing by students.
If there are any queries or suggestions about any of the abovementioned methods/ tools, please feel free to have a chat with me on chellyc@nus.edu.sg