Category Archives: Technology in Pedagogy

Teaching Large Classes: Technology to the rescue!

Technology in Pedagogy, No. 12, October 2012
Written by Kiruthika Ragupathi

Large class sizes are very common on university campuses, and teaching such large classes can be extremely demanding. For new teachers, the task of lecturing 300-400 students in huge lecture theatres may be intimidating particularly at the beginning of term. However, the feeling usually eases out with experience and after the very first lecture. As the term progresses, the bigger challenges that emerge are catering for diverse student capabilities and explaining the same concepts multiple times (via email or in person) and finally, marking, sorting and entering marks for a large class at the end of the semester is not an easy task either.

In this session, Dr Akash shared his experience on how some technology-driven solutions can be used to address these challenges. The solutions are designed to engage students’ specifically in large classes and also help lighten the workload of faculty members. The tips and tricks he shared were classified into three broad areas:

  1. Explaining concepts with ShowMe App,
  2. Conducting lecture quizzes, and
  3. Managing and sorting exam scripts.

Explaining concepts with ShowMe App

At NUS, the class sizes are large for introductory or Level 1 courses with hundreds of students assigned to a single instructor. Typically the demographic of such large foundation classes are composed of students with varying degrees of knowledge and background and also varying learning styles. Thus, some of the challenges faced in such large classes include:

  • Lectures being generally targeted towards average student understanding
  • Explanations to be customized for weaker/stronger students
  • Repetition of the same concept for multiple times
  • Frequent answering of questions over emails/forum

All of these may sometimes be inefficient and insufficient, particularly when elaborate illustrations might be required to solve problems posed or questions raised, particularly when static images may not be sufficient. Hence in an ideal situation, it would be good if the lectures are recorded as video clips when particular concepts are explained to a small group of students and make them for the entire class to refer to it whenever necessary.

Dr Akash was aspiring towards this kind of model and found many iPad Apps for the purpose which could allow adding a voice annotation to a PDF file, while others allow making text notes and adding audio at various parts. However, he only found a few apps which could allow him to actually record the screencast as he explained the concepts to his students – ReplayNote (Paid App that costs US$4.99) and ShowMe (Free).

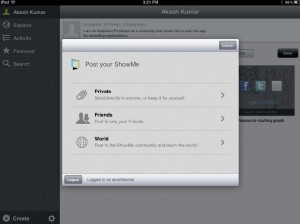
Dr Akash chose to use ShowMe App, as it allows him to work easily using the iPad as a scratch paper and record the video as he draws while also synchronizing the audio. The entire video could then be uploaded to ShowMe database and can be made available to everyone in the world (if you like) or provide access to a specific group by sharing the link with the students. The video can easily be downloaded for uploading to IVLE Mutimedia bank and be published in the IVLE workspace.

He also cautioned that only images can be included in the application, but in reality instructors often use PDF files. Therefore whenever PDF files are to be used, a screenshot of the page can be taken with any PDF viewer available on the tablet. The page could then be cropped using any built in Photo editor. He felt that when illustrating on the tablet, using a stylus pen to write on it would be a better option compared to using the pen.

He shared the 5 simple steps involved in using the ShowMe App:

  1. Install the App
  2. Make an account
  3. Create new videos
  4. Upload and share! Various sharing options are available:
    • Email the link to anyone
    • Use embedded html option from ShowMe
    • Post on Facebook/Twitter
    • Download the video from ShowMe site once it is uploaded
    • Downloaded video has small ShowMe watermark, and can be removed by downloading the video using the embedded video file link
  5. Browse existing videos using the App.

Pedagogical Advantage:

  • Students resonate more with the personal touch of their own instructor and are therefore more likely to subscribe to the concept. The style of the screencasts also conforms to the instructors’ teaching style providing the much needed consistency that students appreciate.
  • The content is tailored to one’s own course and gives you the flexibility to address topics based on the specific the needs of the students in your class (e.g, tutorial questions, assignment tasks, difficult concepts discussed in class, for classes with laboratory components).
  • Gives students the flexibility to review the clips at their convenient time, pace and place.
  • Such screencasts can also be reused with other classes and thus reduces the time taken to produce these clips

 Conducting Quizzes

The second biggest challenge when teaching large classes is to gauge the level of understanding of the topics and materials presented in the classes. The instructor should be able to monitor the progress of class regularly (e.g every 2-3 week time) and ensure that the students are up-to-date with the concepts taught in class. Dr Akash said he employed a fairly simple technique to address this though he could have used other technology-driven solutions like the clickers and IVLE Polls.

For a large class with 350 students, he experimented giving the class 5 short quizzes and assigned 20% marks to those quizzes. However he needed to ensure that his students were not copying from their peers. To make it easier, he used different colour answer papers. This made it easier to ensure that no two neighbours had the same colour answer sheet.

How did Dr Akash do it?

  • Distribute different colour answer sheets
  • Flash four questions on the screen and students answer the questions based on the colour of their own answer sheet.
  • The questions could also be photocopied/printed on 4 different colours, making it easier for students to read questions rather than read it off the projector. 

The similarity in the questions designed makes student feel comfortable that the difficulty level of the questions for his peers is comparable.

It is important to note is that the need for at least 3-4 helpers to distribute and collect answer scripts, and that this exercise takes about 25 minutes to conduct a 10-minute quiz.Dr Akash indicated that he received positive feedback from students for conducting such short quizzes in class. He also felt that this increased participation in forum over the semester. He also initiated a Facebook group where students participated in discussions.

 Pedagogical Advantage:

  • Act as an early assessment strategy that gives early-warning by alerting to problems before disaster develops.
  • Provide formative feedback to the teacher and helps in aligning teaching to students’ learning. For example, the quizzes will provide an indication on how well the class understands things. This allows the instructor to organise and explicitly re-focus content for the subsequent lectures.
  • Promotes discussion, especially peer discussion. When the quizzes are conducted regularly will initiate discussion (e.g., generating arguments for an answer improves the learner’s grasp even if they had selected the right answer), thereby promoting deep learning.

Managing and sorting exam scripts

The next biggest challenge after having conducted short quizzes in large classes is the task of marking, sorting scripts. Overwhelmed with the task of marking and sorting, Dr Akash felt the need for a mechanism to:

  • reduce the time taken to sort scripts
  • eliminate errors in the entry of marks (as it is often embarrassing, when the errors are pointed out by others)
  • a fool-proof and fast method for entering and sorting scripts.

With the need to address the challenges posed, he resorted to using Microsoft Excel for the purpose by using some clever lookup formulas within the Excel worksheet.

Steps involved:

  1. Check uniqueness of last four characters in Matric Number
  2. Enter Marks
    • One person (perhaps TA) reads out the last four characters of Matric number and marks (one participant commented the use of “Speak Cells” option to do the job) while the instructor enters them in Excel
    • Automated functions check if the entry is valid
    • Full Matric number is displayed for cross-checking (Often some wrong entries are found either due to bad hand-writing or wrong numbers being intentionally written)
    • Achieve about 20 scripts per minute of entry
  3. Sort using Excel
    • The basic idea is divide and conquer. The total number of piles that the entire set has to be split into is determined first (e.g. for 300 students you may want 15 piles)
    • The final position given to students’ Matric numbers is already known in Excel, and is used to determine which pile a script belongs to.
    • Each pile is then manually sorted and about 25-30 scripts can be completed in a minute and with only 20 scripts, we often get continuous numbers making sorting rather easy
    • With each pile taking about 3 to 4 minutes, in about 20-25 minutes two people can finish.
  4. Double-check the entry of marks
    • The order of marks in Excel is tallied with the physical sorted list and can be done really fast. Since the order of entering the marks and tallying is very different, the possibility of error after this step is very low
    • The whole process takes about an hour with 400 scripts. In the beginning the process takes longer but gets faster with practice

Dr Akash did a quick demo of the Excel file on how it is being done. This exercise greatly reduced the time taken by the team to make an entry of the marks which would have otherwise take more time and manpower.  (Download the sample excel file)

Q & A Session

The presentation was interspersed with questions for each of the section.

Q:  How popular are the videos with your students?
AK: Very popular during the exam time with the number of downloads increasing rapidly. This could be because it allows students review the video clips as many times as needed to revise for their exams.
Q:  How do you edit the videos created instead of re-recording the entire clip?
AK: I always use 3rd party software like Windows Moviemaker to edit the video by removing the unnecessary portion and replace it by inserting/recording a new clip.  
Q:  Can you prevent the public from viewing the screencast videos you have created?
AK: You can set the viewing rights to private using the ShowMe app or you can convert it to a video, and upload it in the IVLE Mutlimedia.
Q:  Is it possible to type in text instead of writing with the ShowMe app?
AK: No, typing is not possible. However, you can use another app to type in your text, capture as image and insert into the ShowMe app.
Q:  You indicated that participation in the forum increased, but I have students who don’t want to post questions nor share their answers in the forums.
AK: I do not have a problem with that. Probably, you could post the student’s question on the forum and get other students to answer it.I also find that when a Facebook (FB) group is used, students communicate with their peers on academic matters more naturally even if instructors do not initiate questions.

References

  1. A blog post titled “Show what you are thinking with ShowMe App”
    http://blog.nus.edu.sg/thetablet/2012/05/22/show-what-you-are-thinking-with-showme-app/
  2. ShowMe Screencast Video Sample
    http://www.showme.com/sh/?h=mLUOSCe
  3. Facebook group
    http://www.facebook.com/groups/154579507999479/ 
  4. Discussion forum
    https://ivle.nus.edu.sg/forum/forum.aspx?forumid=8d1b154a-7cc8-4baf-824a-3ffb0b7d6443

Using SMS to Increase Interaction with Students during Lectures

Technology in Pedagogy, No. 11, September 2012
Written by Kiruthika Ragupathi

It is well known that interaction during lectures is beneficial for both teachers and students and enhances the teaching and learning process.  Interaction in classes can provide feedback to the lecturers, increase student engagement and promote an active learning environment (Mazur, 1998). However, it is well-acknowledged that to engage students in interactive activities, particularly in large classes, can be very challenging. Classroom Response System (CRS) is one such technology that can be used to enable interaction in large classes.

In large classes, students (in particular, the Mathematics students) are not very interactive says Dr Röllin, an Assistant Professor with the Department of Statistics and Probability. He confirms that his graduate students tend to ask questions during lectures, while that is not the case with his undergraduate students. To better engage his students while teaching large classes with class sizes that from 80 – 200, he opted for using questionSMS (qSMS), an SMS-based Classroom Response System (CRS) developed at NUS. Dr Röllin says it enables him to obtain real-time feedback from his students either through short informal polls or by allowing them to ask questions anonymously.  In this session, he shared his experience on how he uses the qSMS tool to improve interaction with students during his lectures.

 What is questionSMS?

questionSMS is a tool that uses SMS and allows teachers to create questions and SMS codes. Students are then able to SMS their answer to 77577 using the correct SMS code either to participate in asking general questions or in answering the multiple choice questions (MCQ). The SMS codes created start with the first 3 characters of the lecturer’s department that initiates the qSMS and allows up to 5 other characters to be entered.

During his lectures, Dr Röllin says he always has a general question open via the questionSMS tool that allows students to ask questions and raise concerns about the lesson being delivered. He scans through the questions posed by his students during class or during the break either by using an iPad or another laptop to answer selected questions at appropriate times. At times, if necessary he displays the questions and responses to students during the lecture. He employs an online poll to check on the students’ understanding of the lesson. To make it consistent and efficient, he uses a standard code (e.g., (e.g., assign a code using your initials, STAAR) for students to ask general questions during all his lectures. And as the lectures progress, he uses STAAR1, STAAR2, STAAR3,… STAARn for polls and MCQs. Originally, he used the fairly standard method of distributing the questionnaire in class and asking students to complete it before they leave his class. He started using qSMS as it not only cuts his workload on counting and tabulating the student responses given on paper but it also gives him immediate responses and gives a better understanding of his students’ learning. As the answers are anonymous, students feel safe to ask questions.

He gave a quick demo on how to create the SMS codes. The steps are listed as follows:

Login to the tool at: http://qsms.nus.edu.sg/. The tool has two options for lecturers:

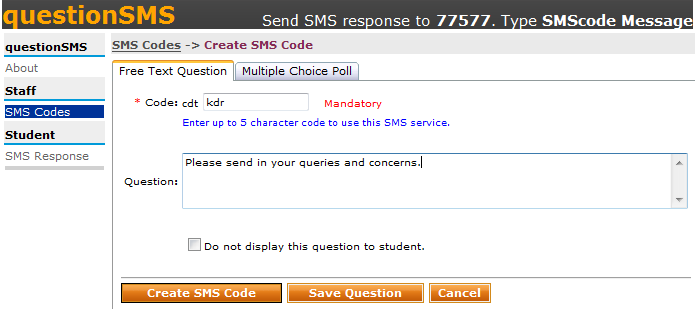
  • Free text question: Used to create general questions
    Create a code and enter the question in the fields provided and finally click on Create SMS Code.

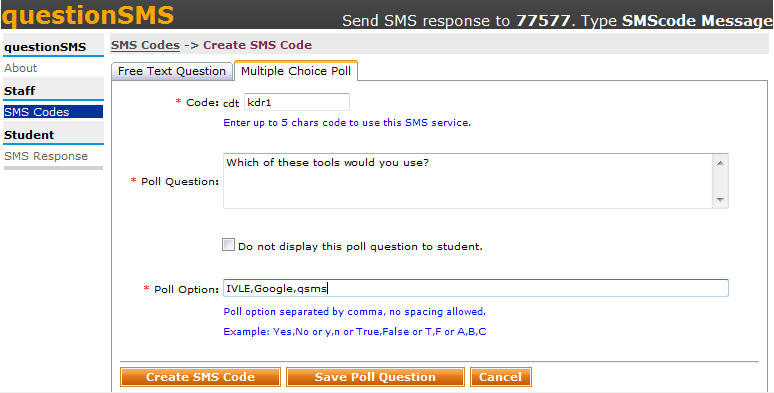
  • Mutliple choice poll: To create multiple choice questions / online polls
    Create a code and enter the question in the fields along with the MCQ/Poll options (the choices are separated by comma) and finally click on Create SMS Code.

Mutliple Choice Poll

 Dr Röllin finds the qSMS tool useful as it:

  • allows for immediate feedback
  • increases interaction in class with more questions raised;
  • enables him to get a midterm feedback on the course;
  • allows him to change the style and pace of the class from time to time;
  • easy to create and use; and
  • may actually reduce his workload. I like it because there is change of style and pace,

Dr Röllin also feels that this tool can also be used for the organization of the course (e.g.) allow students to choose tutorial groups slot or get their feedback on whether certain timings are suited for tutorials.  However, he cautioned that the feedback got is not representative of the class, since some students do not participate. Hence it would not be advisable to use it as an exam tool since not all students participate.

Pedagogical advantages that questionSMS offers

  • Students more likely to attend class, be engaged & participate thereby increasing interaction and encouraging more questions
  • Allows for immediate feedback (raising hands)
  • Allows teachers to understand which concepts they need to spend more time on
  • Encourage honest answers through anonymous response
  • Implement peer instruction
  • Changes the style and pace of the class appropriately

Summary of Feedback/ Suggestions from the Discussion

Q & A Session

Following the presentation by Dr Röllin, a lively discussion ensued. Some participants checked on whether the SMS charges would deter students from participating in the discussions. However, faculty members who have tried using qSMS felt that that does not seem to pose a problem with the students, given that the students have a student plan that gives a free usage of local SMS. There were others who worried about teaching students on how to use the tool, which is rather unfounded with the GenY students.

Listed below are some questions from the subsequent Q & A session.

Q:  If you are doing a poll, can the same student keep giving multiple responses?
AR:

No, as the system recognizes his number and replaces his earlier response with the newer one. However for a free text question, the system will take in multiple responses from the same student.

Q:  Do students participate during the first class?
AR: When I started using this 2 years ago, I got more students participating than it is with my present cohort of students. The first day is more of a trial and gives students a feel of the system. The participation rate greatly depends on the students’ and their interest level.
Q:  Have you taught the class without qSMS? How is the response rate?
AR: Yes, I have and seldom get any questions during the lecture. Students would generally ask questions after the lecture and answers are then discussed with that student or a group of students, and this method does not benefit the entire class. Hence, I prefer to have questions during the class which will enable the sharing of my feedback/responses and provide clarifications to the entire class.
Q:  Is it possible to create impromptu questions during a lecture?
AR: Yes. Since the creation of questions is very quick, it is possible to create impromptu questions as the class progresses. I usually have two screens – an iPad and the projection. While the slides are projected on the screen, one can view the responses using the iPad to decide on the questions to be discussed.
Q:  Do you organize your questions before the lessons?
AR:

I plan the questions in advance and also the appropriate time at which the questions need to be asked well before the class.

Q:  What do you do when you repeat the course again, do you use the same questions?
AR: When I plan the questions for the course, I create a bank of questions that I would use. These questions could then be reused when I offer the same course again. This also gives me a better understanding of the type of questions to ask or not to ask based on the previous years’ experience.
Q:  Is the SMScode used, case-sensitive?
AR:

No, the SMSCode used when replying is NOT case-sensitive. However, when extra spaces are keyed in, it might not translate to valid response.

Q:  You indicated that the SMSCodes expiry in 24 hrs, is it possible to change it?
AR: The expiry is usually set at 24 hrs and is not possible to change it. However, you could at any point of time activate the Expire SMS code, and this would stop receiving any further SMS.
   
Q:  Does the system allow you to send the questions to the students by SMS before the class?
AR:

The qSMS system does not have the option to send your questions automatically to your students before the class. However, you could use other tools in IVLE, the IVLE announcement function or an email to send the questions to your students. You could even display the question in class by having a PowerPoint slide with the question as and when required.

Q:  How much time do you give students to answer?
AR:

Too much time will interrupt the lesson, so I usually give about 1-2 minutes for my students to respond.

Using Multimodal Communications for Critical Thinking Assignments

Technology in Pedagogy, No. 10, August 2012
Written by Kiruthika Ragupathi

Recent pedagogical movements have demonstrated the value of mastering multiple literacies, asking students to become knowledgeable not only in their analysis of the written word, but also in other forms of visual media ranging from advertisements to photojournalism to cinema. However, while approaches to literacy have become increasingly “multimodal”, student outputs have remained largely “unimodal”, with the written word being privileged for its ability to convey a level of complexity supposedly outside the purview of other communication forms.

Research indicates that students who incorporate multimodal forms and approaches to their learning are better engaged with the content than those who employ traditional approaches, thereby enhancing their thinking and learning process. It is possible for students to convey their ideas that is critically engaged through the use of multimodal forms, says Dr Jasmine Nadua Trice, a lecturer in the Ideas and Exposition programme, a multidisciplinary critical thinking and writing programme at the National University of Singapore.  Her background in Film and Media studies with a PhD in Communication Culture and her interest in teaching film studies, public speaking and film productions lead her to trying out the use of multimodal communications in her modules.

In this session, Dr Trice shared her experience teaching a General Education Module (GEM) that essentially employs multimodal communications focusing not on technology but on the content (Emergent Media), and more importantly on the multimodal forms that the assignments took place in. Using her class as a case study, she examined the potential usefulness of multimodal communications for undergraduate level criticism, asking what kinds of critical pedagogies such an approach to student inquiry might enable.

Multimodal communications: An overview

Dr Trice provided a brief overview of multimodal forms of communication and highlighted some examples of scholarly work that inspired the proposal of a new course.

Multimodal communication is a form of communication that uses a combination of written, audio and visual forms to convey an idea and works in tandem with media literacy movements. Gunther R. Kress, a Professor of Semiotics & Education at the University of London points out that “in this ‘new media age’ the screen has replaced the book as the dominant medium of communication and this dramatic change has made image, rather than writing, the center of communication.” Multimodal literacy, therefore, is an established field and it is apparent that it is possible to understand critical ideas and academic analysis through multimodal forms in an undergraduate classroom. 

Multimodal scholarship

In the recent years, multimodal scholarship is stronger in the fields of media studies and digital humanities. The multimodal scholarships sometimes take the form of web-based or interactive text forms and at other times use video essays or screencasts.

Dr Trice showcased some examples of scholarly work that were of particular interest to her:

  • Vectors, Journal of Culture and Technology in a Dynamic Vernacular, USC: “Vectors is realized in multimedia, melding form and content to enact a second-order examination of the mediation of everyday life.”
  • International Journal of Learning and Media, MIT: “Rich media contributions representing key research findings that exceed the boundaries of the printed page.”
  • Kairos,  A Journal of Rhetoric, Technology, & Pedagogy: “publish scholarship that examines digital and multimodal composing practices, promoting work that enacts its scholarly argument through rhetorical and innovative uses of new media.”
  • Alliance for Networking Visual Culture: “creates scholarly contexts for the use of digital media in film, media and visual studies.”

 She highlighted the examples that she would use in the module – those that her students need to read or watch. The examples helped students to visualize complex concepts and emphasizes the fact that creativity is the most important factor in using multimodal communications effectively.

  •  Alexandra Juhasz, Learning from YouTube (MIT Press, 2010):
    Learning from YouTube, the first video—book published investigates questions with a series of more than 200 texts and videos, also known as “texteos.” This video-book, an example of web-based or interactive text mode, integrates the news clips based on the interviews that Dr Juhasz had with CNN, her book and the assignments created by her students when she taught the module on “Learning from YouTube”. Students in her class used YouTube as the media to do their assignments.

Dr Trice highlighted that when she tried using this as an example in her module, the students were disconcerted with the format and also required that a steep learning curve was necessary for her students to use such interactive text. Hence this reading, she said was avoided in the current semester.

  • Richard Langley, “American Un-Frontiers: Universality and Apocalypse Blockbusters”: 
    This example showcases the use of visual elements and the usage of text in a video essay to underscore the idea that the author is getting across. This example of video essay integrates icons, text and archival footage in interesting ways employing a screencast method that employs a linear way of presenting the video essay. (http://vimeo.com/32288942)
  • David Gauntlett, “Making is Connecting” (www.artlab.org.uk / www.theory.org.uk)
    An example of what one can do with basic screencast software (http://www.youtube.com/watch?v=nF4OBfVQmCI&feature=relmfu)
    This example highlights: 

    • The tone that is used in the video he uses when oral voice-over is added much more casual – and that the casual tone does not make the video any less professional but more importantly how the tone has to match the medium;
    • the use of basic information design for presentation of ideas;
    • gives a context of what is being talked about;
    • gives a literature review with citing secondary sources that is used;
    • also visualize the quotes from others.
  • Images from a graphic design books. E.g., visualizing content – Europe; Corriette Schoenaerts, for her fashion spread on countries and borders, in Robert Klanten et al., Eds. Data Flow: Visualizing Information in Graphic Design (Berlin: Gestalten, 2010), 189; Christoph Niemann, Sleep Agony Chart, in Robert Klanten et al., Eds. Data Flow: Visualizing Information in Graphic Design (Berlin: Gestalten, 2010), 107;  C.P.G. Grey, “The True Cost of the Royal Family Explained”

Dr Trice emphasized to her class that the content skills, conceptual skills and practical skills learned in the module would be integrated in producing the assignments. She reassured her students that it was not necessary for them to have high levels of technical ability and skills for doing well in the module and what mattered most was the CREATIVITY.

Proposal for a new module using multimodal communications

A workshop at CDTL that introduced her to the screencasting options available at NUS (Camtasia Relay and Ink2Go), her background in Film and Media studies coupled with her interests in teaching film studies, public speaking and film productions inspired her to propose the new module on “Emergent Media and Multimodal Communications”. This enabled her to combine all her interests to explore a more productive approach to teaching. The module was developed so as to provide students with a broad understanding of transitional media and culture not only through engagement with module content, but also through developing written, oral, and visual communication strategies.

To get her students to understand and better appreciate the use of multimodality in the module, she introduced the idea of multimodality to her students by probing them on:

  • what the idea of “modality” entails,
  • what the idea of “multimodality” entails,
  • how different is multimodal from unimodal communications, and
  • how the written word is still the dominant mode employed in most of the University assignments.

She briefed her class on how things would be different in the module where they (her students) would be involved in producing assignments that employ different forms of modality. The students on the first day of the class were also encouraged to contemplate on what they would gain and/or lose when moving from the written mode to multimodal approach of critical ideas. Students were then asked to reflect upon if it was possible for them to convey critical ideas and academic analysis through multimodal forms. She emphasized the idea of critical thinking and whether it was possible to convey their ideas that is critically engaged and analytically rigorous using images, audio and the written or spoken word.

The module had three units with each culminating in an assignment that require students to use one or more of the written, oral, or visual communicative modes.  The assignment tasks were designed to cultivate the practical comprehension of media by allowing students to convey ideas about class content using multiple forms of communication, both residual and emergent. The tasks enabled her students to:

  • combine video, still images, audio, and text to convey complex, academic investigations in a clear and creative manner, and
  • convey critical ideas in an unconventional form.

However, she also emphasized that the main focus of the assignments were on thinking about the ideas and the video essays using Screencast and not on the technology itself.

The first assignment was to use multimodal essays which were posted on the class Facebook page with peers providing reviews and comments on the essay. The second assignment involved the use of Screencast videos. And the final assignment was an oral presentation in groups.

Assignment 1 – Multimodal Essay:

The multimodal essay assignment is not about testing the multimedia skills but on the usage of the visual parts of the essay. The students were advised against the use of pre-made or readily available templates, as it was important to create something original that is visually and aesthetically compelling. The output was a 575-600 word multimodal essay. The assignments were graded in such a way that the three quarters of the grade was for the content analysis and on how they would visualize the theoretical concepts (75% for analysis; 15% for multimodal aspects and 10% for writing style and structure). All students were required to post their assignments on a class Facebook page that has to be accompanied with an explanation as to why they used a certain approach (assignments were uploaded on SCRIBD, an online PDF environment). This allowed students to justify their visual process/approach taken. Their classmates were then required to comment and critique on their peers’ work. Dr Trice felt that this was extremely helpful for her to understand the student’s thought process, particularly when it is difficult to understand the execution.

The common approach was that students used the evolution approach (e.g., from a book to iPAD). One student used a newspaper format and provided a wider context with the use of news splashes. Listed below are some samples from her students’ work:

Assignment 2 – Screencast/ Video essay

Students will create screencast videos or video essays, each of which should be 6 minute long clip. Again, the grading’s focus was on the analysis with 75% marks assigned for content and 25% assigned for the multimodal aspect. Dr Trice briefed and showed samples on how the students’ video essays should focus on multimodal scholarship and information design; use of videos, moving and still images; slides, on editing and juxtaposition, the voice-over narration, the use of on-screen text and symbols, and the use of music.

Students produced a variety of video essays: videos with no voice – so text heavy slides, with interesting use of on-screen text, good visualization of core ideas, and visuals inspired by RSAnimate series.

Assignment 3: Group oral presentation

The focus of the oral presentations was on: visual aids employed in the presentation; audiences and informative strategies; the vocal and physical modes of delivery; and on preparing for questions.

Assessment/Grading criteria

Overall, the assignments were assessed based on the following grading criteria:

Analysis (75%)

Multimodal aspects (25%)
(Composition, visual components,
editing + transitions, voice)

  • Demonstrates a clear understanding of class readings
  • Assesses and applies these ideas to other authors or to student’s own thoughts &  examples
  • Clearly organized, with an introduction, transitions, and a conclusion
  • Flows smoothly, building the analysis with each section
  • Demonstrates an understanding of the multimodal principles studied in class
  • Uses these principles in creative and compelling ways to support the overall analysis

 Pedagogical potentials of multimodal communications

  1. Enrich and empower student learning. Providing learners an opportunity to create a shared representation of language – textual form, visual form and an auditory form— proves to be cognitively and pedagogically valuable. The usage of multimodal  communication in their assignments help students transfer ideas from writing into multiple ways of communicating, offering them greater opportunities for meaning making. It helps them convey their ideas in critically engaged and analytical rigorous ways. With the changed and changing communication, the use of multimodality in the assignments will enable students to enter the workplace confident of their own potentials.  
  2. Engages peers and promotes reflection. The multimodal components provides a greater opportunity for students to engage with their peers as it allows them to present their arguments in multiple ways through written, spoken, and visual texts. When students view, comment and critique the work of the peers, it aids in reflection after the assignment task and promotes overall learning. These appeal to students’ interest and motivate them to be engaged learners.
  3. Enhance writing and communication skills. Making the multimodal essays, video essays and screencast helped students to hone their writing and communication skills.

Reflections and future directions

Dr Trice reflected upon the planning of assignments and indicated that she would change the way she did the oral presentation assignment and would consider the use of other criteria for assessing multimodal forms based on the work by (Ball, 2012). Ball (2012) identifies items that need to be considered when assessing such multimodal forms of assignments and could also be used by students when developing their assignments and while peer reviewing other’s work. Some items to consider include: (i) the project’s structural or formal elements must serve its conceptual core; (ii) the design decisions made must be deliberative, controlled, and defensible; (iii) the project should have distinguishable and significant goals that are different from what be achieved on paper; (iv) the design should enact the argument; and importantly it is important for students to have thought of a visual metaphor for the argument.

Summary of Feedback/ Suggestions from the Discussion

Dr Trice welcomed ideas and ways that participants have employed multimodality in their classroom.  A  lively discussion followed and participants discussed on:

  • To what degree is it possible for undergraduates to convey critical analysis through multimodal forms?
  • How to develop class content and/or assignments that would allow students to employ multimodal approach?
  • How should the grading criteria be designed to effectively assess such multimodal forms of assignments?

There were other participants who had used such multimodal forms of assignments in their modules. They also agreed with Dr Trice that the technical skill of students was never a problem as it was “super easy” to edit and create movies (e.g., FinalCut Pro, Windows movie maker, Adobe premiere). They also pointed out that when students start working in groups, they tend to help each other. One participant felt that once a student’s work is uploaded, and a high bar is set, then all the other students try to outdo each other, and in the process also teach other.

Another participant indicated that for his module, the students were free to choose their own platform based on what they were comfortable with – YouTube, videos, multimodal or essay. Based on his experience, students submitting written essays tend to go deeper in their analysis. However, he used an assessment criterion that awarded 60% for content and 40% for presenting ideas and also had two different sets of criteria for the multimodal form and the written essay. However, he found that it was difficult to follow two standards and he also felt that this might not be fair.

Q & A Session

Listed below are some questions from the subsequent Q & A session:

Q:  Did you have lessons that taught students the necessary technical skills for creating such assignments?
JT: Drag-drop editing necessary to create these videos does not need background knowledge on technology. I created a tutorial using Screencast – options include the use of camtasia, ink2go, & imovie. Students can also meet with me for consultations if they needed help. Only those students who were super enthusiastic used the consultation sessions—and usually the huge proportion of focus was on content.
Q:  Do students with technical skills/technology background have an edge/advantage over the others?
JT: This was something that I put a considerable amount of thought into and that was the reason for having the grading criteria place a greater emphasis on the content rather than on technology. I also got students to get their preliminary sketches and to have discussions with their peers before submitting the assignment. I also got them work in groups and discuss on what they were planning to do, and that also helped, I think.
Q:  How do you measure if this new method is more effective than your old method?
JT: I don’t think it is very different from writing an essay, it is pretty similar structurally and in terms of the ideas that they get across if they are doing a voice-over in particular. It is interesting for collaboration, and students will find it easy for peers to watch it rather than reading the peer’s essay. It is also interesting for public dissemination– making the materials available beyond the classroom. So it might be good to a website in addition to the Facebook page. In term of whether it is better for critical thinking – I think a lot of it is same when compared to writing essays but this form is more novel, and students like it for its novelty.I also felt that students were seeing each other’s work and were benefitting from it. I required them to comment on at least 2 of their peer’s work.  But students generally went beyond that and comments comment on more students’ work. Since it is in the students’ social space, appearing on their FB timeline. I also discussed with them on providing constructive critique and how they could improve on their comments.
Q:  Do you spend time to talk to students about copyright and plagiarism (fair use of information)?
JT: During my first lesson, I talk to them on the fair use of information. I told them to make the link to their essays private as I was not sure if the references made were appropriate. I did not spend too much time on that aspect as the presentations were not made public. And also since this was mainly for educational purpose, I guess it is fair use.  I also informed that whatever they used cannot be pre-fabricated and that the components made has to be original. I also gave them open source websites, creative commons site from where they could get the images, photos and music. Students also need to provide a worksite page, and which would have the references and links. Personally, I would spend more time on it when I teach this course again.
Q:  If we want to incorporate this type of teaching, as a teacher what skills do I need to have?
JT: CDTL’s workshops like Screencast, Breeze, Ink2Go, Moviemaker would be a good starting point. I also researched and explored online on the things one can do with Screencast. It is also important to get a lot of examples and showcased them to the students and engaged them in discussion during the class. Most of these applications are intuitive.
Q:  Have you wondered about how different a traditional essay by the same student would be? What are the implicit and explicit assumptions that are more pronounced in multimodal forms vs a traditional essay? Are students prone to making assumptions when make a video due to addition of music, tonality, songs, etc. How do contrast the both?
JT: That’s right, rather than explicitly spelling out exactly what they are trying to get across, they would present to you with some kind of multimodal image, sound combination and expect those to the work, and the meaning is more ambiguous.But this is something that I have not looked at it very rigorously which I should look at.  But one of the things that I try to do is to include a lot of opportunity for students to discuss their design elements and they would need to include justifications for their decisions in terms of the multimodal form. And since for most of them this was a first attempt, most of them were reading scripts from probably an essay format. There should be probably ways to study if there is difference between traditional essay & video essay. But definitely this is something that I would like to work on in the future.

 References

Cheryl E. Ball, (2012). “Assessing Scholarly Multimedia: A Rhetorical Genre Studies Approach,” Technical Communication Quarterly, 21: 61-77, 2012.


Apps for Educators

Technology in Pedagogy, No. 9, May 2012
Written by Kiruthika Ragupathi

From keeping track of files, folders and email messages to sharing lesson plans on numerous gadgets – the PC, the MAC, the iPAD and/or Smartphone, educators now have a host of web-based applications to stay organized and be productive. In this session, Mr Dewanto, an Instructor with the Department of Physics, Faculty of Science and an Assistant Director for the Special Programme in Science shared his experience with using Apps. He offered solutions on why and how he used applications like Dropbox, Sugarsync, Evernote, Wunderlist, Skitch, Team Viewer and Splashtop Remote and elaborated on the pros and cons of these apps. These apps are cloud-based, compatible across major platforms, relatively easy to use, and, most important of all, they are free. He also discussed on how these apps helped him in teaching and for effectively managing his administrative tasks.

Mr Dewanto started the session by highlighting how he realised that his travelling time could be well-spent and be made productive by using some of the free utility and productivity apps. His top priority in selecting the apps was to allow for planning and preparing lessons, managing classroom and research materials, and communicating with students anytime, anywhere and more importantly the apps would have to be versatile and compatible with the various gadgets – Office PC, home PC, MAC, iPAD and Smartphone — that he uses.

He considered the following four aspects when selecting an app to identify if it meets his requirements:

  1. Convenience: Is the app easy and intuitive enough to operate? It is also important to choose apps that do not involve a steep learning curve.
  2. Versatility: Is the app compatible across operating systems, platforms and versions? It would be even more advantageous if one app could be easily integrated with another.
  3. Support: Is the app constantly being developed and updated? It would be good to check if necessary technical support is available.
  4. Price/Cost: Is the cost of the app low? It would be good to start with free apps which delivers a lot at no cost. Hence when planning to purchase an app, it might be worthwhile to consider if it is value for money.

He then showcased some apps that had helped him:

  • to be better organized;
  • to be prepared for his lessons; and
  • to manage his resources effectively.

File Storage/Sharing Apps:

Dropbox and SugarSync allow for file hosting and/or file sharing. Both these apps are free and allow for storage of files in the cloud and enable easy access from multiple locations and across multiple computers and devices. These apps are useful to back up, to sync and to share all documents, photos, music and movies and enables users to access stored files from a PC, Mac, iPhone, iPad, Android, BlackBerry, or any other device.

Dropbox offers a free storage space of 2GB for a start, and a 250MB referral bonus up to 18GB. One major advantage is its stability.


SugarSync, on the other hand, offers a free storage space of 5GB for a start and 500MB referral bonus up to 111GB.  It allows for multiple accounts to be created which can be inter-connected giving a larger storage capacity. Even when a folder is shared with others, it does not affect the storage capacity of the other party.

Mr Dewanto uses Dropbox and SugarSync to organise and store all materials related to teaching, research and administration. His personal trick is to use Dropbox to store materials which are currently being used (e.g. current semester’s lecture notes, ongoing research project). However, because of the larger capacity that Sugarsync provides, once the files are no longer needed or seldom referred, he will then store the files in Sugarsync.

Productivity App:

Evernote is a cloud-based “notepad” with basic MS-Word like capabilities. It is an easy-to-use, free app that allows users to take notes, capture photos, create to-do lists, clip webpages and record voice reminders. All data is synchronized and made available to clients on Windows, Mac, Web, and mobile devices. In addition, the Evernote Web Clipper option allows for capture of websites in real-time.

Mr Dewanto uses Evernote to:

  • draft notes (for lectures, online consultations, and feedback to students)
  • draft email messages, minutes of meetings, and blog postings
  • capture interesting photos which can be used for his teaching/research
  • prepare eLearning exercises

Screenshot editing App:

Skitch is a cloud-based screenshot editing and sharing utility, and helps users to get their messages and ideas across with fewer words using annotation, shapes and sketches. Evernote is to Notepad, and Skitch is to “Paint”.  With the help of Skitch, users can easily annotate to draw attention to anything.  Skitch is integrated with Evernote, and is ideal for quick photo editing, great for writing down equations, and hence becomes useful for consultations with students via email. 

Mr Dewanto described and demonstrated how he uses Skitch to:

  • reply to student’s queries, in particular to show calculation steps (which otherwise is very hard to do using email e.g, NUS Microsoft Exchange).  It enables teachers to explain ideas and concepts with fewer words.
  • draft a proper explanation to accompany the steps when replying to students, in conjunction with Evernote.
  • provide feedback to students on their work.
  • highlight or annotate changes and important aspects in pictures, diagrams or poster designs.
  • screen grab online chats / discussions.

 Organisational App:

Wunderlist is a cloud-based “sticky note” tool and can be used to jot down quick reminders/notifications and “what-to-do” lists. Mr Dewanto uses this app to check on his “to-do” list every morning, and usually uses it for tasks with no specific deadline in conjunction with Google Calendar, which manages his deadlines and appointments.

 Remote Access Apps:

Splashtop Remote and Teamviewer are remote access apps which allows for remotely controlling the desktop and/or Macs during lectures, seminars, or tutorials. Both these apps can be used to view files, presentations, or applications while away from your main computer.

Splashtop Remot e works better with systems located within the same LAN network. This app is not free for Android users. Splashtop Remote can be used in class to connect to the desktop using an iPAD, making it act as the wireless presenter. Not only the iPAD controls the desktop, it also mirrors whatever projected on the screen from the desktop. Hence, whatever on the iPAD is projected to the screen and this gives teacher greater mobility within a the LT and easy reference to his/her slides without keep on turning back, and makes the lessons more interactive.

TeamViewer works with systems outside of the same LAN network. That is, it can be used to remotely access computer even across the globe, but the connection tends to be slower and can be used to remotely access your computer via an iPAD. Mr. Dewanto normally uses TeamViewer to remotely access his office desktop for quick work.

 Finally, two potential issues/challenges related to the usage of the Apps were discussed:

  • Connectivity: Will this lead to over-dependency on the Internet? (For example, a slow connection or loss in connection). Perhaps, but in the Singapore context, connectivity is rarely a problem.
  • Security: Is it safe to upload classified data uploaded in the cloud? Mr Dewanto personally feels uploading his lecture notes, research materials, and presentations are ok. However, he would not feel comfortable having his students’ data and/or grades uploaded.

He then concluded the session with a summary snapshot of the compatibility of the apps across the various platforms:


Summary from the Discussion

A lively discussion followed Mr Dewanto’s presentation. Participants gave their experiences and details on how and why they used certain apps. Listed below are some Apps discussed on task management, scheduling, storing files and reading files:

Apps for storing, reading, and annotating files

  • GoodReader is used for reading all kinds of files, especially PDFs
  • FileApp, a free App is useful as a file manager and reader. FileApp supports a variety of formats – MS Office files (Word, Excel and PowerPoint), image files, and audio files. It enables users to sort the files by file type, date, or folder and also allows for bookmarking specific scrolling positions on longer documents.
  • iAnnotate allows users to integrates the annotations made directly into the PDF making it easy to be sent to students.

Scheduling App:

  • Doodle is a free tool for scheduling group meetings with the input from all members of a group or project. It can act essentially as a polling platform for teachers to schedule consultations.

Note Taking App:

  • Penultimate, a note taking app allows users to create handwritten (using finger or stylus) notes, import photos and images to be use with notes and to sketch things.

Q & A Session

Listed below are some questions:

Q:  Can you use the same email to create multiple accounts on SugarSync?
AD: Different emails are required to create multiple SugarSync accounts. But the good thing is that all of these accounts can then be shared, thereby allowing a user to access all of his/her accounts from a single account.
Q:  I have used Dropbox, but I am concerned with security issues? How do you deal with it?
AD: I feel that it is okay for me to upload and store my lecture notes, and other research materials on the cloud. However, when it comes to sensitive files with students’ data and grade, I store them using in a secure thumbdrive provided by NUS.
Q:  Does Wunderlist work on a PC?
AD: Yes, Wunderlist is compatible across all platforms – PC, MAC, internet browsers, iPAD, iPhones, Smartphones with Android OS.
Q:  Why do use Wunderlist and not Google tasks for creating “to-do” lists?
AD: Though Google Tasks would perform the same task of creating “to-do” lists as the number of steps required to access the tasks is longer requiring users to open a browser, login to their Google accounts, and then access the tasks. Besides, Mr. Dewanto is also personally prefers  Wunderlist’s more aesthetic and user-friendly interface.
Q:  Have you used the apps for distributing materials to your students?
AD: The closest I have got to using it for classroom distribution is to use and Skitch to draft emails, instructions and project ideas, and send them to students.
Q:  By using all these apps, don’t you have the urge to always be connected to work and students? How about the “me”-time?
AD: Personally, I have no issue with this. Perhaps I love my job so much, or I am simply being a workaholic, but my real intention with using these apps is that I can stay connected and do my work during those “idle” moments for something more productive. But this of course might not be true for everyone.   

Teaching Computational Thinking using Cloud Computing

Technology in Pedagogy, No. 8, April 2012
Written by Kiruthika Ragupathi

Computational thinking is an emerging basic skill (Wing, 2006) that is becoming an integral part of higher education together with reading, writing, critical thinking, and problem solving.  Not only is it critical to all physical sciences but also highly relevant in other domains. The recent data deluge requires our students to be computationally competent and IT savvy, not just in theory but particularly in practice says A/P Tan, an Associate Professor and the former Head of the Department of Biochemistry, Yong Loo Lin School of Medicine. The world of computing has made possible profound leaps of innovation and imagination as it facilitates our efforts to solve andexpands our understanding of the world around us. The way in which the world is progressing technologically (in particular with the bombardment of datasets), students are expected to think statistically, computationally and quantitatively making it critical to provide our students a chance to experience and learn this skill set.

In this session, A/P shared his experience in the development and deployment of a bioinformatics LiveOS (BioSlax) on a private cloud computing platform that was set up to facilitate scalability. He highlighted how such a platform will be powerful in allowing students to practise computational thinking during research lab practical sessions and compulsory mini-projects. He then went on to explain about the flexibility it allows and its ease of customisation.

 What is Computational Thinking?

Jeannette Wing coined the term computational thinking in a recent 2006 CACM article. 1.   She argues that in order for students to apply computational techniques or computer applications to the problems and projects in their particular discipline (be it the arts, sciences, humanities, or social sciences), this skill set becomes necessary. Wing also claims in her seminal article that the ideas of abstraction, layering of abstractions, and automation are some of the fundamental computer science concepts that have provided new insights into the natural sciences and hard social sciences. She emphasizes that computational thinking is an emerging basic skill for everyone not just for computer scientists. Hence,   it should become an integral part of education and be added to every student’s analytical ability in addition to reading, writing, and arithmetic skills. By using the concepts fundamental to computer science, computational thinking enables and enhances the ability to solve problems, design systems, and understand human behavior (Wing, 2006).

Considering the area of life sciences as an example, it is not typical for life sciences student to have programming skills whereas an engineer or a physicist it is common to have ready expertise in programming. Many students who make life sciences as their choice of study are terrified by mathematical equations commonly found in the hard sciences. However the intellectual and reasoning skills associated with computational thinking are necessary for life science students and the onus is thus on us as teachers to address this problem by making provisions for students to understand computational thinking by providing them with tasks related to the Internet, informatics and computation.

There has been tremendous progress in life sciences driven by technological advances and this relates to the issue of addressing the problem of the volume of data that has been increasing exponentially over the last ten years. In the past, students just did one experiment and recorded the results; however the emergence of robotic systems that are currently being used in the laboratories generate thousands of data points. Hence, for our students to be employable, they will need to be able analyze things computationally and need to think in terms of computational scale.

Therefore, A/P Tan and his team studied the aspects of life sciences that would be impacted by computational thinking. He then urged the participants to explore and think about how computational thinking will impact their own disciplines to give them a better idea on how computational thinking would impact their own discipline and their own lessons.

As Lord Kelvin famously said, “When you can measure what you are speaking about, and express it in numbers, you know something about it; but when you cannot measure it, when you cannot express it in numbers, your knowledge is of a meager and unsatisfactory kind; it may be the beginning of knowledge, but you have scarcely in your thoughts advanced to the state of Science, whatever the matter may be.” 

Therefore, as teachers it is important for us to help students

  • to think quantitatively (both mathematically as well as statistically);
  • to think algorithmically as a continuation of the thinking advancement process (started during their school days);
  • to think in terms of machine learning and prediction;
  • to engage in higher level activities of thinking in terms of representing the observed phenomena/results in the form of models and then to simulate.

Setting the framework: Teaching Computational Thinking

To instill these skills in life science students, A/P Tan embarked on a study to identify the minimum skill set needed for university graduates to meet the informatics needs and challenges of the “-omics” era . The study also confirmed that for students to achieve these skills, basic training geared towards acquiring a minimum skill set in computation and informatics be embedded in the undergraduate and graduate life science education. Two modules – “Introductory Bioinformatics” teaching the application of computational and informatics technology to the solving biological problems in the life sciences and “Bioinformatics and Biocomputing” teaching in-silico research techniques in life sciences were introduced for the past ten years.

The main objectives of the modules were to provide students with:

  • the basic essential knowledge in the specific domains of computer science, statistics and mathematics that intersect with modern biology ;
  • the expertise in communicating and representing biological knowledge and processes in mathematical, statistical and computing terms and concepts;
  • the ability to use and develop efficient bioinformatics and biocomputational tools and techniques for the acquisition, interpretation, analysis, prediction, modeling, simulation and visualization of experimental and other biological data;
  • the proficiency in the search, retrieval, processing, curation, organization, classification, management, and dissemination of biological data and information in databases for deriving biological insight and knowledge discovery;
  • critical thinking and problem solving skills in quantitative aspects of biology;
  • skills in machine learning and prediction; and
  • basic programming skills.

To implement this in the modules, it was necessary to have at least 100 computers in the classroom (with all necessary software installed) or to use laptops. However, this posed a number of problems:

  1. Too many students  (70 to 270 students) in a class;
  2. The field was ill-defined and comparatively new;
  3. To provide students with the technological expertise, a number of software applications/programs were required to be installed; and
  4. Too much time was spent in class handling computing problems during the hands-on laboratory sessions.

To overcome this, the option of a Live operating system CD was tried over the years. However, this was also not an ideal solution. Hence, a cleaner (and better) solution was needed that was easier to scale up – cloud computing emerged as the best option eventually.

Why Cloud Computing?

Cloud Computing is not a completely new concept and is closely related to grid computing. It is an approach of managing computing resources by increasing the capacity or adding the capabilities without having to invest (heavily) in new infrastructure, and train new personnel. Thus, cloud computing services represent a potentially cost-effective solution for server hosting. Furthermore, the performance of cloud servers can be scaled up or down according to the projected amount of traffic and load. Besides cost and technical advantages, cloud servers provide a platform for customised and personalized learning in which individual server instances can be created for each user. Hence, the option of cloud computing was chosen over the Live OS CD since it allows for a style of computing where massively scalable IT-enabled capabilities are delivered to students using Internet technologies. This enables students to use remote IT resources such as servers and storage, thus using applications not residing on their own hardware.

As such, students can immediately practise all the techniques that they have been taught in the two modules. The students were able to use any device (laptop, desktop, Mac, iPAD, smartphone or other mobile devices) to access the virtual systems online and administer the virtual computer through a web interface. It was easy on the part of the teachers to easily control the virtual machines and re-configure whenever necessary. In addition, the data generated or acquired by the user also resides online, and the user has sole access to that data unless he or she decides to share it.

The platform was then used to help students learn – programming languages,         structural modeling, machine learning, 3D structural visualization, multiple sequence alignment, database creation, curation and administration.

 Advantages of teaching using Cloud Computing

Thus the redevelopment of the curriculum for the two modules to teach using cloud computing enabled the teachers to add mathematical rigour to the program and engage the students visually. The key advantages were it allowed students to:

1. Focus more on thinking about science rather than the interface

Students do not have to worry about the technological concerns related to hardware and software but instead focus their attention on the science. Students could focus on the scientific problem at hand, and could even advance to the level of using supercomputing applications based on their interest and capability.

 2.  Focus more on students’ learning process

The variety of tasks and activities updated by the teacher provides the student with the flexibility to choose and repeat the tasks to learn the techniques at their own pace. This allows the learner to be in control of the whole learning process.

Thus, this is a very practical way of approaching a problem that involves the implementation of fundamental philosophical changes in the life sciences curriculum, and in the transformation of how computational thinking is taught to students and more importantly on how students learn computation. Students are able to easily identify the steps involved that could be documented and scripted, allowing them to understand the process more clearly. Thus, enabling the creation of a “work-flow” and further allowing them the opportunity to refine the workflow. This approach allows students to tweak the process, cross-validate, and see how and why the process was tweaked to obtain a better estimate.

This combination of both pedagogical aspects along with advanced technology developed using cloud computing, and the experience of his team with developing of the live OS CD enabled the implementation knowledge.

 Q & A Session

The presentation by A/P Tan Tin Wee (TTW) was followed up by a short demo and a discussion session. Listed below are some questions:

Q:  Does this solution help you in standardizing the computing environment for the students?  Does it also help with the hardware?
TTW: Yes, it standardizes the computing environment for the students. The hardware is not an issue anymore, as it is maintained by the administrative team maintain the servers.
Q:  Do you still need a classroom that is equipped with computers?
TTW: Technically, it is not necessary. However, not all students have their own mobile devices, and hence I still conduct my classes in a classroom equipped with computers (computer training cluster).
Q: Is there a change in requirements for students to enter this course?
TTW: Effectively there is no change to the requirement. However, it should be noted that this module has been a compulsory module, as our department understands the importance of computational thinking in our students.

References

  1. Tan TW, Lim SJ, Khan AM, Ranganathan S., A proposed minimum skill set for university graduates to meet the informatics needs and challenges of the “-omics” era. BMC Genomics. 2009 Dec 3; 10 Suppl 3:S36.
  2. J. Wing. Computational Thinking, Communications of the ACM, 49(3), pp. 33-35, March 2006.

If you can’t Say it, Voice it: Using Text-to-speech in Presentations

Technology in Pedagogy, No. 7, February 2012
Written by Kiruthika Ragupathi

Text-to-speech (TTS) is not anymore the nasal and metallic robot-like voice with which it is often associated. Although text-to-speech technology may not yet have reached the quality level at which it can be used to read very long texts, it is definitely effective enough for use in dynamic and interactive presentations.

Whether you are tired of recording the same sentence for the umpteenth time because you keep stumbling over the same tongue twister, are generally feeling unsure about your diction, or simply want to introduce some variety in your presentations, if your budget does not allow hiring professional voice actors, instructors should look into should use text-to-speech, says A/P Stéphane Bressan from the School of Computing, National University of Singapore.

Text-to-speech narrations are set to overtake professional voice narrations for use in eLearning presentations. With the variety of many good quality voices available for different genders, accents and languages, one can easily author presentations with professional sounding narration. Simulating multiple commentators and discussions with such presentations is also easily achievable with this technology. In this session, A/P Bressan highlighted on why and how he uses Text-to-speech in his presentations, and showcased on how he integrates it into PowerPoint and Breeze presentations.

Setting the framework

A/P Bressan started the session with an example comparing the quality of various TTS voices from early days to the most recent and explained how technology has moved away from using narrations that sound robotic to the more professional voices. He also showcased other examples to illustrate the possibilities of using TTS to engage student learners. This helped set the framework on what could be achieved using the TTS technology. For instance, how it can be used to create a take away list of vocabulary and be made available to students as podcasts, iPods, MP3 audio, enabling students to listen to such vocabulary them while on the move.

It is not just about creating these TTS voices but more importantly on how these can be integrated into the presentations. Therefore, it is also important to see how these voices can be integrated and combined to be used in PowerPoint presentations. When integrating TTS with PowerPoint presentations, there is an issue of coordination as it is not easy to have the sound and the display be synchronized. In an ideal situation, as the text is being typed, it would be good to sync the audio accordingly. He explained on how this would be difficult to achieve as a lot would invariably depend on the hardware used. Hence, A/P Bressan explored using TTS in other applications like the Adobe Presenter (Breeze).

Text-to-speech (TTS) technology

TTS or Text-to-speech system is the name given to a system that can synthesize speech from text, those that can read text in the natural language and translate it to a sound in a wav file or mp3 file. The technology that is being used in TTS is SAPI (Speech Application Programming Interface). SAPI is the Microsoft standard interface to both speech recognition and speech synthesis applications. Since 2000 computers using Windows have SAPI 5, and this interface is built into the windows OS for all voice applications – voice recognition or speech synthesis. Text-to-speech tools on Windows also use SAPI to integrate with other software such as Microsoft Office like PowerPoint.

A/P Bressan also pointed how the technology is sophisticated enough to determine the pronunciation of specific based on the part of speech of each word in the text. In particular, the system is able to determine parts of speech for each word based on the context and can expand known abbreviations. Again, he illustrated how the technology was able resolve ambiguities with ease by using example.

Examples of TTS systems

A TTS system comes in two parts – The software to generate the sound files from the text and importantly, the voices. Listed below are some of the available TTS systems:

However, A/P Bressan’s choice is TextAloud, as it offers a simple and easy interface. It supports both SAPI4 and SAPI5 voices and allows for changing pitch, tone, volume, rate speed, and emphasis in a voice. The application exports sounds to mp3 and wav file formats. It also offers the possibility to change voice within a text and to develop your own vocabulary particularly when special characters and acronyms are used. Interestingly the software also allows for batch conversion – the capability to create voice files for the corresponding text files compiled in a folder.

The interface is simple with a window for entering text along with 2 buttons to Play and Save. Text from a PDF document can be imported over to the window, and then the application converts the text to speech. To make changes to the reading, you can use XML.

XML TTS could be used to provide instructions to the TTS engine in order to control what is happening and uses tags to provide such information to the system. Based on the context, the XML will be able to indicate to the program on how to speak (e.g., how to pronounce ‘record’ as a noun, verb etc.).

It supports a variety of tags – to control the state of the current voice like Volume, Rate, Pitch, Emphasis, and Spell; to insert special items like Silence and Pronunciation directly; to provide context to the voice; and to provide variations to the language. For example when special acronyms or names need to be used, then special instructions in the form XML tags can be used. It would be painful to learn to write these tags, especially for non-programmers. However the application interface allows for easy insertion of tags using the menu bar.

Regardless of the software tool that is used for conversion, it is important to have good voices and therefore investing in voice packages (which is not free) is necessary. The free voices from Microsoft are the typical robot-like monotone voices, but the voices available from companies like AT&T, Cepstral, NeoSpeech, Acapela and others are of premium quality.


Pedagogical advantages that TTS technology offers

How can it be used?

  • One simple way is to use Insert sounds into the PowerPoint slides.
  • Another way is to use to record voice narrations for eLearning lessons, for e.g., in Adobe presenter / Breeze where “import audio” feature from the Presenter Tab can be used to easily embed audio narrations on a slide-by-slide basis.

How A/P Bressan uses the TTS technology in his lectures:

  1. Idea is to have a mixed voice lecture, as very often you, as an instructor, wonder why you would need to read the slides aloud. It is obvious that students can read the slides much faster than the instructor. However, for courses that use symbols, the symbols would need to be read out aloud to students. Therefore, it would be nice if someone could read the slides for you so as to wake the students up, and help them to follow, and follow along with the slides.

And particularly when it involves long texts that need to be read, then it becomes rather boring for the students. As students are not very familiar with symbols and languages when they are new to such concepts, it becomes imperative for instructors to read these out to the students. Using TTS voice narrations instead of the instructor reading it aloud, captures the student interest very easily and also breaks the monotony while also giving the instructor the break – thus making it advantageous to both the instructor and the student.

  1. Having two voices promotes the idea of discussion – sort of triggers the argumentative part of the mind. For example, when he teaches database he needs to explain to his students on how to translate request queries into a machine language for the computer (e.g., SQL). Based on the question displayed to the students during the presentation, instead of just displaying the program snippets to students, it makes it interesting to use TTS voices to read out the program snippet in class – capturing students’ interest and attention.
  2. Change of voice means of change of attention on the students, and implicitly signals to the student that there is a change in the mode of the lecture or a change in emphasis. Voices can be changed for different kind of notations. Thus a series of voices or two voices can be used to read theoretical/conceptual aspect and technical aspect of the lecture. His earlier Breeze presentations had 2 voices: one reading the theories another reading the technical aspect.  Different voices can also be used for different notations – choosing from a series of voices.
  3. Ethnic voices can be introduced to bring in diversity and to keep the attention of students.


Other Uses/Advantages

  • Keeps narrated presentations continuously up-to-date (it’s too time consuming/expensive to re-record human narration). Therefore, using TTS makes it easy to keep the material current and accurate as it is easy to re-record.
  • Prepare scripts, particularly the research papers and articles. Usually authors read aloud what has been written to check if it sounds okay, and the same concept would work here. You could also advise your students to practice the same when working on written assignments.
  • Provide audible feedback for student work.
  • Use to proofread for helping the user catch typing errors (e.g., in Excel) missed by the usual proofreading.
  • Easy-to-listen news: News information can be converted to audio allowing you to listen to the news from your favourite newspaper or magazine.

Summary of Feedback/ Suggestions from the Discussion

The participants felt that the session provided a good overview of the existing TTS technologies. They considered it useful for eLearning, enhancing presentations during lectures, presenting materials more clearly and in particular useful to put across technical concepts. There were others who felt that this technology could be useful for teaching in a foreign language, but not sure how useful it would be in a native language.

Listed below are some questions from the subsequent Q & A session:

Q: 

What are other possible applications for using TTS in teaching?

EM:
  • Creating podcasts making using of the TTS voice recordings will be useful for short phrases, definitions, short lessons, FAQs, or for situations that can be easily explained vocally.
  • I have also used it when I had visitors from New Zealand and had some of their sessions recorded. Then we could introduce questions and then combine with the audio recordings of the visitors.
  • Could be used for providing technical definitions, pre-laboratory demonstrations/instructions or extra content.
Q: 

How is it useful as a podcast?

EM: Podcast is particularly powerful for providing take away points for students so that they can be used by students during revision. Podcasts integrates very well into the mobile applications. However, he pointed out that when students listen to such podcasts using earphones, there tends to be noise that makes it difficult to listen for a longer time.One of the participants offered a solution to the problem indicating that light background music combined with these voice recordings would make it better. A/P Bressan indicated that Audacity can be used to edit and prepare such audio recordings.
Q: 

Are there any unusual applications of this technology where students are using it?

EM: In one of my classes, I get my students to do video presentations as a part of the assessment. Students (non-native English speakers) who are shy to use their own voices use the TTS technology rather than recording their own voices for the videos.For developing mobile applications for iPAD, iphone or other smartphones, this technology integrates very easily and well into Flash. It can be used with animation applications (e.g., ToonBoom) where it can allow for full animation along with character mouth movements.
Q: 

Is it possible for the system to learn from my voice?

EM: Technically it is possible to create a voice similar to yours but this currently requires huge efforts by a team of specialists and is prohibitive.

Using Personal Learning Environments (PLEs) to encourage peer learning and learner autonomy

Technology in Pedagogy, No. 6, October 2011
Written by Kiruthika Ragupathi

Personal Learning Environments (PLEs) are becoming more widely used by educators who are responding to the e-Learning needs of their students (Harwood, 2011).  The idea of a PLE recognises that learning is ongoing and seeks to provide tools to support that learning thereby enabling individualized learning. A PLE, therefore, is a combination of the formal and informal tools and processes used to curate, reflect and critically evaluate the information obtained.

PLEs enable “non-formal learning within a formal learning context”, says Mr Harwood from the Centre for English Language Communication (CELC) at NUS. In this session, he shared his experience on how and why his centre introduced SymbalooEDU as a PLE platform to support students in their learning of English for academic purposes. Then he went on to provide insights from a pilot study on the PLE platform.

Platform for peer and independent learning

The current situation

The online version of Self-Access English Learning Facility (ITSELF) was set up to provide materials to help students improve on their grammar, vocabulary, listening, reading and writing skills and thereby encourage independent and lifelong learning. In recent years however, they found that students were not accessing the facility – students were not aware of it or just did not use it.  The main reasons reported were the materials were not easy to access and not as engaging as they could be.

Needs Analysis

With the support of the CELC e-learning committee, Mr Harwood conducted a needs analysis survey of 600 CELC learners. It was clear from the findings that students prefer mobile internet devices.  The laptop computer was by far the most common way students (97%) accessed the internet and 42.3% of them accessed it on their smart phones. The needs analysis showed that students also learn in many different spaces- 41.2% accessed and learned online in retail Wi-Fi hotspots while over 20% used it on public transport. With regard to the preference of using online materials for study purposes, 91.5% of respondents preferred a mix of materials that have been prescribed by the tutor and those that they perceive as important. However, 78.1% claimed that they need help finding good websites to support their learning. Most students (92.3%) also indicated that they prefer customizing the available online course resources in one space and organising the categories to their individual preference.

Thus, it was important for the team to construct an online space featuring specially selected websites, video tutorials and other resources required for the course that would allow their students to personalize the information provided.

PLE for peer learning and sharing

Wheeler (2010) summarized the PLE (as shown in Fig 1) and suggested it not only encompasses the personal web tools and personal learning networks (connecting people through social network) but it takes in the experiences as well as learning through other formal media contexts like the TV, music, paper based materials.

Anatomy of a PLE

Figure 1: Anatomy of a PLE

According to Anderson (2006), “A PLE is a unique interface in the owners’ digital environment. It integrates their personal and professional interests (including their formal and informal learning), connecting these via a series of syndicated and distributed feeds.” Clearly, PLEs are systems that help learners take control of and manage their own learning. Hence, Harmelen (2007) suggests that teachers can use PLEs to “provide support for learners to set their own learning goals, manage their learning; managing both content and process, communicate with others in the process of learning and thereby achieve learning goals.”

That was exactly what Mr Harwood with the CELC e-learning committee set out to do, he facilitated the construction of one such environment, curating content that simultaneously allowed students to peer share and peer tutor the newly learned knowledge in a social environment. He shared an example of how a peer sharing approach worked well in his classes. In a business communication module, one of his students shared a fantastic resource on presentation skills. Using Facebook as a media, Mr Harwood ‘liked’ that resource which then prompted his students to use it as a learning resource. This further paved the way for further discussions in the class and allowed students to exchange ideas and share their experiences on how to improve presentation skills.                                                                     


Selection of an appropriate tool – SymbalooEDU

SymbalooEDU is a software application that enables learners to organize, integrate and share online content in one setting or Personal Learning Environment. The visual interface and ease of aggregating content and sharing it makes SymbalooEDU a great resource for teachers and instructors, says Mr Harwood. The platform also allows educators to create mixes of tailored resources and share these mixes with students (Harwood, 2011).

SymbalooEDU works by enabling users to simply construct customizable tiles which are linked to URLs of online resources. Once a grid of tiles (or webmix) is created, it can be shared with others via email. The application has a grid layout, with color icons (called tiles) within each space. The user can organize the tiles however they like and a search box at the top of the grid allows users to quickly search for specific resources or add them to their SymbalooEDU webmix. Thus, the platform allows educators to create mixes of tailored resources and share these mixes with students and allows students in turn to easily access, share and update content. One of the main advantages of this environment is that it allows for hosting almost every other platform within this space – learning management systems (IVLE, Blackboard), social networks, Facebook, Twitter, mySpace, Collaborative cloud tools, Google docs, Dropbox, Integrated curriculum activities such as blogging (Harwood, 2011).

Constructing the webmix

Their team discussed the content and materials of the Intensive English Programme (IEP) courses offered at CELC and identified the following five elements of the curriculum for inclusion in the webmix:

  1. Academic writing: introduction, overview, approaches, style.
  2. Essay writing: Thesis statements, paragraphs, cohesion, compare and contrast, referencing and so on.
  3. Vocabulary: collocation, vocabulary, phrasal verbs.
  4. Grammar: pronouns, verbs, tenses, noun phrases, determiners etc.
  5. Resources: dictionaries, writing guides, academic wordlists.

In order to make the webmix easy to navigate and visually attractive, different coloured tiles were used for different topics.

SymbalooEDU

SymbalooEDU

Mr Harwood explained how two icons were selected from the ‘symbalooEDU’ collection to signify the type of resource tile – ‘book’ was chosen to signify text-based content and ‘a speaker at lectern’ was chosen to signify video content.  They also added social media tiles for Facebook and twitter along with the CELC language learning portal. This was then shared with the IEP students at the start of their IEP courses.


Pedagogical Advantages that PLEs Offer

  1. Easily organise and share information
    SymbalooEDU is visually very attractive and simple for customizing, organizing and sharing information. It is also very easy to use, even for those with minimal IT knowledge, in order to create an effective compilation of resources, mixed in a way they believe is most useful. This allows instructors and learners to co-construct PLEs, which should provide support for learners to set their own learning goals, manage their learning, and communicate with others in the process of learning (Harwood, 2011).
  2. Single learning space across courses  
    Single learning space supports formal and informal learning across the various courses. Students are able to set up their own learning environment and space by reusing and remixing content based on their own needs and interests. Such an environment encourages students to see learning as inter-related, connecting both their personal and professional spaces to facilitate deeper learning.
  3. Gives learners’ control of their learning
    Rather than placing controls on what and how students learn, PLEs give them control over their learning.  Though students receive support and guidance from tutors, they are also empowered to set their own learning objectives and manage both the content and the process of their learning.
  4. Promote peer learning by bringing the learning environment to students’ social space
    Instructors should embed social learning opportunities into courses to facilitate peer learning and allow the PLE to evolve with the learners’ needs and use. Learners should be encouraged to communicate and share information, ideas, knowledge and resources using social media. For example, the use of blogs and class Facebook pages will help students develop reflective practice or constructive feedback skills and provide them with opportunities for non-formal peer learning.
Take away points:

  • 16-24 tiles within a webmix so as not to overwhelm learners with too many resources.
  • Keep the tiles simple and resources direct – specific resources rather than simply linking to website home pages, where students can easily get overwhelmed and lose interest.
  • Share and update the webmix through email or using social media like Facebook and Twitter.

 Recommendations

SymbalooEDU is a very useful tool to support learning. However, Mr Harwood recommends educators to:

  • Embed Social media into the curriculum
  • Provide sufficient training to the course instructors
  • Refer to webmix content in class to promote awareness and use of the platform.

Thus, it is important to collect quality learning resources, curate, categorise them effectively and make them easily accessible to students anywhere, anytime (easily achieved through SymbalooEDU).

Summary from the Discussion

A lively discussion followed Mr Harwood’s presentation that touched on issues related to using social media in classes. Many participants were positive about the benefits of using this tool to support learning. One of the participants said that he had registered for SymbalooEDU during the session itself and had already started planning his course for the next semester. Another suggested that he would use it to showcase exemplary work of his students.  There were others who pointed out that switching to this format will solve a lot of problems that they have been facing with Delicious, a social bookmarking tool, while others felt that this will act as a good motivation for their students.

Q & A Session

Q:  How do your students actually use it? Do they bring the webmixes into their own account?
CH: Once the webmixes are shared, students can integrate them into their own SymbalooEDU PLE, where they are free to use, add and share content with their peers. They can also customize it with resources related to their personal interest. 
Q: Can students forward these webmixes to others?
CH: Yes, very easily. Students can use one webmix as a starting point, customize it to suit their class/course needs, and share it with the entire class. 
Q: Are there other specific PLE platforms designed to be used as PLEs?
CH: There are other platforms but they are not as user friendly as SymbalooEDU. This platform is unique because it is really user friendly with widgets and share functions as well as being visually attractive and easy to customize.
Q: How about privacy when you use Facebook as a tool within your webmix to generate discussion?
CH: Privacy has not been an issue.  I use class Facebook pages setup exclusively for the classes – the students cannot see your private Facebook page and it is not necessary for you to friend them at all. The advantage of using social media such as Facebook is that, used effectively,  it can encourage peer learning. 
Q: How easy is it to update the webmix?
CH:

It can be done simply and quickly using the UPDATE button.

Q: Have you done an evaluation to understand how learning has happened when students started using these webmixes?
CH: As the PLE environment enables more informal learning, it becomes incredibly difficult to measure.  How do you measure the impact of informal learning on a business presentation? It is very difficult but you observe the results when eavesdropping on student group discussions and so on. Similarly, based on our observation, the usage of webmixes by students has increased students’ level of engagement and interest.  It has also received good student feedback through the qualitative comments in the year-end survey. 
Q: How has your role changed?
CH: I now focus even more on creating learning environments that enable students to construct knowledge and negotiate meaning autonomously through self and peer learning. I have also become a “learner along with my learners”. Students introduce new ideas and resources that they can easily relate to, which I would otherwise may not have found. This makes them more engaged, and I have become more engaged thinking about how to facilitate and bring back these resources into the classroom.  It is also important to understand that students use it the way you model it, making it increasingly important for me to reflect on my own practice. 
Q: Do you think you can do away with lectures?
CH: Those of you who have heard of or used the Khan academy will understand the idea of ‘flipped classrooms’. One of the greatest benefits of ‘flipping’ is that overall interaction increases: teacher to student and student to student.  Since the role of the teacher has changed from “presenter of content” to a “facilitator of content learning”, more time can be spent understanding and facilitating the process. This will allow us to use classroom time more effectively answering questions, working with small groups, and guiding the learning of each student individually.

References

Anderson, T. (2006). PLE’s versus LMS: Are PLEs ready for Prime time? Retrieved October 18, 2011, from http://terrya.edublogs.org/2006/01/09/ples-versus-lms-are-ples-ready-for-prime-time/

Harwood, C. (2011). Review of SymbalooEDU, the Personal Learning Environment Platform. Retrieved October 18, 2011, from http://blog.nus.edu.sg/eltwo/2011/03/27/a-review-of-symbalooedu-the-personal-learning-environment-platform/

Van Harmelen, M. (2006). Personal Learning Environments. In Proceedings of the Sixth International Conference on Advanced Learning Technologies (ICALT’06). Retrieved October 18, 2011, from http://csdl.computer.org/comp/proceedings/icalt/2006/2632/00/263200815.pdf

Wheeler, S. (2010). Anatomy of a PLE. Retrieved October 18, 2011, from http://steve-wheeler.blogspot.com/2010/07/anatomy-of-ple.html

(Research and references provided by Chris Harwood)

Wikis for Participatory Learning

Technology in Pedagogy, No. 5, September 2011
Written by Kiruthika Ragupathi

Participatory learning with the use of wiki technology enables learners to contribute in varied ways to achieve both individual and shared learning goals. Learners can easily participate as a learning community to share, discuss their ideas/projects and comment on each other’s ideas/projects within a wiki platform.

The use of wikis promote peer-to-peer learning and encourage students to look over each other’s shoulders says Eric Thompson, an Associate Professor and chair of Graduate studies in the Department of Sociology at the National University of Singapore. In this session, he provided insights into harnessing the power of Wiki platforms for participatory learning – not only to make students more aware of both the potential and pit-falls of the medium, but also to facilitate and inspire active peer-to-peer learning and teacher-student interactions in a large classroom setting. He shared his experience with using wikis in the classroom and discussed on what worked for him and how it could work for others. He highlighted on how his students moved away from individual competition and transformed into participatory learners aggregating their ideas and experiences in a way that enhanced everyone’s learning. 

What is a Wiki?
A/P Thompson started his talk with explaining on what a Wiki is – “A collection of web pages designed to enable anyone who accesses it to contribute or modify content.” It is a particular kind of platform which allows people to create web content rather quickly (i.e. without having to learn HTML). Though this platform was introduced fairly soon after the World Wide Web (www), it became popular only through Wikipedia, the world’s best-known “Wiki”. It was this wide popularity and influence of Wikipedia that prompted A/P Thompson to start using the wiki technology in his classes. (Note: The word “Wiki” comes from Hawaiian “wiki-wiki” meaning “quick”).

 sc2218

Moving from Discussion Forum to Wiki

A/P Thompson explained on how he relied heavily on discussion forum ten years ago, which was primarily of the Q & A type. He highlighted the differences between discussion forums and wikis as tabled below:

Discussion Forum vs Wikis

He also explained that though he could have used blogs, he decided to use wikis. Blogs, he clarified are restrictive in the sense that the author can only edit the articles and only allows other users to add in their views and ideas through comments.

Why Use Wiki?

A/P Thompson started using wiki as an attempt to come to terms with the power and prevalence of Wikipedia and taking inspiration from Mike Wesch’s “A Portal to Media Literacy”. Similar use of wiki platform in classes was relatively rare in those years! Students he said, generally have the tendency to take Wikipedia as an authoritative reference. Hence in 2007/2008 (Semester 2), he set up a group assignment which required the use of Wikis. As part of the assignment, students were required to find a page on Wikipedia relevant to Gender Studies and re-write it for the module, “SC6214: Gender Gender Culture and Society”.

Originally, his intention was to have the students revise Wikipedia Though the assignment proved technically challenging, it proved to be very successful and students clearly learned a lot about Wikipedia! (Student: “I didn’t know that just anyone could write entries.”; “Some of the information is really bad!”). Students also learned to think critically and were able to critically engage with the information that was available to them. This experiment was on a small scale with only 10 graduate students in the class. He pointed out that it might be difficult to scale-up for large undergraduate classes.

A/P Thompson informed participants on how he set up class Wikis for the modules using Wetpaint.com (a free educational wiki, when he started). Over the coming years, he set up three wikis and made a comparison of how he used it across these modules.

wiki-table-2

A/P Thompson elaborated that the use of wikis in his undergraduate classes proved incredibly useful. He felt the group projects allowed for good interaction compared to assigning individual projects. However, students were somewhat constrained by group structure as they were not “free” to contribute how and where they liked. The students used the wiki platform as “collective class notes” – for lectures, readings and films. He elaborated on how he follows an “open-ended pedagogy”, where lecture notes/slides and webcast of all his lectures were available to students. The students were then required to make a substantial contribution (at least a 500-words article) to the class and were not constrained to any particular format. The students could:

  • write notes on the lecture;
  • summarise on what happened during the lecture;
  • provide commentary on a lecture, going beyond the summary to analyse on the concepts discussed; and
  • bring in new related-information and examples that the lecturer might not have thought of.

The open-ended wiki approach allowed for elaborate and more creative contributions, which brought in useful, relevant material far beyond that which the instructor could do alone. One problem that he encountered was that the number of contributions could be massive to read with a class of 150 students.  Using the wiki makes it easy for him to review and compare contributions fairly rapidly compared to marking (grading) a stack of written assignments. In the recent years, he has also made it mandatory for students to make two contributions – one in the first half of the semester and the other in the second half.

As an example, he quoted the World cultures project – to look at one traditional culture and then compare it with 3 or more cultures – that his students were assigned to work on. The wiki platform allowed his students to easily produce these pages, include in images, videos and links to information. Importantly, all the information is available in a more public space and this openness of wikis motivates students to do well and take ownership of their work. A/P Thompson also guides students by posting a set of “exemplary models” from the previous batches to minimize the students’ learning curve. This lets students them know what the instructor expects to see on wikis before students start their assignments/projects.

Lessons Learnt

Lesson 1: Architecture (how to set-up the Wiki)

It is always important to think about the architecture that would suit your style. But, whatever be the architecture it is important to provide enough guidance and support for students on what they could do. For A/P Thompson, his architecture was based on:

  • How can students best contribute and learn on the Wiki platform? –So his approach was to use the Wiki as a set of “collective class notes” and discussion forum.
  • Assign group and/or individual projects (online term papers)
  • Another approach would be to post sets of problems or questions.

Lesson 2:  Incentives!

It is known that students work for grades (if they just wanted to learn, they could sit in a library or surf the web). A/P Thompson provided students with a guideline on a “minimum” or “general” (average) expectation while he did not specify a “maximum” limit. This allows some students (20-25%) do a lot-more than expected while most (70%) stick to doing the necessary and as expected, there would be the 5% students who do almost nothing. He always made a point to credit students who contributed more in terms of both quantity and quality. He emphasized that in one of his modules when he did not make group interactions (critique and feedback) a very explicit requirement tied to grades, the result was that there was minimal Interaction on the Wiki.

Lesson 3: Opening up maximum discursive space

It is important to maximize the space allowed for students to contribute. In some modules, he made the Wiki participation more organized (students were assigned to groups; each group was responsible for writing up summary and commentary on particular readings) while in others he allowed for a more open-ended approach. The open-ended approach was more rewarding – both to the students and lecturer. He would also provide suggestions on the numerous ways possible to contribute. Though each student was expected to make at least two “substantial” contributions (e.g. about 500 words of text), the “open-ended” mode inspired much more participation and allowed them to be more creative

Evaluation (of students)

Recommendations:

  • Take time to familiarize yourself with the Wiki platform and how they work (before using; building the basic architecture will take you a long way)
  • Take time to familiarize your students with Wiki (but, they can and will figure out a lot of it).
  • Be prepared to let go control of content. Always remember that you are not responsible for everything on the Wiki!
  • Getting students to learn the culture of Wiki learning is more important than technical details.
  • Getting students to be technically competent in communicating (increasingly communicating through blogs, web pages, etc is becoming important)

The structure of the Wetpaint Wiki made evaluation (relatively) easy. Each student (wiki member) had a page on the wiki listing all of their contributions – to pages and discussion threads. Contributions could be easily quantified (number of page and thread contributions; number of words, widgets, etc. contributed on pages). Contributions can also be evaluated qualitatively and was easy to find through hyperlinks.

Pedagogical Advantages that Wiki Offers

In conclusion, A/P Thompson ended by emphasizing that “Wiki is an excellent environment for group collaboration projects encouraging peer-to-peer learning, and it is vital to clearly define what you want your students to do, the purpose of the project, and its expected outcomes”. He highlighted the following features on why he is encouraged to using Wiki in his classes:

  1. Wiki encourages peer-to-peer learning
    The wiki changes the role of the lecturer and allows the instructor to engage the students much more directly than lecture or tutorial (discussion group) formats. Wikis provide much deeper access into students’ involvement in their own as well as their peers’ learning and understanding of course materials. This allows for greater learning as valuable contributions from students are added which would be unlikely to surface otherwise.
  2. The Wiki encourages students to look over each others’ shoulders
    In this mode of learning, students can look over each other’s shoulders, exchange ideas, and generally inspire each other. This experience in using Wiki (like life!) is not a closed book exam as this is not (purely) individual competition but is more open-source not proprietary learning. (Kill kiasu culture! Reward those who share, contribute and enhance everyone’s learning.)


Q & A Session

Following the presentation by A/P Thompson, a lively discussion with a Q & A session followed. Listed below are some questions from the session.

Q:  How long did it take for you to get to know and familiarize with using wikis?
ECT: Using the wetpaint, I did not find it difficult at all. I found setting up and using a wiki quite easy. I might have spent a total of few days in creating a wiki, setting up pages. I have not tried using NUS Wikis but hope to migrate to that in the near future as the NUS wiki format improves. The wetpaint is quite user-friendly. It took only a few days for me to put up my website and wikis. You will need to create the different pages by adding new pages, and the editing tools are pretty self-explanatory and relatively simple to use like any other word processing program. Wetpaint automatically creates the template so all you need to do is to edit and put in content. So yes, it requires some effort but it is very worth the effort. 
Q:  Is it possible to track students?
ECT: It was easy to track the students using Wetpaint. Wetpaint gives detailed breakdown information on what each user has contributed. However, this feature is not available within the NUS Wikis and only gives the most recent contributions. However, the history any individual page would then give details of all the contributions/edits made.
 
Q: Using Wikis looks great, but looks like an enormous amount of work on the part of the instructor. So how do you evaluate?
ECT: Most of the work by the students is on their contribution of their own pages and not a whole lot interaction is happening. This involves reasonable amount of assessment work similar to that of evaluating an essay assignment. Usually at mid-term, I quickly read through the assignments to get an understanding of what they are doing and give them an assessment – Excellent, Very good, Good, Adequate, Need Improvement, Inadequate – but will not provide a grade.I actually set up a template in a word document that has their names, user names for the wikis and has their contribution title. I look at their contribution – read through the page(s), see what they said, whether it makes sense, whether it is interesting, see how much they have done –  and then I evaluate it and make the assessment and also write comments on how they could improve on the pages or if they need to include in more pages. 
Q:  There is not too much interaction and collaboration but when there is, do you have conflict with one student not happy with the other student editing on their work?
ECT: I recommend them to try to contribute to pages if they can either improve the page or be able to provide a better format. I inform students that they will get credit for going through other people’s work and for editing to improve on the page. Hence, the guidelines that you provide your students should address this issue. I discuss this with students and advise them to add another page rather than deleting the original page made by their peers when editing. They could add an additional page and provide a secondary summary, an alternative summary or add commentaries to the existing pages. And, I assure my students that I will look at all their submissions and look at all the versions submitted, even if the pages have been deleted or heavily edited by their peers. 
Q: Wiki pages are available in the public space. Have you been worried that your students might put incorrect information?
ECT: Usually the problem of incorrect information does not arise, and that could be due to the nature of our project and discipline. Because they are providing with commentaries giving their own opinions or their point of views, there is not really an incorrect factual information. 
Q: If Wikis are used in a field like the Sciences, would it not be difficult for students to come up with content?
ECT: Yes, it might be difficult for students to come up with content in technical subjects. There are wikis where they address this problem by putting up questions or problems. The students try to figure out or give answers to these problems. 

Enhancing Your Academic Reputation with Social Media

Technology in Pedagogy, No. 4, August 2011
Written by Kiruthika Ragupathi

Social media are “web-based services that allow individuals to establish a public profile and articulate a list of other users with whom they share a connection. Social media can help facilitate the meeting of strangers but also allows individuals to maintain and/or strengthen their current, off line social networks (Boyd & Ellison, 2008). In the session, A/P Chan talked specifically about exploiting the power of social media to enhance one’s research and academic reputation.

A/P Chan started his session highlighting how social media has quickly becoming ubiquitous online and that the biggest penetrations are Facebook and Twitter. Social media has been widely used for advertising. It allows you to interact not only with the advertisers but also with your friends. Prof Chan pointed out tweets as an example that allows individuals to hold discussions on the tweeted message. Thus, Facebook and Twitter allows the cyber-word of mouth propagation.

What about academics? How can they exploit this cyber-word of mouth propagation? Prof Chan cited two examples on how academics can use social media to their advantage.

  1. Firstly, he pointed out that academics have realised that they need not wait years to get their publications cited. These days, all major academic publishers have a strong presence on Twitter. This enables publishers to review the publications on Twitter and thereby create a lot of response on the publication.
  2. The second example he cited was on how social media helped a doctorate student in his research work. The student uploaded photos of fishes onto his Facebook page and got his friends and others to help identify the fishes.

A/P Chan focused mainly on how academic reputation can be achieved through research – recognition of work, number of times publication/work is cited, invitations to give talks at conferences, invitations to editorial board and Research grants. 

It is common to do the research, publish the work and wait for others to cite the work. However, this takes a long time though it is very important to get the publications published and cited early. This is where social media can help. 

Wizfolio has two components where you have a My Wizfolio and a Public Profile page. My Wizfolio is a private page where you can share to a selected group of people and the Public Profile is open to the Public. You can share the information with one-click using the Facebook or Twitter icons. After you share, you can view the number of times the information is viewed by others.


Q & A Session

Following the presentation by Adjunct Professor Casey Chan, a discussion session followed. Listed below are some questions from the subsequent Q & A session.

Q:  You main focus today was on how to enhance academic reputation by promoting one’s own publications. Do you have any thoughts on how this can promote interactions with our students?
CC: My focus today was on enhancing your academic reputation by promoting your publications to enable it to be cited more frequently and at a faster pace. However, the earlier sessions in this Technology in Pedagogy Series on Facebook, Blogs and GoogleDocs focused on promoting interaction with the students.
Q: How effective is WizFolio when it is combined with Linkedin?
CC: Linkedin is like a professional version of Facebook but Wizfolio does not have a built-in link to Linkedin yet. However, you could use your profile page as a home page that can be but there are some limitations, as Linkedin does not allow you to leave their page.

Google Docs and the Lonely Craft of Writing

Technology in Pedagogy, No. 3, May 2011
Written by Kiruthika Ragupathi

It has been widely acknowledged that the use of collaborative technologies increases students’ engagement with the content and enhances their learning process. By using Google Docs, instructors can better understand students’ thinking process and can help them learn to write in often different and sophisticated ways, says Eleanor Wong, an Associate Professor of Law and the Director of the Legal Skills Programme at the National University of Singapore.  She is in charge of developing the skills component in the Law faculty – the task of getting students to analyse, reason, research for themselves and finally be able to communicate in a cogent and clear way. She teaches courses on Legal Skills, and specifically the module on “Legal Analysis Writing and Research”. 

In this session, A/P Wong shared her experience with using Google Docs over the past three years in teaching persuasive writing to law students. She explained that she wanted to examine whether the learning skills – the positive ones – that students develop were achieved through the correct process of thinking and reasoning.
 

Teaching skills of analysis and communication

The current situation

The law faculty uses interactive classes to enhance the learning skills of students. These classes are geared towards students who are open to speaking up. Instructors intervene at appropriate times to give feedback to their students. However, this was not the case with writing assignments. Traditionally, writing is a solitary work and can be an intimidating and a harrowing experience. Hence, it is rather tough to get into the students mind while they are writing and to understand what’s going in their mind.

Written assignments have the following limitations due its nature and format:

  • Format: The format of an assignment allows instructors to see the result or the final work but not the students’ thought process or the drafting process.
  • Feedback: Feedback given to students for written work is very often a balance between timeliness and detail. Feedback provided may either be timely but not detailed, or detailed but not in time for students to improve on their work.
  • Assessment: Assessment given is a bit more summative that formative. Due to the long time lag between the assignment been given and detailed feedback coming back, there is not much time left for the students to improve on their work.

Hence, these constraints on written assignments are not as good for teaching skills as one would like. Ideally, an activity that tests substance as well as excavating process (format), whether feedback is timely and detailed, and an assessment that is both summative and formative are the most necessary aspects when teaching skills. In the field of Law, the quintessential model to achieve this is the moot court. Instructors will be able to intervene and help students to think by asking the “What If” questions, giving students the opportunity to respond, rephrase their arguments. Even in terms of argument style, feedback on hand gestures or voice control could be provided on the spot.

Selection of an appropriate tool

A/P Wong was aspiring towards this kind of model – “helping students to learn writing” as well. She wants her students to think about the process of writing and break the act down into simpler steps to demystify it. Though she feels that using Google Docs is not 100% similar to the moot court model, it is the nearest approximation. Before moving on to Google Docs, she tried out the following activities to improve student-writing skills:

  • One-on-One conference: Students submit their assignments. She then sets up a one-on-one conference to provide customised feedback on specific issues and problems that her students face. Though this platform enabled her students to understand the problems in the assignment, feedback given is not timely enough as students were unable to recall what they did and thought at the time of writing. She also realised that it is difficult to make this type of activity an open learning process.
  • Mahjong Paper: She gets her students to write their analyses on sheets of mahjong paper in class and displays to the entire class. In this activity, the feedback is timely but the result of the draft is not in its final form. It generates good discussion and gets students well prepared to explain their written position orally. However, this activity does not enable the instructor to understand the students’ thought process.
  • Using IVLE: The IVLE platform is used to get students to submit their arguments. Based on the submission, A/P Wong will highlight good arguments to the class.
  • Google Docs: Google Docs is an online platform that allows her students to work easily on their documents allowing her to share documents with the class. It supports synchronous editing and comment writing, and saves versions of the document – options that are necessary for real-time collaborative learning.

Framework for exploring the collaborative writing process using Google Docs

A/P Wong chose to use Google Docs as it allows her students to work easily on their documents using a web browser. Each student would need a Gmail account (which can be obtained from Google free of charge) to access the application.

She created a folder for her tutorial class and shared the folder with the group. She then uploaded a “clean sample” of the objective memorandum on a topic that the class had worked on earlier during the semester. Students work in pairs, with each pair working on a clean sample in class. The activity was designed to be interactive and required students to rephrase and convert an objective memorandum into a persuasive argument.

During the activity, she suddenly realised that her tutorial classes became very quiet from the usual interactive session and the only discussion that was happening was between the teammates working in pairs. However, when she shifted her attention to the documents in the Google Docs folder, there was a flurry of activity with students working on counter arguments. Some teams rightly analysed the facts and reasons, reframed the arguments into persuasive ones and peppered it with punchy headings. She was able to make comments in a timely fashion as students were rephrasing their drafts and pay specific attention to individual teams. Students felt encouraged and motivated to improve on their writing with the constructive feedback (timely) given by the instructor.

This activity engages students, requiring them to attend to feedback and allows them to redraft on the spot (formative). After teams responded to her feedback, she pulled out the work of a group who had organised their arguments well and then displayed it for the entire class to see. This allowed teams to see each other’s drafting process and enabled them to follow suit and work towards making their arguments better.

Take away points from the activity:

  • It was easy for instructors to toggle between students’ work allowing the instructor and students’ to access the documents simultaneously
  • Instructors can see what students’ were writing and the thinking process involved
  • Instructors can choose when to intervene and provide constructive feedback to individual students
  • Highlight a good or bad model and allow students to keep an eye on the modeled work
  • The writing process that is a “closed” and “solitary” now becomes exposed to everyone allowing other students to benefit

An important phenomenon to note is that the organisational insights pointed out in class was quickly adopted by other students prompting them to reorganise their documents. This activity is not only a good way to combine the interaction and group thinking of the students but also to allow students the needed privacy to write on their own. The instructor is able to see the thinking process.

Q & A Session

Following the presentation by A/P Wong, a lively discussion with a Q & A session followed. Listed below are some questions from the session.

Q:  Elaborate on the required length of the essay.
EW: In the first half of the semester, students are involved in drafting arguments, with a number of face-to-face interaction or one-on-one conference with the instructors, and through intensive research. Students are by then comfortable in preparing documents that are of 2000-word in length, and are ready to write an essay of up to 3000 words. This is the point when I know that my students are ready for this type of collaborative writing exercise. My students feel comfortable when I intervene with feedback and criticise their thinking process. So, I usually reserve this activity for the latter part of the year.
Q:  Do you explore and analyse your students’ thought process at a later stage?
EW: I have not attempted that. Writing does not happen as quickly as it happens like in talking. The changes happen quite slowly. I only have six teams at a time and hold this activity at a time when I roughly know my students better. The comments that I give would need to be timely and will improve their writing process. 
Q:  You mentioned that you monitor students’ thinking process. Do you also grade the process?
EW: I have not used it for grading as that is not my primary objective.  I would like to understand my students’ thinking process and based on that, I take every opportunity to provide feedback. I will comment on what they did not get right and how they can modify to write better.
Q: What is the feedback from your students? Did you have difficulties getting your students to subscribe to this activity?
EW: Sometimes students encounter technical problems, for example some students had problems with wireless connectivity in the seminar rooms. Otherwise students were happy with the activity. Three years back, it was tough, not all students had Gmail accounts and it took a long time to set up and get everyone on board. But, during the last two years, students had Gmail accounts and were already working in groups. To make the process easier and smoother, this year I used Google Docs as the platform for some of the initial student assignments. Some students are non-talkative writers. Top students are forthcoming in face-to-face classes and these students would not write or modify anything in their documents until they have mulled over, discussed and debated on issues they would want to change. Then there are students who are talkative writers. They quickly understand the facts and are usually way ahead in this activity but are typically quiet in class.
Q: Do you do this activity only during class?
EW: Yes, I have primarily used it during the class as I can understand the process that happens. However, some of my other colleagues have assigned it earlier, and have noticed that some students start working on the documents and make the changes before the tutorial class. 
Q: Students are able to see each other’s work. Do they then comment on their peers’ work?
EW: Yes, students do comment on their peer’s work. During previous lessons, a number of discussions happen, and students are used to each other’s ideas and expressions. You might need to moderate if you have not taught the etiquette of commenting in your classes. In general, students behave well when providing comments. 
Q: I would assume that this activity is a type of active learning that you employ.
EW: Yes, you can consider it as a form of active learning. Students are writing and making counter arguments (DOING) while discovering the process and applying information that they get from their discussion, from the instructor and their peers. This activity focuses on developing students’ writing skills and involves higher-order thinking skills like analysis and synthesis.
Q: Do you allow your students to flag when they are ready to receive feedback on their changes?
EW: That is a very good point but I have not looked into that issue. Since I know my students, I would roughly know when they are ready, for example, on a paragraph or a sentence. When they move away to work on other paragraphs and sentences, then that would be an indication that the required changes are complete. Since students are working in pairs, they usually move on to other parts when they have agreed upon the changes made. However, your suggestion is good, as it will make the process more systematic. I could inform my students to highlight the parts in “yellow” when they are ready to for feedback on those sections.
Q: Do you do this process in stages?
EW: Yes, I do work in stages. We must understand that when students speak, they need to deliver the information sequentially, but when they write, it allows them to decide on what to change and in any order that they wish. However, when I discuss and comment, I use stages. For example stages in the process would be:

  1. Organisation – the headings, the signposts
  2. Language – sometimes even exact expression
  3. Technical issues – citation formats
Q: How do you deal with – when and how often to interrupt the students during the class?
EW: I do not interrupt or intervene often. I usually bring up only 3 to 4 points in a class. I will showcase one good model during a class. 
Q: Do you need prompts to guide the discussion?
EW: No, not for this class, mainly because I know the students well enough. In early sessions, it will be low energy, where students will be looking at their own work. The key issue here is to “know your students well and make sure they know each other well”. 
Q: How often does Google save versions? When you have a completed document, do you check to see the number of versions saved?
EW: Yes, Google does save versions. Since I do not use it for assessment, I have not tracked these versions and analysed them. However, I am sure Google offers the possibility to check out the saved versions for analysis.